


Crestron WPR-48 Waterproof Wireless Handheld Remote
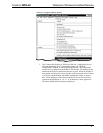
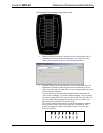
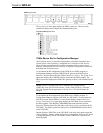
6. Specify the RF or the IR gateway compatibility options that apply to your
Cresnet system. For an RF configuration, you can also specify the RF
power level as a percentage from 1% to 100%.
7. As you select the number of buttons that will be used in your configuration,
note the limitations stated on the screen.
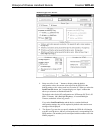
8. The Miscellaneous Settings area lets you set the relative brightness level of
the backlight (from 1% to 100%), set the timeout for the backlight (1-999
seconds), which reduces wear on the battery, or choose to disable the
backlight completely.
You can also choose to allow changing the RF ID or IR ID via button
presses. (Refer to “Setting RF/IR ID via Button Presses” below.)
This can be useful when first setting up a job. However, Crestron
recommends that you disable this option when the WPR-48 will be operated
by an end user, to avoid accidental changes to the ID settings.
9. The Information from WPR48 area displays the WPR-48 firmware version
and the battery’s charge level (as a percentage value). This area also
displays communications status messages.
10. The three buttons at the bottom of the screen are used to send the screen
settings to the device, to save the settings to a file, or to exit the
configuration setup operation.
If you select the Save To File button, the saved file can be used to upload
directly to the remote via the Viewport File Transfer | Update WPR-48
Firmware function. This can be useful if you are preparing files in the
office to be sent to an installation site.
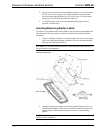
NOTE: Do not remove the WPR-48 from the docking station until you have exited
the configuration operation. If you do, the backlight timeout function may be
disabled, which would result in excessive wear and tear on the battery.
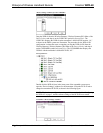
Setting RF/IR ID via Button Presses
If you have checked Allow key presses to change unit’s RF or IR ID on the “WPR48
Configuration” window, you can use a special button sequence to alter these values
without having to connect to a PC. Perform the following steps.
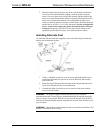
1. Press and hold both page buttons (press center of bottom button).
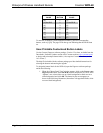
2. While holding the page buttons, press and hold the appropriate button to
select the desired operation (Set IR ID or Set RF ID), as shown in the
following table. This will cause both page LEDs to illuminate.
3. While holding the operation button, release the page buttons.
4. Release the operation button. (The page LEDs remain on until you enter the
ID number.)
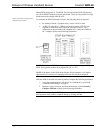
The following table lists the two ID functions as well as hexadecimal values, shown
in brackets [ ], corresponding to the left and right positions of the top eight buttons
on the WPR-48
Operations Guide – DOC. 6254A Waterproof Wireless Handheld Remote: WPR-48 • 9