


Crestron WPR-48 Waterproof Wireless Handheld Remote
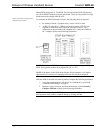
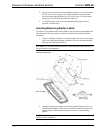
3. Place the button labels in position, face down, and carefully assemble the
rear cover to the button faceplate, making certain the gasket is properly
seated. Use two or three screws to hold the assembly together and turn the
unit over to verify that the button labels are properly positioned and can be
easily seen. Then add the remaining screws and tighten all eight screws
evenly just until the gasket is no longer visible between the button faceplate
and the rear cover (from 1.5 to 2 in/lbs, maximum). Do not overtighten the
screws. To do so may damage the gasket such that the unit is no longer
waterproof. Exposing such a unit to water may result in damage to the
equipment, possible personal injury, and void the product warranty.
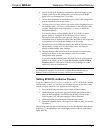
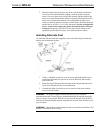
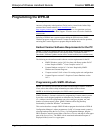
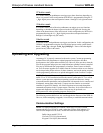
Installing Alternate Foot
To install the alternate blank foot (supplied), refer to the following illustration and
perform the associated procedures.
1. Using a #1 Phillips screwdriver, remove the two pan head Phillips screws
securing the lanyard foot to the rear cover of the WPR-48, and carefully
remove the foot.
2. Retain the lanyard foot (note the placement of the lanyard end knots in the
cavity of the lanyard foot) for use at another time.
3. Assemble the blank foot to the rear cover as shown, and secure with the
screws removed in Step 1.
WARNING: The lanyard, supplied with the lanyard foot, poses a possible
strangulation hazard. Crestron does not recommend placing the lanyard around the
neck as a means of carrying the WPR-48. Do not leave the lanyard, or the WPR-48
with lanyard foot and lanyard attached, unattended in any area where children or pets
may be present.
WARNING: This product contains small parts and is not intended for children. This
product is intended for adult use only.
Operations Guide – DOC. 6254A Waterproof Wireless Handheld Remote: WPR-48 • 13