


7
Product Information
6
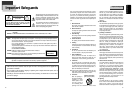
Read Carefully before Using
Cautions in use of DVD-Video player are described below.
Please read carefully before using a DVD-Video player.
Installation place and handling_____________
• When you place this player near other devices, they may
affect poorly together.
• When you place DVD-Video player and TV in the upper
and lower sides, it may cause flickering of pictures or
failure (tape is not ejected).
• When you place this player near strong magnetic
materials, it may affect image or voice poorly or damage
recording.
• Do not spill volatile liquids like insect spray over the
player. Do not leave rubber or plastic products in contact
with the player for a long time. They will cause
deterioration or paint peel-off.
Not in use______________________________
• When the unit is not in use, be sure to remove the disc or
tape and turn off the power.
• If you do not use the unit for a long period, remove
batteries in remote control to prevent leakage.
• In case you don’t use the unit for a long time, the unit
may not function properly in the future. Turn on and use
the player occasionally.
Moving________________________________
• Repack the unit as it was originally packed at the factory.
Alternatively, pack this product with towel not to be
damaged.
• Eject any videotape.
Cleaning_______________________________
• Dust off dirt in cabinet or control panel part smoothly
with a soft cloth.
• For heavy dirt, soak the cloth in a weak detergent
solution, wring it well and wipe. Use a dry cloth to wipe
it out.
• Follow instructions in using chemical cleaners.
• Do not use any type of solvent such as gasoline or
benzene, as they may cause deterioration or paint peel-
off.
Checking_______________________________
• Video is a high precision device. To obtain a clear screen,
we recommend regular inspection and maintenance
every 1,000 hours of use by technical engineers.
• For checking, contact your dealer or your nearest service
center.
Checking and Replacement of Antenna______
• Antenna is subject to change in its direction or damage
by wind and rain. For clean screen, contact and consult
your nearest service center about checking and
replacement.
In recording important screen______________
• Be sure to record the screen and check whether
recording is performed properly. Please understand
compensation of recording if recording is performed
using low quality tapes or videos.
Copyright______________________________
• Do not use your recordings without permission of a
copyrighter except personal usage.
Tape and Disc Handling___________________
• Do not use any tape and disc below. Damage of video
head or cut/coiling of tape may cause failure.
- Tape with mold
- Tape or disc stained with juice or attachments
- Tape having breakage connection
- Disassembled tape
- Disc with severe scratch
• Moisture condensation may occur in tape. Moisture
condensation damages the tape. Please use the tape
after the moisture condensation is disappeared.
• After use, store tape vertically in a case to prevent loose.
• Do not store the following places.
- High temperature and humidity
- Subject generation of mold
- Subject to direct sunlight
- Much dirt or dust
- Near strong magnetic materials such as speaker
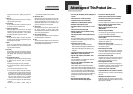
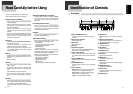
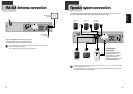
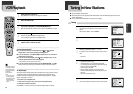
Identification of Controls
Front panel
!
Power (STANDBY/ON) button
Use to power the device on/off if AC power supply is
connected.
@
Place to insert videotape
Insert the desired tape.
#
Eject button
Use to eject the tape.
$
Disc tray
%
Open/Close Tray button
Open or close tray by pressing [OPEN/CLOSE] button.
Place a disc on the disc tray, label side up.
^
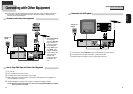
Video / Audio input jack
Connect a cable coming from the video/audio out jacks
of a camcorder, another VCR, or an audio visual source
here.
&
Playback/PAUSE button
Playback videotape or disc. Press this button to pause a
screen.
*
Stop/MEMORY button
Use to stop playing a tape or disc. Use to memory radio
stations.
(
Tuning & Search –/+
Search- (œœ ): Use to rewind currently being played
videotape or disc; or to playback back rapidly.
Search+ (√√): Use to wind currently being played
videotape or disc; or to playback rapidly.
Tuning –/+ : Scan all available radio stations.
)
Record button
Record a programme from TV or other sources (except
DVD).
1
Operation Display Window
Display operation of device. For more information, see
“Operation Display Window” in the next page.
2
VHS/REC indicator
Illuminate in VCR mode.
3
DVD indicator
Illuminate in DVD mode.
4
VCR/INPUT button
Use to change into VCR or other output mode.
5
DVD button
Use to change into DVD mode.
6
FM/AM button
Use to change into RADIO mode.
7
PR & Preset – / +
Used to select the memorised TV broadcasting program
or radio stations.
8
SOUND FIELD button
Use to adjust the Sound Fields.
9
Volume control
Change the loudness of the sound from the speakers
connected to the unit.
0
Headphone jack
!
& 1)^
@ $ %#
( 723 5 9 0* 84
6