


28 29
CHAPTER 4 BASIC OPERATION
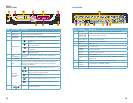
PICTURE 4-6
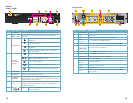
PICTURE 4-7
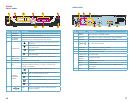
PICTURE 4-8
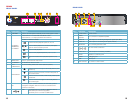
PICTURE 4-9
IMPORTANT! Date and time should be properly set before continuing so that
you can easily locate recorded events. Inaccurate dates and times on files may
affect their admissibility as evidence.
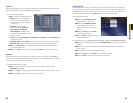
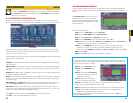
DATE/TIME
To set the date and time:
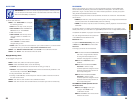
STEP 1. Click DATE/TIME and configure
the following options:
• DATE: Enter the day, month, and year.
• DATE FORMAT: Select DD/MM/YYYY,
MM/DD/YYYY, or YYYY/MM/DD
• TIME: Enter the time
• TIME FORMAT: Use the drop-down
menu and select 12 HOURS or 24
HOURS
• DST: Use the drop-down menu to
select ON/OFF to enable/disable
Daylight Savings Time
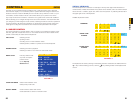
PASSWORD
When you first startup your system, you are automatically logged in as the ADMIN under
Device ID000000. By default, passwords are disabled on the system. You will not need a
password to log in or access menus. You will not need a password to access your system
using the browser-based remote software.
The system employs two levels of user authorities connected to a Device ID. The authorities
are as follows:
• ADMIN (administrator): Has full control of the system, and can change both administrator
and user passwords and enable/disable password checking
• USER (normal user): Only has access to live viewing, search, playback, and other limited
authorities.
For security reasons, it is highly recommended to enable passwords on your system. If you
enable passwords, you must select a 6-digit ADMIN password and a 6-digit USER password.
The QS434 and QS464 only support one Admin and one User account.
• ZONE: Select the correct time zone based on your current location. If you are uncertain
of your time zone, you can find it at http://www.worldtimezone.com
STEP 2. Click MODIFY DATE AND TIME. Click CLOSE in the confirmation window.
STEP 3. Click APPLY. The new date and time are saved.
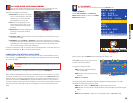
Daylight Savings Time
To set daylight savings time:
STEP 1. Under DST, select ON. DST options appear.
STEP 2. Under DST MODE select one of the following:
• CUSTOM: Set customized start and end times for DST (go to step 4)
• DEFAULT: The Default setting will apply DST from the second Sunday of March to the
second Sunday in November (Go to step 3)
• If using the DEFAULT, click APPLY.
• If setting a CUSTOM DST, use the drop-down menus to select a week and month for
the start and end times.
STEP 3. Click APPLY. Click CLOSE in the confirmation window.
STEP 4. Click EXIT in each menu until all windows are closed. Type date via numeric key.
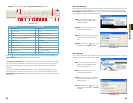
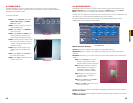
You can change the Device ID and password
of the ADMIN and the USER from the
Password menu.
To open the Password/Security menu, click
on Basic in the Main Menu and then select
Password.
To change your Device ID and Password:
STEP 1. Click the field beside Device ID
and enter a 6-digit numerical Device
ID using the Virtual Keyboard. For
example: changing the ID to 000010.
STEP 2. Under Password, select
ENABLE.
STEP 3. Click the field beside Admin
Password to enter a 6-digit
numerical password using the Virtual
Keyboard. Re-enter the password in
the corresponding field.
STEP 4. Click the field beside User
Password to enter a 6-digit
numerical password using the Virtual
Keyboard. Re-enter the password in
the corresponding field.
The ADMIN and USER passwords must
not be the same.
STEP 5. Click Apply to save your
changes. Click Close in the
confirmation window.
STEP 6. Click Exit in each menu until all
windows are closed.