


32 33
CHAPTER 4 BASIC OPERATION
4.7 PLAYBACK
View recorded video on the system through the Search menu.
PICTURE 4-13
PICTURE 4-13
M A I N M E N U
K E Y L O C K
C H N S W I T C H
D I G I T A L Z O O M
V I D E O S E A R C H
P T Z
M U T E
M A N U A L R E C
S T O P R E C
R O T A T I O N
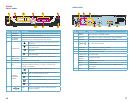
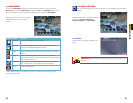
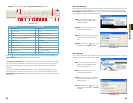
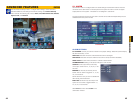
VIDEO SEARCH
Select VIDEO SEARCH in the Shortcut
Menu (Picture 4-13) or select it in the Main
Menu (Picture 4-14).
Click PLAY to play back the last minute of
recorded video (Quick Search).
To search for a particular event:
STEP 1. Select a specific channel to
view or select All.
STEP 2. Enter a date using the Virtual
Keyboard
STEP 3. Click Search
PICTURE 4-15
PICTURE 4-12
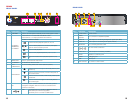
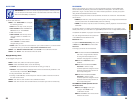
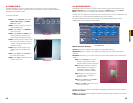
4.6 HARD DRIVE (HDD) MANAGEMENT
This window displays essential information about the system’s internal hard drive,
and lets you format the internal hard drive and external USB flash drive.
The HDD menu displays the following:
• HDD STATUS: The system will display
“OK” for normal operation. This DVR
supports up to a 1TB or 2TB hard
drive depending on the model.
• SIZE: The size (in gigabytes) of the
internal hard drive. The size of your
system`s internal hard drive will vary
by model
• FREE SPACE: The space (in gigabytes)
remaining on the system`s internal
hard drive.
• AVAILABLE TIME: The recording time (in hours) remaining on the HDD based on your
current record settings
• OVERWRITE: Select ENABLE or DISABLE. If Overwrite is enabled prior to recording,
the system will record over the oldest video data once the hard drive is full. If Overwrite
is disabled, the system will stop recording once the hard drive is full and the “FULL”
LED on the front panel of the system will light up.
If there is no hard drive in DVR, or the DVR cannot read the hard drive, or the hard drive is not
formatted, it will display an “H” in the video preview interface.
FORMATTING THE INTERNAL HARD DRIVE
If you installed a new hard drive, you must format the hard drive in the DVR before it can be
used. Clicking on the HDD Format button will begin the formatting process. After formatting,
the system will restart.
CAUTION! Formatting the hard drive erases all video data! This step cannot
be undone!
To install a new hard drive, or to replace a defective one, please see Chapter 7.
Most currently available USB flash drives are compatible with this DVR, however if you need
to reformat your flash drive - say to erase old data - then clicking on the USB Format button
while the drive is connected to the upper USB port on the front of the DVR will allow you to
reformat it. This button is not for use with any external USB hard drive you may connect to
the DVR for backup. External hard drives will need to be formatted using the Fat32 format and
this can be done by connecting the drive to the USB port on a PC and reformatting it from
there.
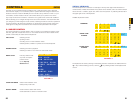
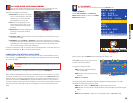
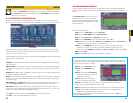
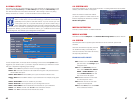
BASICHDDSEARCH RECORD EXITADVANCE
SEARCH
When you first open the Search menu it will display the current date.
CHN
RECORD STATE
DATE
EXIT
FILE LIST
ALL
JUL.
14TH
RECORD SEARCH
07/14/2011
SEARCH 09:07 PLAY
00 01 02 03 04 05 06 07
08 09 10 11 12 13 14 15
16 17 18 19 20 21 22 23
01 02 03 04 05 06 07 08 09 10 11 12 13 14 15 16
17 18 19 20 21 22 23 24 25 26 27 28 29 30 31
Recorded events (Alarm and Motion Detection-triggered recordings) appear in red while
scheduled recordings will be shown in green.
STEP 4. Click a date in the Month Grid to select the date of the video.
STEP 5. Click on an hour block to begin playback of the video file(s) recorded during that
period.
or
STEP 6. Select File List to see a list of recorded files. (Shown in Picture 4-16)
1 2 3
4
5
6