


16 17
1
2
3
4
VGA
USB
1
+5V
GND
485B
485A
GND
1NO
1COM
GND
3
2 4
1 3
2 4
ALM IN
RJ45
DC +19V
IN
AUDIO INAUDIO OUT
VIDEO OUT
VIDEO IN
-
+
1 2
5
4
6 87 9
3
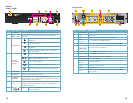
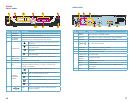
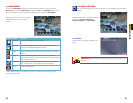
Item #
Connector Description
1
AUDIO
OUTPUT
For connection to amplified speaker
2 VIDEO IN Video input for connecting analog video signal input (BNC)
3 AUDIO IN Audio input for connecting audio signal (4 feeds)
4
DC 19V Power Connection
5 VIDEO OUT Video output for connecting TV (BNC)
6 NETWORK For connecting Ethernet cable
7 VGA OUTPUT To connect to VGA monitor
8
ALARM INPUT 8 I/O Alarm input
ALARM
OUTPUT
I/O Output for alarm
RS485 RS485 for connecting PTZ
RS232 Debugging port
+12V
Power supply for DC relay, the current is 100MA (to prevent
short circuits)
9 USB Mouse port
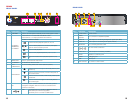
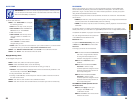
Item # Name/ Symbol Description
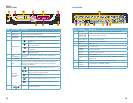
1 STANDBY Press to set the system in standby mode. Press again to wake.
2 MENU/EXIT Press to open/close the main menu.
3
CHANNEL/
NUMBERS
Press buttons 1-4 to view that channel full-screen
Press buttons 1-0 to input passwords and user IDs.
4
NAVIGATION
▲
Press to move cursor up; in PTZ mode, press to pan
camera up.
▼
Press to move cursor down; in PTZ mode, press to
pan camera down.
◄
Press to move cursor left; in PTZ mode, press to pan
camera left.
►
Press to move cursor right; in PTZ mode, press to
pan camera right.
5 LED
INDICATORS
Shows status of hard drive, recording, alarm, HDD full and
network.
6 IR SENSOR IR Receiver for remote control.
7
OK
In menus, press to confirm selections; in PTZ mode, press to
change the navigation buttons to control a connected PTZ
camera (not included)
8
DURING
PLAYBACK
PRESS:
◄ ◄
Increase reverse playback speed 1X, 2X, 4X.
n
/
►
Press to freeze playback to one frame, then press
again to advance frame-by-frame.
►
Press to start playback
► ►
|
Press to slow playback speed by 1/2, 1/4, 1/8.
► ►
Press to increase forward playback speed 1X, 2X,
4X.
9
USB Connect a USB flash drive for data backup and
firmware upgrades
HDD REC ALM FULL NET
OK
MENU
EXIT
1 2 3 4 5
6 7 8 9 0
21 4 63 5
7 8 9
QS434
FRONT PANEL
REAR PANEL