


38 39
CHAPTER 4 BASIC OPERATION
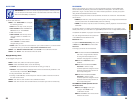
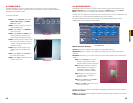
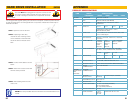
Click the button on the bottom of the multimedia player and then click the Play button
(Item number 5 in Picture 4-24) to start playing the file.
The Playback Control Bar shows the date the file was recorded. The Hour Blocks indicate
(in 24 hour format) at what hour the event took place. The green area in the Progress Bar
shows when in that hour the event occurred as well as how far the player is in the video
recording.
The example displayed in Picture 4-24 above, shows that the event being played was
recorded on April 2, 2009 from 4:57pm (16:57) to 5pm. Clicking on the Next Hour button
(Item number 11 in Picture 4-24) would take the user to the rest of the event beginning
at 5:00.00.
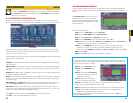
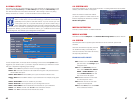
Video Play Settings
Each video record contains data from all the cameras that were recording at that time. You can
view up to four of those recordings at one time by clicking on the “Play All Channels” button
(Item number 14 in Picture 4-24). Or, you can choose which channel will be played back
in the Playback software by following these steps:
STEP 5. When you select Play, a Playback Control Bar will appear.
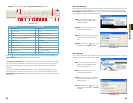
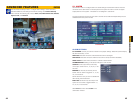
41 2 3
5 6 7 8 9 10 11 12 13 14 15 16 1718 19 20 21 22
# Function # Function
1 Hour Blocks 2 Minute
3 Progress Bar 4 Date
5 Play 6 Previous Recording File
7 Pause 8 Stop
9 Previous Frame / Next Frame 10 Slow Play, Normal Play, Fast Play
11 Next Hour 12 Snapshot
13 Reduce window 14 Play All Channels
15 Add window 16 Start
17 Cut 18 Delete
19 Convert AVI 20 On-Screen Display
21 Mute 22 Volume
PICTURE 4-24
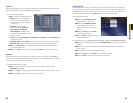
PICTURE 4-25
PICTURE 4-26
PICTURE 4-27
PICTURE 4-28
STEP 1. In the Setting menu in the
Playback software toolbar, select
Video Play Setting
STEP 2. From that pull-down menu,
choose Normal Video Bar.
STEP 3. In the resulting pop-up window,
choose which channel you wish to
view.
STEP 4. Check the box next to “Play
the Video”. Click Apply then OK.
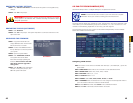
Audio Settings
If you have connected an audio-capable camera or a microphone to Channels 1 or 2, you can
play back recorded audio along with the video.
STEP 1. In the Setting menu in the
Playback software toolbar, select
Audio Channel Setting.
STEP 2. From that pull-down menu,
choose Normal Video Bar.
STEP 3. In the resulting pop-up window,
choose which channel you wish to
enable audio for.
STEP 4. Check the box
next to “The
channel has sound data”. Click Apply
then OK.