10
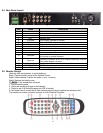
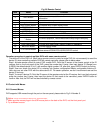
Fig 2.6 Remote Control
Item Name Function
1
Power Button
Stops firmware so that you can power down DVR
2 INFO Button
Get information about the DVR like firmware version, HDD
information
3
REC Button
To record manually
4
Digital Buttons
Input numbers or choose camera
5
Multi Screen Button
To choose multi screen display mode
6
SEARCH Button
To enter search mode
7
MENU Button
To enter menu
8
ENTER Button
To confirm the choice or setup
9
Direction Button
Move cursor in setup or move PTZ camera
10
+/- Button
To increase or decrease the value in setup
11
Playback Control
Button
To control playback, Fast forward/rewind/stop/single frame play
12
AUDIO Button
To enable audio output in live mode
13
Auto Dwell Button
To enter auto dwell mode, display screens in sequence
14
BACKUP Button
To enter backup mode
15 PTZ Control Button
To control PTZ camera:
Move camera/ZOOM/FOCUS/IRIS/SPEED control
Operation procedure to control multiple DVRs with same remote control
The device ID of the DVR is 0. When using remote control to control a single DVR, it’s not necessarily to reset the
device ID; when controlling multiple DVR with remote controller, please refer to below steps:
Step1: Activate remote control to control DVR: enable DVR: Point the IR sensor of the remote control at the IR
receiver that on the front panel of the DVR, press the number key 8 twice, then input device ID (Range from:
0-65535; the default device ID is 0.) with another digital number: 0-9, after that, press ENTER button to confirm.
Step2: User can check the device ID by entering into System configurationBasic configurationdevice ID.
User also can set other DVR with the same device ID. For easier operation, we don’t recommend user set the
device ID too long.
Step3: To cancel a device ID: Point the IR sensor of the remote control at the IR receiver that is on the front panel,
press the number key 8 twice, then input the device ID that needs to be cancelled, press ENTER button to
confirm. After that, the DVR will not be controlled by remote control.
2 6 Control with Mouse
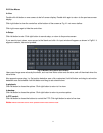
2.6.1 Connect Mouse
DVR supports USB mouse through the port on the rear panel, please refer to Fig 2.4 Number 5.
Notice: If mouse is not detected or doesn't work, check below steps:
1. Make sure the mouse plugs in the USB mouse port on the back of the DVR, not the front panel port.
2. Try a different mouse


