


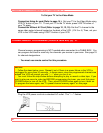
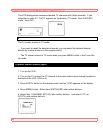
ANTENNA/CABLE SYSTEM CONNECTIONS
19
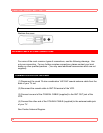
Connect the editing (recording) VCR, the source (playing) VCR and your TV using the
following diagram.
See Dubbing Diagram
1. Insert a pre-recorded video cassette into the source (playing) VCR.
2. Insert a blank video cassette, or one you want to record over, into the editing
(recording) VCR cassette compartment.
3. Press TAPE SPEED button to select the desired recording speed (SLP, LP or SP) of
the editing (recording) VCR.
4. Select AUX position on the editing (recording) VCR. See page 15, under "Input
Select".
5. Press REC button on the editing (recording) VCR.
6. Begin playback of the tape in the source (playing) VCR.
NOTE: For best results during dubbing, use the VCR's front panel controls whenever
possible. The remote control might affect the playback VCR's operation.
Always use video-quality shielded cables with RCA-type connectors. Standard audio
cables are not recommended.
You can use a video disc player, satellite receiver, or other audio/video component
with A/V outputs in place of the source (playing) VCR.
TO MONITOR THE RECORDING
1. Turn on the TV, and set it to the same output channel as the editing VCR channel 3
or 4.
2. Press VCR/TV button on the editing VCR so that VCR appears on the display.
USING A CABLE CONVERTER BOX