


Installation Instructions PRJ-WALLKIT-11
Visit the InFocus support site at www.infocus.com/support 9
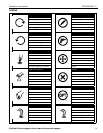
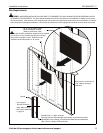
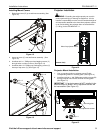
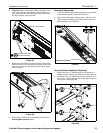
Installing Mount Covers
1. Raise lower cover (D) up to wall mount assembly. (See
Figure 12)
Figure 12
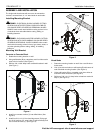
2. Lower top cover (C) onto wall mount assembly. (See
Figure 13)
3. Install two #10 x 1" Phillips pan head tapping screws (V)
through holes on sides of covers. (See Figure 13)
4. Install two #8 x 1/2" Phillips pan head tapping screws (U)
into top of top cover (C). (See Figure 13)
Figure 13
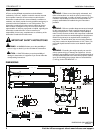
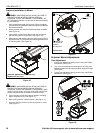
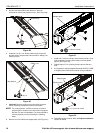
Projector Installation
WARNING: Exceeding the weight capacity can result in
serious personal injury or damage to equipment! It is the
installer’s responsibility to make sure the combined weight of
all components attached to the short throw projector mounts
up to (and including) the projector does not exceed 25 lbs
(11.34 kg) for the PRJ-WALLKIT-11.
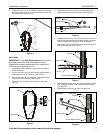
Figure 14
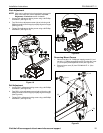
Projector Mount Installation
1. Line up mounting holes on projector mount (E) with
corresponding holes on mounting plate. (See Figure 14)
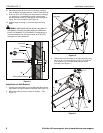
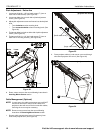
2. Install four #10-24 x 1-3/8" Phillips pan machine screws (W)
through projector mount holes and into mounting plate.
(See Figure 15)
IMPORTANT ! : If projector mount is NOT installed in the
same direction as shown, ROLL adjustment screws will
be inaccessible! (See Figure 15)
Figure 15
(D)
1
2
(C)
3
(V) x 2
4
(U) x 2
(bottom view)
Holes for projector mount
Mounting plate
(E)
(W) x 4
2
Roll adjustment screws