


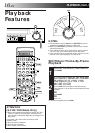

EN 11
On-Screen
Displays
You can choose whether or not to have various operational
indicators appear on screen, by setting this function ON or OFF.
Messages appear in the selected language (੬ pg. 9 or 10).
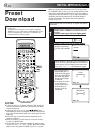
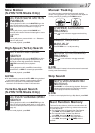
TURN ON THE RECORDER
1
Press .
ACCESS MAIN MENU
SCREEN
2
Press MENU.
ACCESS MODE SET SCREEN
3
Move the highlight bar (pointer) to "MODE SET" by
pressing %fi, then press OK or
#
.
ENABLE/DISABLE
ON-SCREEN DISPLAY
4
The default setting is "ON",
so if you want on-screen
displays, leave the setting
as it is and go to step 5. If
you don’t want the displays
to appear, press %fi to
move the highlight bar
(pointer) to "O.S.D." and
press OK or
#
to set
"O.S.D." to "OFF".
RETURN TO NORMAL
SCREEN
5
Press MENU.
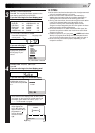
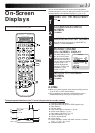
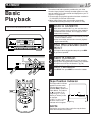
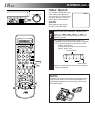
1– Operation mode indicators
2– Tape speed SP/LP/EP (EP is for NTSC playback only)
3– Tape direction
4– Counter display
5– Tape remaining time indicator (੬ pg. 25)
6– Audio mode display (੬ pg. 21)
7– Tape position indicator (੬ pg. 15)
8– Type of Broadcast (੬ pg. 27)
9– Current day/month/year
10– Clock display
11– Channel position number and station name/Aux. indicator
(DV, L-1, L-2, F-1, S-1 or S-2)
12– Cassette loaded mark
The superimposed indication on the TV screen tells you what the recorder is doing.
MODE SET
B. E. S. T. ON
PICTURE CONTROL AUTO
AUTO TIMER OFF
O. S. D. ON
DIRECT REC ON
AUTO SP=LP TIMER OFF
DIGITAL 3R ON
NEXT PAGE
[5∞] =
[MENU] : EXIT
q6
PR. 12 ABCD
]
SP
21 : 00
24. 12. 99
ST
–1 : 23 : 45
NORM REMAIN 1 : 00
0
++
+
+
1
12
11
10
9
8
7
6
4
5
2
NOTES:
●
When you use this recorder as the player for editing, be sure
to set "O.S.D." to "OFF" before starting.
●
During playback, the operation mode indicators may be
disturbed depending on the type of tape being used.
1 2 3
4 5 6
7 8 9
1
2
1
2
3
– –:– –
0
3
4
4
OK
MENU
3
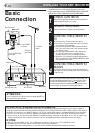
Turn on the TV and select the AV mode.