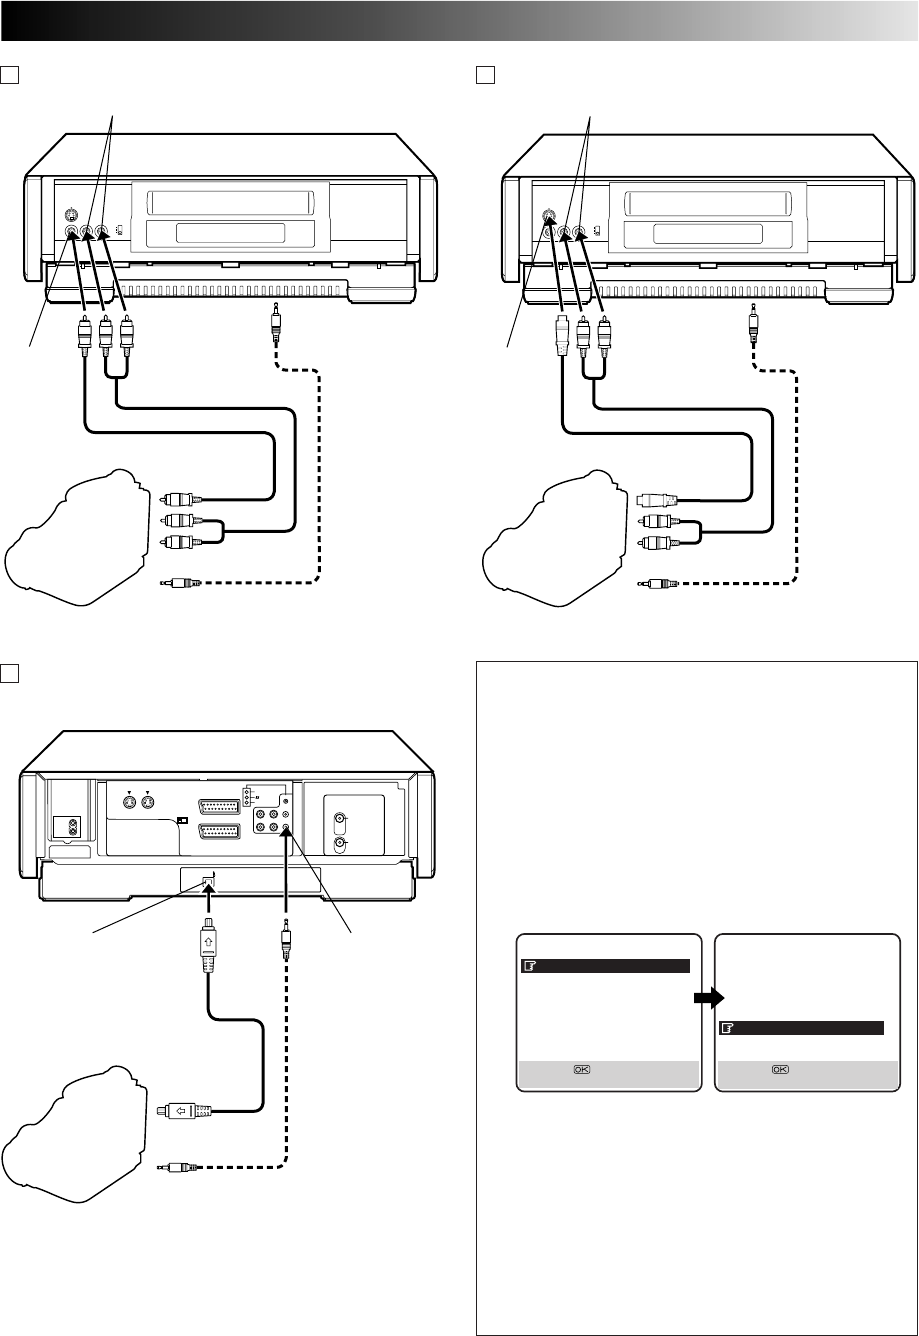
EN 51
Mini-Plug Cable
(not provided)
(JVC camcorder
only)
VIDEO OUT
EDIT
Camcorder
VIDEO
input
Recorder
To rear panel
R.PAUSE connector
AUDIO OUT
Video Cable (not provided)
Player
AUDIO input
A If the camcorder has no S-VIDEO output connector...
Mini-Plug Cable
(not provided)
(JVC camcorder
only)
S-VIDEO OUT
EDIT
Camcorder
S-VIDEO
input
Recorder
To rear panel
R.PAUSE connector
AUDIO OUT
Audio Cable (not provided)
Player
B If the camcorder has an S-VIDEO output connector...
AUDIO input
S-Video Cable (provided)
Audio Cable (not provided)
Mini-Plug Cable
(not provided)
(JVC camcorder only)
EDIT
DV Camcorder
Recorder
DV OUT
DV Cable
(provided)
Player
C If the camcorder has a DV OUT connector...
DV IN R.PAUSE connector
DV Sound Setting
Up to four audio signal channels can be input from a DV
camcorder through the DV IN connector (i.Link). This
recorder allows you to select and record two of these
channels. This setting is used to specify which two
channels to record.
1 Press MENU to access the Main Menu screen.
2 Move the highlight bar (pointer) to "MODE SET" by
pressing
%
fi, then press OK or
#
.
3 Move the highlight bar (pointer) to "DV SOUND" by
pressing
%
fi, then press OK or
#
to select "SOUND1",
"SOUND2" or "FULL".
When there are four DV audio channels (32kHz):
SOUND1: Records the two channels (L/R) of DV
SOUND 1.
SOUND2: Records the two channels (L/R) of DV
SOUND 2.
FULL: Mixes and records both DV SOUND 1 and
2.
When there are two DV audio channels (48kHz):
Because there are only two channels, those two
channels are recorded regardless of the DV sound
setting.
4 Press MENU to return to the normal screen.
PREVIOUS PAGE
POWER SAVE OFF
S-VHS AUTO
AV1 SELECT VIDEO
AV2 SELECT AV2
COLOUR SYSTEM PAL/NTSC
DV SOUND SOUND1
AUDIO REC NICAM
[5∞] =
[MENU] : EXIT
MODE SET
B. E. S. T. ON
PICTURE CONTROL AUTO
AUTO TIMER OFF
O. S. D. ON
DIRECT REC ON
AUTO SP=LP TIMER OFF
DIGITAL 3R ON
NEXT PAGE
[5∞] =
[MENU] : EXIT


