


Masterpage:Right+
EN 67
Filename [DVM700ER_12Subsidiary.fm]
TROUBLESHOOTING
Page 67Wednesday, 20 September 2006 10:03
● A finalised DVD-R disc is loaded.
] Recording cannot be made on finalised discs. Load a
recordable disc on the unit.
● The disc is full or does not have enough space for the title to be
recorded.
] Clear unnecessary titles on the disc or load a blank disc.
(A pg. 38)
● The DVD-RAM disc loaded has had its protect tab slid to the
protect position.
] Release the protect tab. (A pg. 8)
Recording (HDD Deck)
● The camcorder has not been properly connected.
] Confirm that the camcorder is properly connected.
● The input mode is not correct.
] Set the input mode to AF-1B. (A pg. 50)
Recording (DV Deck)
● The unit is in the Record Pause mode.
] Press I to resume recording.
● There is no cassette loaded, or the cassette loaded has had its
erase protection switch set to ASAVEB.
] Insert a Mini DV cassette, or set the erase protection switch set
to ARECB.
● The camcorder has not been properly connected.
] Confirm that the camcorder is properly connected.
● The input mode is not correct.
] Set the input mode to AF-1B or ADVB.
● The end of the tape was reached during recording.
] The programme may not have been recorded in its entirety.
Next time make sure you have enough time on the tape to
record the entire programme.
● ADV AUDIO RECB had been set to A16BITB at the original
recording.
] Set ADV AUDIO RECB to A12BITB at the original recording.
● The tape speed had been set to LP at the original recording.
] Set the tape speed to SP at the original recording.
] This is normal. Monitor the sound using the connected devices.
Other Problems
For basic connection
] Press PROGRESSIVE SCAN for 3 or more seconds so that the
Video output indicator (q) lights off on the front display panel.
For component video connection
] Press PROGRESSIVE SCAN for 3 or more seconds so that the
Video output indicator (q) lights up on the front display panel.
● The camcorder’s microphone is too close to the TV.
] Position the camcorder so its microphone is away from the TV.
● The TV’s volume is too high.
] Turn the TV’s volume down.
● Recording or RetroActive Recording* is in progress.
] Press W to pause recording, change the AV input, then press I
to resume recording.
* HDD deck only .
] Reset the unit by disconnecting the AC power plug from the AC
outlet and connect again.
● Mode Lock is activated.
] Press and hold F1 for more than 5 seconds to cancel Mode
Lock. Or disconnect the power cord and connect again.
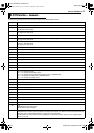
Camcorder recording is not possible.
During recording, the tape does not run. The DV recording
lamp lights up on the unit.
Recording cannot be done.
Camcorder recording is not possible.
The tape is automatically rewound, then the unit is shut off.
Audio dubbing is not possible.
Monitoring the audio dubbed sound is not possible during
audio dubbing.
The image of the programme appears distorted on the TV
screen.
Whistling or howling is heard from the TV during camcorder
recording.
The AV input cannot be changed.
Malfunction occurs and the unit cannot be power off.
Buttons and controls do not function at all.
DVM700ER_00.book Page 67 Wednesday, September 20, 2006 10:03 AM