


20
21
of video scenes as you have inserted projects
with “DVD-Arabesk 2”.
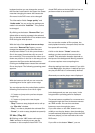
You will also have a 20-second long background
image with several PIPs on it (and the complete
DVD menu). You can now set audio clips under
this scene. To do this, insert your new scene into
the storyboard and go to “Audio Mix”, set the
original audio off (in order to delete the audio of
the video scenes on the background image) and
insert an audio clip of your choice.
The menu is played repeatedly, so it is useful to
fade the audio clip in and out in order to avoid
an abrupt transition. Now go to the “Image
processing” effects menu and click on the
“Scene” button, so that the time-frame menu
appears.
Make sure by using the IN and OUT buttons that
you have really selected the menu scene, but
usually this 20-second long scene should appear
automatically for selection. Click on “Ok” and go
to the “Edit” menu.
Now your scene (menu and perhaps also music)
is in the middle frame of the scene bin. Start
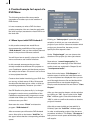
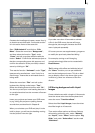
“DVD-Arabesk 2” and go to the function “Edit
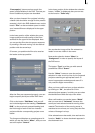
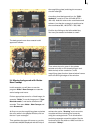
Menu”. Select the menu item “Background”
and set the option “Type” under “Scene”.
Clicking on the button “Select” below calls up
project selection. Conrm the activated project,
so that the corresponding scene bin appears, in
which you now call up the previously created
menu and conrm with “Ok”. Afterward set the
option “Animated” unter “Mode” and activate
additionally - in the case that you have put a
video clip under the DVD menu created with
PIP-Studio - the function “Audio”, so that a
checkmark appears.
Then set the “Size” under menu item “Borders”
at least to the value two. The alpha value of the
frame color (or frame pattern) must not be set to
0%.
Select an appropriate “Color” for the frames,
so that the frames can be seen clearly on the
background.
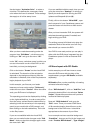
Now only the most important thing is missing:
linking your inserted lms with the PIPs.
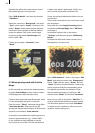
Enter the menu item “Stamps”, click on an icon
of one of your projects, so that it is surrounded
by a dashed-line frame, and set the option
“Background-Stamp” under “Type”. You will
see that your previous reference image (except
for the frame) has completely disappeared, so
that you can see the South Sea picture at this
position.
Select under “Size” the setting “medium”,
because you have also created a picture of
average size (120 x 96) with the program PIP-
Studio.
Now you only have to click on the button
“Position” and drag the project frame onto the
PIP-Studio icon, and you are nished!
You will see - surrounded by a frame - your new
picture, titled with the original lm name.
Do the same for the rest of the projects until you
have put the frames for all of the projects on the
images created with PIP-Studio.
If desired, you can turn off the frame by
selecting the frame color and setting its alpha
value to 0%.