


EN
–
2
3
–
In
f
ormatio
n
T
rou
bl
es
h
ootin
g
Gui
de
g
If this unit does not perform properl
y
when operated as instructed in this Owner's Manual, check this unit consulting the following checklist
.
• Some functions are not available in specific modes, but this is not a malfunction. Read the description in this Owner’s Manual for details on correct
operat
i
ons
.
• Playback
f
rom a desired track and random playback are not available during program playback
.
• Some functions are
p
rohibited on some discs.
I
nf
o
rm
a
ti
on
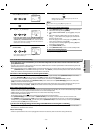
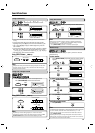
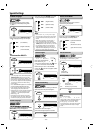
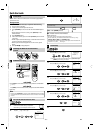
Hi
n
t
•
W
h
en you cance
l
to
i
nitia
l
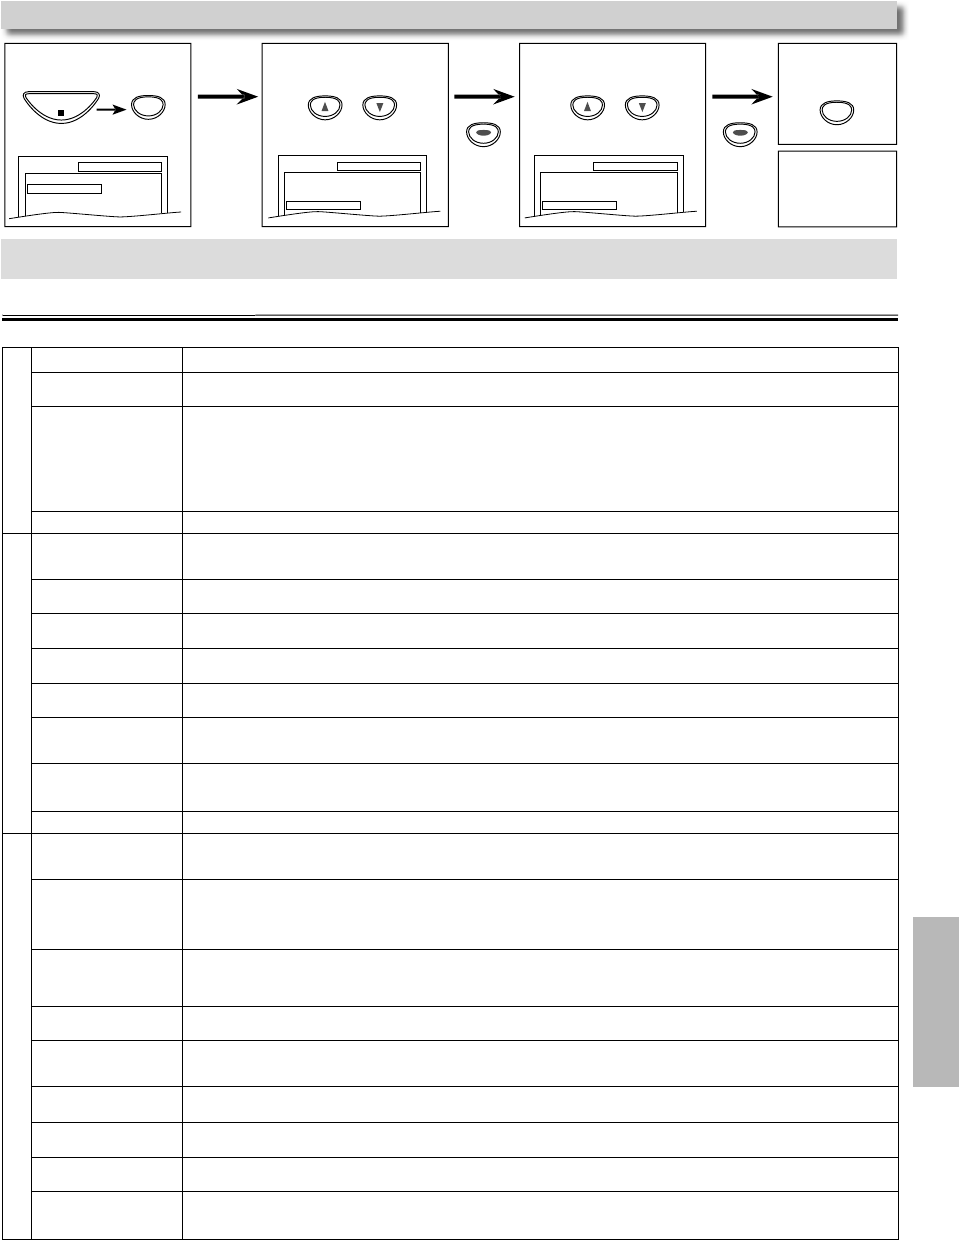
ize at step 3,
select
“N
O
”
.
2
Select
“INITIALIZE”
.
4
3
Select
“YE
S
”
.
1
P
r
ess
[
SETUP
]
in t
h
e stop
mode
.
Reset to the De
f
ault Settin
g
(Except
f
or PARENTAL Settin
g)
SETUP
QUICK
CUSTOM
INITIALIZE
SETUP INITIALIZE
Initialize?
NO
YES
<
S
ETUP MENU
>
SETUP
T
o
e
xi
t
the
menu
P
r
ess
t
wi
ce.
SETUP
QUICK
CUSTOM
INITIALIZE
SETUP
STOP
ENTER
ENTER
ENTER
ENTER
ENTER
ENTER
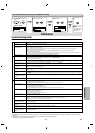
D
VD
/
V
C
R
PR
O
BLE
M
CO
RRE
C
TIVE A
C
TI
O
N
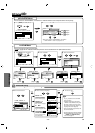
No
p
ower
.
• Ma
k
e sure t
h
e power p
l
ug is connecte
d
to an AC out
l
et
.
• Ma
k
e sure t
h
e power is turne
d
on
.
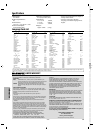
T
his unit does not res
p
ond to
t
h
e remote contro
l.
• Check i
f
the power plug is connected to an AC outlet
.
• C
h
ec
k
t
h
e
b
atteries in t
h
e remote contro
l.
• Aim the remote control directly at the remote sensor. I
f
necessary, remove all the obstacles between the sensor and the remote control
.
• You have to be within 23
f
eet (7m) o
f
this unit
.
• Check i
f
the right mode is selected. I
f
it’s not in the right mode, press
[
DVD
]
or
[
VCR
]
,
w
h
ic
h
ever you nee
d
, on t
h
e remote contro
l.
• Check i
f
a cassette tape is in this unit.
• Tune your radio to an empty AM station so that you hear a lot o
f
noises. Turn the volume up, then i
f
you hear some signal sound
f
rom the radio in
r
esponse to your pressing
b
uttons on t
h
e remote contro
l
, t
h
e remote contro
l
is wor
k
ing
.
P
oor
p
icture or noise
.
• Interference signal ma
y
be received. Change the position and orientation of the unit
.
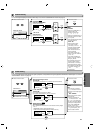
VC
R
T
imer recor
d
ing is impossi
bl
e
.
• Ma
k
e sure t
h
e Timer Recor
d
ing is set correct
l
y
.
• Make sure TIMER REC indicator on the
f
ront panel lights up. I
f
not, press
[
SUBTITLE/T-SET
]
.
• Ma
k
e sure t
h
e VCR c
l
oc
k
is set correct
l
y
.
C
annot
g
o into record mode
.
• Make sure the tape has a record tab. I
f
needed, cover the hole with adhesive tape
.
• Activate t
h
is unit in VCR mo
d
e. Pres
s
[
VCR
]
on t
h
e remote contro
l
so t
h
at t
h
e VCR OUTPUT
l
ig
h
t is
l
it
.
P
la
y
back picture is partiall
y
n
o
i
sy.
• Adjust tracking control for a better picture b
y
pressing
[
CHANNE
L
L
/
K
]
o
n
t
h
e
u
ni
t
o
r
[
SKIP/CH.
G
/
K
,
H
/
L
]
o
n
t
h
e
r
e
m
ote
co
n
t
r
o
l
.
Cannot view a ta
p
e but the
a
u
d
io is OK
.
• Head cleaning may be necessary. Re
f
er to “AUTO HEAD CLEANING”
.
• Ma
k
e sure t
h
e VCR is not in t
h
e Menu mo
d
e
.
N
o or poor, pla
y
back picture
.
• C
h
ange t
h
e RF output c
h
anne
l
to CH4. T
h
en se
l
ect t
h
e same c
h
anne
l
on t
h
e TV
.
• F
i
ne tune your TV
.
TV pro
g
rams cannot be seen
norma
ll
y
.
• Re-check the ANT-IN and ANT-OUT connections. See the
f
ront page and page 6
.
•
P
ress
[
VCR
]
.
•
P
ress
[
VCR
]
on the remote control to activate it in the VCR mode. Check i
f
the VCR OUTPUT light is lit, then set it to the TV position by pressing
[
VCR
]
.
Video or color fades in and
out when making a copy o
f
a
video ta
p
e
.
• You cannot cop
y
a cop
y
righted video tape. You are experiencing cop
y
guard protection
.
Cannot remove t
h
e tape
.
• Check i
f
this unit is in the VCR mode. I
f
not, press
[
VCR
]
on t
h
e remote contro
l
to switc
h
t
h
e mo
d
e
.
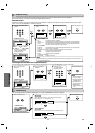
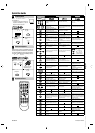
D
V
D
N
o p
i
cture
.
• Connect the video cable rml
y
.
• Insert a correct video disc that pla
y
s on this unit
.
• Pr
ess
[
DVD
]
on the remote control. Check if the DVD OUTPUT light is lit. Then tr
y
other DVD features
.
D
isc cannot
b
e p
l
aye
d.
• In
se
r
t
t
h
e
d
i
sc.
•
C
l
ea
n
t
h
e
d
i
sc.
• Place the disc correctl
y
with the label side up
.
• Cancel the parental lock or chan
g
e the control levels
.
• Handle a disc with special care so that it does not have n
g
erprints, scratches, or dusts on its surface.
N
o soun
d.
• Connect the audio cable rml
y.
• Turn the
p
ower of the audio com
p
onent on
.
• Correct the audio output settin
g
s
.
• Correct the input settin
g
s on the audio component
.
N
o DTS au
d
io is outpu
t
• This unit does not support DTS audio
.
-Thi
s
i
s
n
ot
a
m
a
l
fu
n
ct
i
o
n
.
D
istorted
p
icture
.
• Connect t
h
is unit
d
irect
l
y to t
h
e TV
.
• There are some cases where pictures ma
y
be slightl
y
distorted, and those are not a sign o
f
a mal
f
unction
.
• Although pictures may stop
f
or a moment, this is not a mal
f
unction
.
A
udio or subtitle lan
g
ua
g
e
d
oes not matc
h
t
h
e setup
.
• The selected language is not available
f
or audio or subtitles on the DVD
.
-This is not a mal
f
unction
.
The camera an
g
le cannot be
c
h
ange
d.
• The DVD does not contain sequences recorded
f
rom di
erent camera angles
.
-This is not a mal
f
unction
.
A
udio or subtitle lan
g
ua
g
e
cannot
b
e c
h
ange
d.
• T
h
e DVD
d
oes not contain au
d
io source or su
b
tit
l
es in t
h
e se
l
ecte
d
l
anguage
.
-This is not a mal
f
unction
.
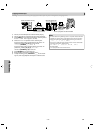
“Prohibited icon” a
pp
ears on
th
e screen, pro
h
i
b
iting an
o
p
eration
.
• T
h
at operation is pro
h
i
b
ite
d
b
y t
h
is unit or t
h
e
d
isc
.
-This is not a mal
f
unction
.
or
or