


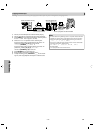
EN
–
9
–
S
etu
p
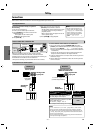
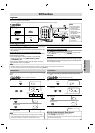
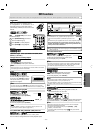
6: VIDEO IN
j
ac
k
Connect a cable coming
f
rom the video out jack o
f
a camcorder, another
VCR or an au
d
io-visua
l
source (
l
aser
d
isc p
l
ayer, vi
d
eo
d
isc p
l
ayer, etc.)
h
ere
.
7: DVD/VCR VIDEO OUT
j
ack
Connect the supplied video cable here through the video in jack o
f
a
tele
vi
s
i
o
n
.
8: COMPONENT VIDEO OUT
j
ack
s
Connect optiona
l
COMPONENT VIDEO ca
bl
es
h
ere t
h
rou
gh
t
h
e COMPO
-
NENT VIDEO in jacks of a television. (DVD onl
y)
9: S-VIDEO OUT jac
k
Connect an optional S-VIDEO cable here through the S-VIDEO in
j
ack of a
television. (DVD onl
y)
10: DIGITAL AUDIO OUT COAXIAL jac
k
Connect an optiona
l
coaxia
l
d
igita
l
au
d
io ca
bl
e
h
ere t
h
roug
h
t
h
e coaxia
l
digital audio in jack o
f
a decoder or audio receiver. (DVD only
)
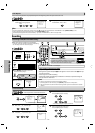
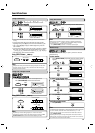
Fu
nct
io
n
O
verv
i
e
w
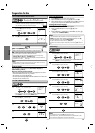
You must
f
irst select which component you wish to operate with
[
SOURCE
]
, as this product is a combination o
f
a VCR and a DVD
pla
y
er
.
DVDVCR
SOURCE
STANDBY-ON
DISPLAY VCR DVD PAUSE
SLOW
VCR/TV
SKIP/CH.
PLAY
STOP
RECORD
MENU
SETUP TOP MENU
MODE ZOOM
SUBTITLE
T-SET
ANGLE
ENTER
RETURN
SEARCH
MODE
REPEAT A-B
OPEN/CLOSE
/EJECT
SPEED AUDIO
C
LEAR
/
C.
RE
S
E
T
123
456
789
0
+10
PLAYDISC IN
DVDVCR
OPEN/CLOSE
CHANNEL SOURCE PREV STOP PLAY NEXT
DVD PLAYER / VCR CMWD 2206
SOURCE button
DVD SOURCE light
VCR SOURCE light
DVD button
VCR button
V
C
R M
O
DE
P
ress
[
VCR
]
on t
h
e remote contro
l.
(Veri
f
y that the VCR SOURCE light is lit.)
DVD M
O
DE
Pr
ess
[
DVD
]
o
n
t
h
e
r
e
m
ote
co
n
t
r
o
l
.
(Verif
y
that the DVD SOURCE light is lit.)
Hi
n
t
•
Pressing onl
y
[
SOURCE
]
on the front
p
anel DOES NOT switch the mode
o
f
t
h
e
r
e
m
ote
co
n
t
r
o
l
.
Y
ou
M
US
T
se
l
ect
t
h
e
co
rr
ect
m
ode
o
n
t
h
e
r
e
m
ote
co
n
t
r
o
l
.
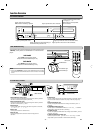
VCR / DVD Switchin
g
F
r
o
n
t
P
a
n
e
l In
d
i
cator
PLAYDISC IN
DVDVCR
OPEN/CLOSESTANDBY-ON
POWER ON
AUDIO
REC
RECORDF.FWDREW STOP/EJECT
TIMER REC
IR
CHANNEL SOURCE PREV STOP PLAY NEXT
VIDEO
REC
RECORD
TIMER REC
PLAY
DVD PLAYER / VCR CMWD 2206
Lights up when the inserted disc
is
b
eing p
l
a
y
e
d
b
ac
k
.
B
l
in
k
s w
h
en an unaccepta
bl
e
d
isc is inserte
d
.
L
i
g
hts up when the Timer Recordin
g
or
a
n OTR recordin
g
has been set
.
L
ights up during a recording
.
Bl
in
k
s w
h
en a recor
d
ing is pause
d.
Li
g
hts up when power is on
.
Li
g
hts up when this unit is in the DVD mode
.
L
i
gh
ts up w
h
en t
h
is unit is in t
h
e VCR mo
d
e.
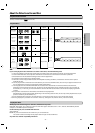
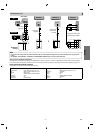
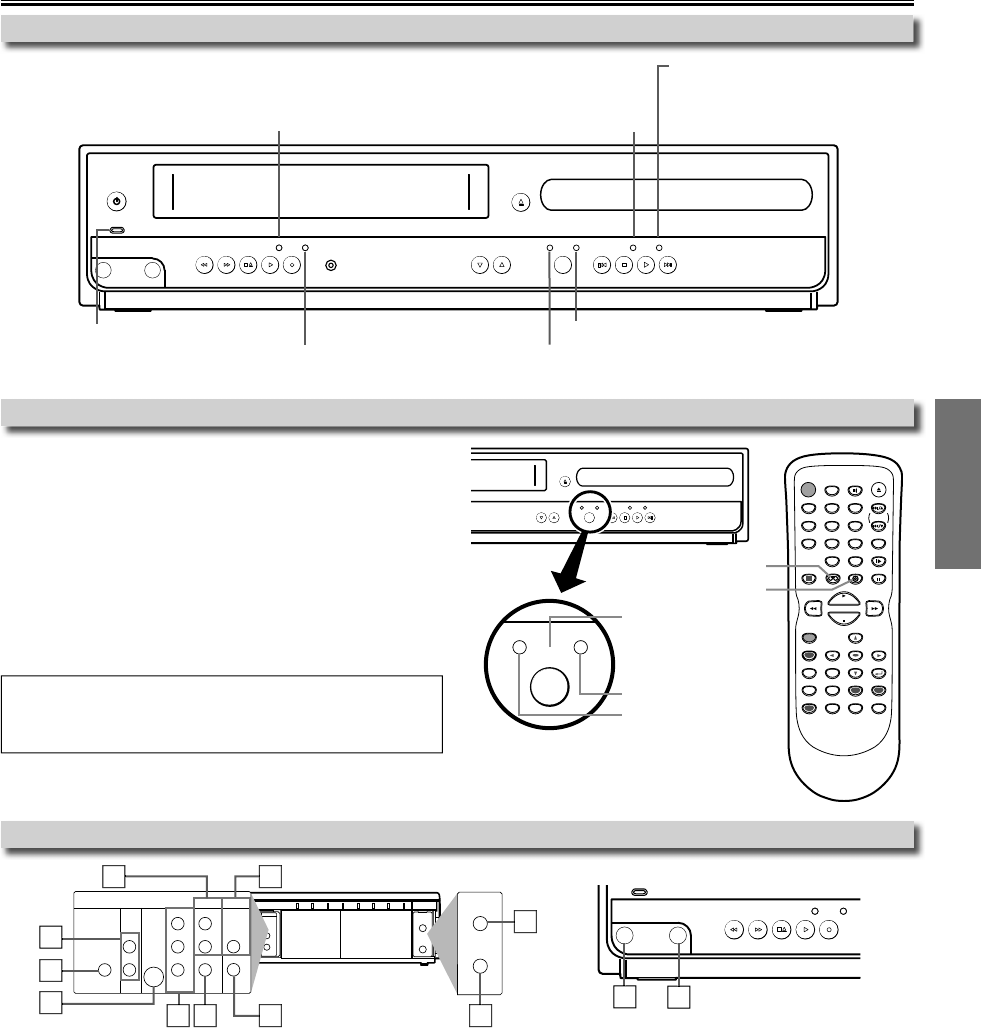
Front & Rear Termina
l
s
DIGITAL
AUDIO OUT
COAXIAL
ANT-OUT
ANT-IN
AUDIO
OUT
DVD VCR
DVD/VCR
S-VIDEO
OUT
COMPONENT
VIDEO OUT
AUDIO IN
VIDEO IN
AUDIO OUT
VIDEO OUT
L
LY
R
R
C
B
C
R
ANT-OUT
ANT-IN
DIGITAL
AUDIO OUT
COAXIAL
AUDIO
OUT
DVD
DVD/VCR
VCR
S-VIDEO
OUT
COMPONENT
VIDEO OUT
AUDIO OUT
VIDEO OUT
AUDIO IN
VIDEO IN
L
Y
C
B
C
R
L
R
R
AUDIO
REC
RECORDF.FWDREW STOP/EJECT
TIMER REC
VIDEO
REC
RECORD
TIMER REC
PLAY
[
Rear Panel
]
[
Front Panel
]
1: DVD AUDIO OUT (analog)
j
acks
Connect the supplied audio cable here through the audio in
j
acks o
f
a
television or other audio equipment. (DVD onl
y)
2
: DVD/VCR AUDIO OUT jac
ks
Connect the supplied audio cable here through the audio in
j
acks of a
television or other audio e
q
ui
p
ment
.
3
: AUDIO IN jac
k
Connect audio cable coming from the audio out
j
ack of a camcorder,
a
n
ot
h
e
r V
C
R
o
r
a
n
aud
i
o
sou
r
ce
h
e
r
e.
4: ANT-IN
j
ac
k
Connect your antenna or ca
bl
e
b
ox
h
ere
.
5
: ANT-OUT
j
ac
k
Connect the supplied RF cable to the antenna input jack o
f
a
te
l
evision
.
3
2
10
9
1
8
7
6
3
4
5
Li
g
hts up when the disc is inserted
.
6