


8. Connect one end of the the supplied audio cable to the audio output (audio out) of your
DVD Recorder. Connect the other end of the audio cable to your soundcard. Do not force
in the connector heads. Gently try to insert the connector heads in after determining their
correct orientation. Please note that some soundcards may only have one internal audio
input which is probably occupied by the audio output of your CD-ROM or DVD-ROM drive
already. If this is the case, it is best to leave the existing drive connected to the soundcard.
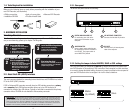
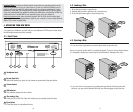
Analog Connection:
Important Notes: Some sound cards have more than one audio input jack, including those which do not
support the specification of the drive. If you cannot hear playback audio from the speakers, refer to the
documentation that comes with the sound card.
13
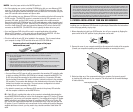
4. Select an available drive bay that can hold your new DVD Recorder. Most computers have
a blank cover plate over the empty drive bay. These plates typically snap into place
although some may be secured by screws. Consult your computer’s documentation
and then remove the cover plate.
12
Note 1: To install your new DVD Recorder, you need an empty drive bay. If you plan to use an existing drive
bay currently occupied by a CD-ROM drive, you must first remove the driver software for that drive and then
turn off your computer and remove the drive. Then, turn on the computer again, making sure that your system
recognizes that the old drive is no longer there. Turn off the computer again and start the installation process
of your new DVD Recorder from the beginning.
Note 2: The drive bays of most computers accommodate any Memorex DVD Recorder directly. However, some
computers may require an accessory rail or mounting bracket. These components should be available from your
computer’s manufacturer or your local computer hardware store.
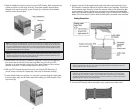
5. Your Memorex DVD Recorder is protected in a poly bag. Ground yourself again and
then remove the drive slowly from its poly bag. Make sure you hold your DVD
Recorder by its main case and not the tray or front panel. Check your drive Jumper
selection in section 2.2.1 before installing the drive into the CPU
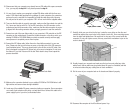
6. Slide your DVD Recorder into the drive bay. Do not force the DVD Recorder in if
you feel it does not fit the slot. Repeat step 4 and study the illustration carefully.
7. If space is tight inside your computer, you may wish to connect the audio output cable,
the power supply cable, and the ribbon cable before sliding your DVD Recorder all the
way into the bay.
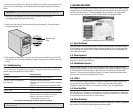
9. Your new DVD Recorder will be connected to your computer via a ribbon cable.
Important Notes: Your new Memorex DVD Recorder will be fully functional without any connection to the
soundcard. The only exception is that you will not be able to play an audio CD on your new drive and
hear it through your sound card. Of course, you can still play back an audio CD on your CD-ROM drive.
The ability to playback audio through your computer sound system without the use of the audio cable is
dependent upon the version of your operating system.
(Not Included)