


EN-24
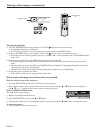
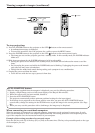
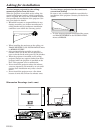
Adjusting projected images
To adjust the brightness (CONTRAST and BRIGHTNESS):
You can make adjustments for the brightness of the projected image using the menu.
(See Page 21 for menu setting.)
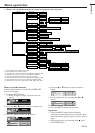
1. Display the IMAGE menu.
2. Select CONTRAST or BRIGHTNESS by pressing the { or } button.
3. Adjust the selected item by pressing the $ or % button.
To cancel the menu:
4. Press the MENU button.
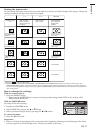
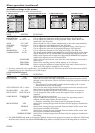
CONTRAST
Select to adjust the contrast of the image. Every time the % button is pressed, the image becomes brighter and
more defined. Every time the $ button is pressed, the image becomes darker and less defined.
BRIGHTNESS
Every time the % button is pressed, the image becomes brighter. Every time the $ button is pressed, the image
becomes darker.
To adjust the color (COLOR and TINT):
You can adjust the color of the projected image using the menu.
(See Page 21 for menu setting.)
1. Display the IMAGE menu.
2. Select COLOR or TINT by pressing the { or } button.
• COLOR is unavailable when the computer or DVI-D is selected as the input source.
• TINT is available only when the NTSC signal is input.
3. Adjust the selected item by pressing the $ or % button.
To cancel the menu:
4. Press the MENU button.
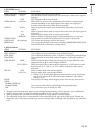
COLOR
Use to adjust the color thickness of the projected image. Every time the % button is pressed, the color becomes
thicker. Every time the $ button is pressed, the color becomes lighter.
• COLOR is unavailable when the computer or DVI-D is selected as the input source.
TINT
Use to adjust the tint of the projected image. Every time the % button is pressed, the image appears more
greenish. Every time the $ button is pressed, the image appears more reddish.
To sharpen or soften the projected image (SHARPNESS):
You can adjust the sharpness of the projected image using the menu.
(See Page 21 for menu setting.)
1. Display the IMAGE menu.
2. Select SHARPNESS by pressing the { or } button.
3. Adjust the selected item by pressing the $ or % button.
To cancel the menu:
4. Press the MENU button.
To enhance or weaken the white level of the projected image (CineRichColor):
Use to enhance only the white level of the image. Level 10 enhances the white level most. Default is AUTO. Level 3
is automatically selected for VCR image input signals such as 480i and 720p and level 10 for computer image input
signals such as XGA and SVGA. (See Page 21 for menu setting.)
1. Display the IMAGE menu.
2. Select CineRichColor by pressing the { or } button.
3. Adjust the selected item by pressing the $ or % button.
To cancel the menu:
4. Press the MENU button.