


Page 18
MODELS: WD-60C9 / WD-65C9 / WD-73C9 / WD-60737 / WD-65737 / WD-73737 / WD-82737
WD-65837 / WD-73837 / WD-82837
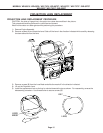
CAUTION: Wear gloves when handling the Lenticular Screen and Fresnel Lens.
This prevents cuts and finger prints. Do not place Fresnel Lens in the sun.
This may cause fire and heat related injuries.
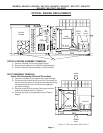
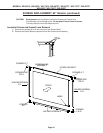
Lenticular Screen and Fresnel Lens Replacement
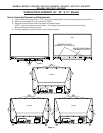
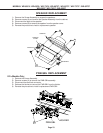
1) Apply LENS-TAPE along the rear top edge of the Lenticular Screen.
2) Place the Fresnel Lens on top of the Lenticular Screen, and apply pressure along the top edge.
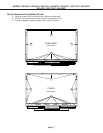
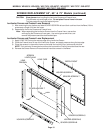
3) Place the screens in the screen frame and reinstall the cushions, top, bottom and side rails.
NOTE: The Lenticular Screen label must face the front and the Fresnel Lens label face the rear.
4) Reverse the Screen Removal Procedure and insert the screens in the Bezel.
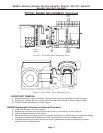
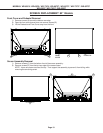
Lenticular Screen and Fresnel Lens Removal
1) After removing the top, bottom and side HOLDER-SCREEN rails and their cushions from the Bezel, lift the
screens as a single unit from the frame.
2) Separate the Lenticular Screen and Fresnel Lens.
Note: When separating the Lenticular Screen from the Fresnel Lens, use caution
while prying the Screen and Lens apart. Use a slot type screw driver, and
remove the pressure sensitive double sided tape.
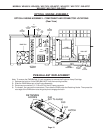
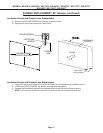
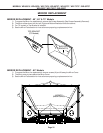
SCREEN REPLACEMENT 60”, 65” & 73” Models (continued)
BEZEL FRONT
LENS-TAPE
SCREEN
LENTICULAR
LENS
FRESNEL
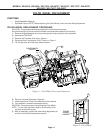
COVER-HOLDER-T
HOLDER-SCREEN-S
HOLDER-SCREEN-B
LABEL
LABEL
HOLDER-SCREEN-T
SPACER-SCREEN-S
SPACER-SCREEN-B
SPACER-SCREEN-T