


Chapter 3. TV Setup 39
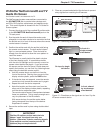
When You First Connect a Device
Duringtheinitialset-upprocessforadevice,theTVwill:
a. detecttheconnecteddevice
b. promptyoutoidentifythedevicebyname
c. promptyoutoperformNetCommandset-upfor
thedevice,ifapplicable
d. repeattheabovestepsforanyadditionalnewly
connecteddevices
ClearThought® Easy Connect Auto Input Sensing
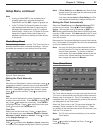
ThisTV’sClearThought®autoinputsensingfeature
detectsmostconnectionsautomatically.Thefirsttime
youconnecttoaClearThoughtinput,youarepromptedto
selectanamefortheconnecteddevice.Thetablebelow
definesconnectionstheTVcandetect.
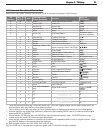
Auto Detection Active No Auto Detection
INPUT
1
,
2
,
3
videojacks
ANT 1/ANT 2
COMPONENTvideojacks
MONITOR OUT
(alljacks)
HDMI
*
PC-DVI
*
All
AUDIO
jacks
IEEE 1394
* Ifthedeviceispoweredoffwhenconnected,detec-
tionoccurswhenthedeviceisnextpoweredon.
1. ConnectyourdevicestotheTV,makingnoteofwhich
TVinputyouhaveusedforeachdevice.
TheTVandthedevicescanbeeitheronoroffwhen
connecting.IftheTVispoweredoff,thedetection
processwilloccurthenexttimeyouturnontheTV.
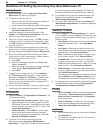
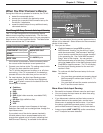
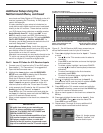
2. Formostdevices,theAutoInputSensingscreen
opens(seefigure6).Withthetextboxhighlighted,
press toselectanameforthedevicefromthe
followinglistofnames:
Cablebox
Camcorder
DVD
DVD2
DVR(digitalvideorecorder,recordableDVD)
Game
HD Disc (high-definitiondisc)
Satellite
VCR
ThenameyouassignherewillappearintheInput
Selectionmenuandcanbechangedlaterthroughthe
InputNamemenu.
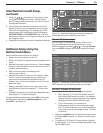
Ifyouselectoneofthedevicenamescheckedin
thetableabove,theon-screenLearnbuttonwill
changefromgrayedouttofullcolor,indicatingthat
NetCommand“learning”isavailableforthedevice.
NetCommand
“Learn” button
(initially grayed out)
Name you
select for
the input
TV connec-
tion used for
this device
Figure 6. The Auto Input Sensing screen appears when a
device is first detected. Select a name for the connected
device in this screen.
3. Nowyoucaneither:
HighlightLearnandpress
ENTER
toperform
NetCommand“learning”forthedevice,ifappli-
cable(recommended).NetCommand“learning”
canbeusedtocontrolthedevicetypeschecked
intheprecedinglist.See“InitialNetCommand
Setup”laterinthischapter.Youcanperform
NetCommandsetupatalatertime,ifpreferred,by
usingtheLearnoptionintheNetCommandmenu.
Press
EXIT
toclosethescreen.TheTVwilldisplay
theAutoInputSensingscreenforthenextcon-
nectionitfinds.
Note: TocontinuewithNetCommandsetupforthecur-
rentdevice:
• Youmusthaveconnectedandproperlyplaced
NetCommandIRemitters(seechapter2,“TV
Connections”).
• Youmusthaveathandtheremotecontrolsfor
theTVandthecurrentdevice.
More About Auto Input Sensing
• Becarefultochooseadifferentnameforeachinput.
• Youcanchangetheinputnameatalatertimeusing
theInputNamemenu.
• Ifyoudisconnectadeviceandthenlaterconnecta
differentdevicetothevacatedjack,usetheInput
Namemenutoupdatethedevicename.Ifyouwant
thedeviceunderNetCommandcontrol,youmust
performNetCommand“learning”forthenewdevice.
• Antennainputs(
ANT 1/ANT 2)
,audioconnections,
andTVoutputsareneverdetected.