


44 Chapter 3. TV Setup
Additional Setup Using the
NetCommand Menu, continued
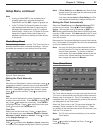
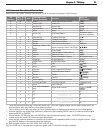
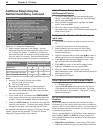
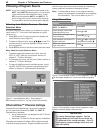
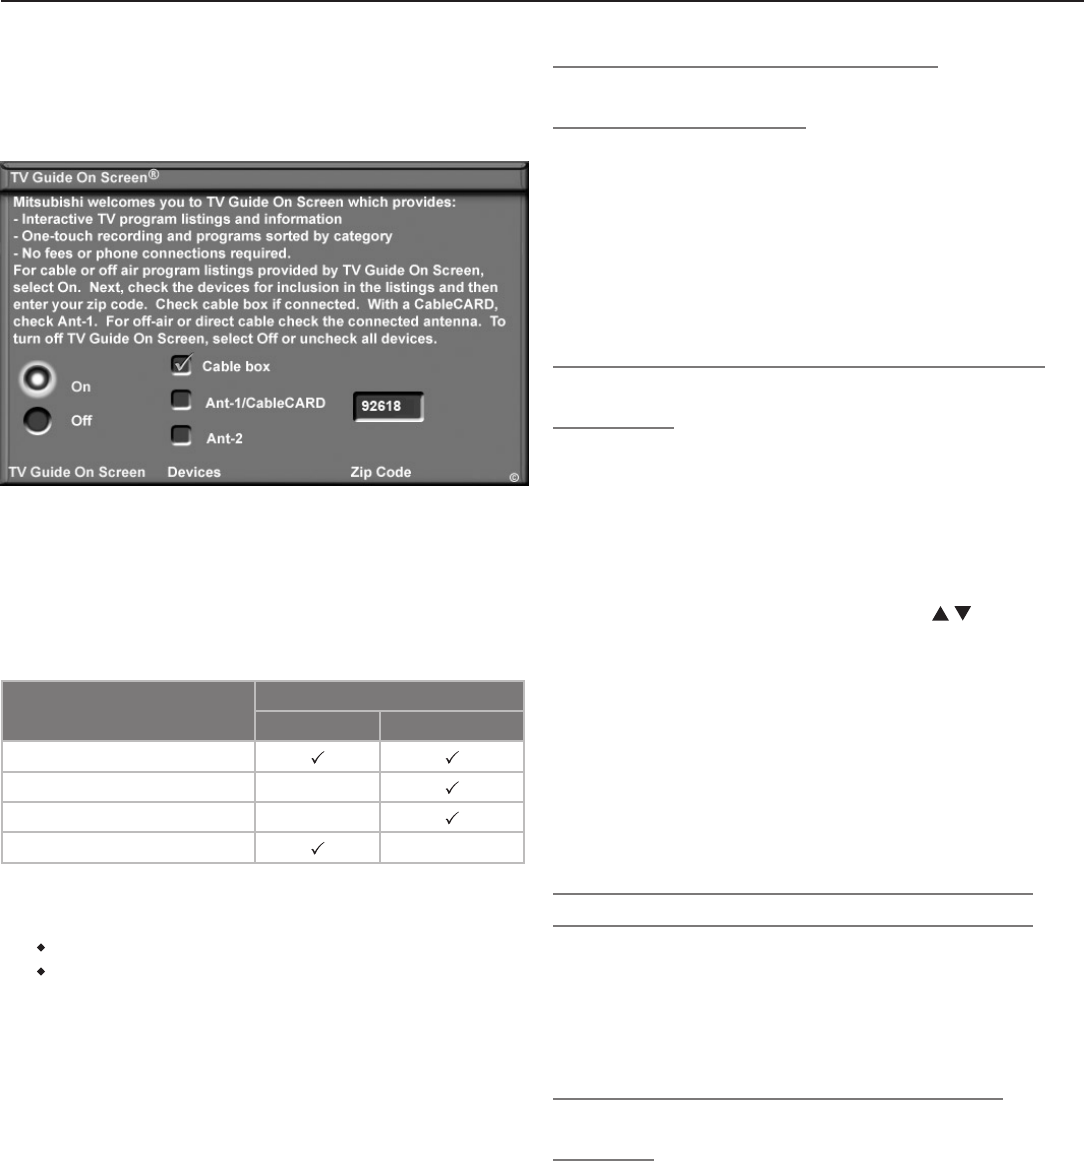
Figure 12. TV Guide On Screen setup
3. Selectprogramsourcesforthelistings.Youcan
selectoneover-the-airsourceandonecablesource
forTVGuideOnScreen.If,however,youhavemul-
tiplecablesources,thechannel-numberassignments
maynotmatchupcorrectly.Seethefollowingtable
andnotesforthepreferredconnectioncombinations.
If One Source Is:
The Other Source Can Be:
Ant-1 Air Ant-2 Air
CableBox
CableCard N/A
Ant-1ChannelsviaCable N/A
Ant-2ChannelsviaCable N/A
Note:
• InputstoTVGuideOnScreencaninclude:
Onlyoneover-the-airsource
Onlyonecablesource
• AnantennainputisrequiredfordownloadingTV
GuideOnScreenschedules.Ifyourcableboxis
connectedusingHDMIorIEEE-1394,youmustalso
connectanantennainput.
• Ifyourcableboxisconnectedtoa
COMPONENT
input,besuretheboxissettosendanalogchannels
as480i.Ifthisisnotpossible,addanantennainput.
4. MovetotheZIP Codeboxandenterthefive-digitZIP
codeforyourlocation.Toreceivethecorrectprogram
listingsforyourarea,youmustentertheZIPcode.
FordetailedinformationonusingtheTVGuideOnScreen
system,pleaseseetheseparateTV Guide On Screen
Interactive Program Guide User’s Manual.
Add or Remove Device Keys from
NetCommand Control
1. To“Learn”devicekeys,youmustbewatchingthe
device.Press
INPUT
,highlighttheiconfortheaffected
device,andpress
ENTER
.
2. OpentheNetCommandmenu,highlighttheLearn
button,andpress
ENTER
.
3. WhentheLearnscreendisplays,continueas
describedearlierunder“InitialNetCommandSetupfor
MostDeviceTypes.”
To Replace One Device with Another on an
Input Jack
1. Disconnectthedeviceyouwishtoremovefromthe
TV.
2. Connectthenewdevicetothevacatedjack.
3. BeforeselectingtheinputfromtheInputSelec-
tionmenu,opentheInputNamemenufromthe
NetCommandmenu.
4. Highlighttheinputtextboxandpress toselecta
devicenamefromthelistassociatedwiththeinput.
5. Press
INPUT
toopentheInputSelectionmenu.High-
lighttheinputiconandpress
ENTER
.
6. Press
MENU
andreturntotheNetCommandmenu.
7. HighlighttheLearnbuttonandpress
ENTER
.
8. WhentheLearnscreendisplays,continueas
describedearlierunder“InitialNetCommandSetupfor
MostDeviceTypes.”
9. Press
EXIT
whenfinished.
Other Options on the NetCommand Menu
• ForInput NameandIcon Orderoptions,seechapter
5,“TVMenuSettings.”
• UsethePC DVI Inputoptiontospecifythetypeof
videosignalcomingfromyourcomputer.Formore
aboutthisoption,seechapter7,“UsingtheTVwitha
PersonalComputer.”
Set Up NetCommand Control of an A/V
Receiver
PerformthissetuptoenabletheA/Vreceivertoswitch
automaticallytothecorrectaudioinputwhenyouselecta
deviceintheTV’sInputSelectionmenu.Youmusthaveat
handtheremotecontrolsforboththeTVandA/Vreceiver
toperformthisprocedure.
ThisisasamplesetupforaDVDplayer,directantennaor
directcable(to
ANT 1
or
ANT 2
),andananalogVCR.
Thisexampleillustratesthreescenariosforsendingaudio
toanA/Vreceiver:
• DigitalSurroundSound.Adevice(e.g.,DVDplayer,
cablebox,satellitereceiver)cansenddigitalsurround