


46 Chapter 3. TV Setup
Additional Setup Using the
NetCommand Menu, continued
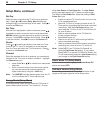
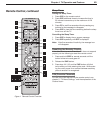
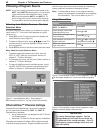
Part 2: Learn A/V Receiver Power and Volume Keys
1. Press tohighlightthecheckboxforPower On.
2. Press
ENTER
ontheTV’sremotecontrolandwhilethe
textPower Onisflashing,pressandholdthe
POWER
or
POWER ON
keyontheA/Vreceiver’sremotecontrol.
3. IfyourA/Vreceiverhasaseparate
POWER OFF
key,press
tohighlightthecheckboxforPower Off.Repeat
theprecedingstepto“learn”the
POWER OFF
key.
If your A/V receiver has no POWER OFF key, skip this step.
4. Press tohighlightadditionalcheckboxesand
repeatstep2fortheotherA/Vreceiverkeys.
5. Whenallkeyshavebeenlearned,press
EXIT
.
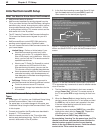
Figure 15. Perform NetCommand
“learning” for these A/V receiver
functions.
Part 3: Tell the TV Where Connected Devices
Send Audio
Digital Surround Sound
1. Press
INPUT
todisplaytheInputSelectionmenu.
2. HighlighttheiconfortheDVDplayerandpress
ENTER
to
switchtotheDVDinput.
3. Press
MENU
andopentheNetCommandmenu.
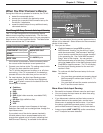
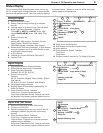
4. HighlightthetextboxunderAV RECEIVER SETUP.
5. Press tomovethroughthelisttoDVD.
ThissettingtellstheTVthatdigitalsurroundsound
fromtheDVDplayerisconnecteddirectlytotheA/V
receiver’s
DVD AUDIO
input.
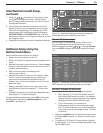
Figure 16. A/V receiver setup
indicating the DVD player’s audio
output is connected directly to
the A/V receiver’s DVD Audio
input.
6. Press
EXIT
toclosethescreen.
Audio Directly from TV
1. Press
INPUT
todisplaytheInputSelectionmenu.
2. Highlighttheiconforanantennainput(
ANT 1
or
ANT 2
)andpress
ENTER
toswitchtotheinput.
3. Press
MENU
andopentheNetCommandmenu.
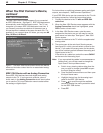
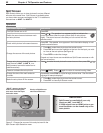
4. HighlightthetextboxunderAV RECEIVER SETUP.
5. Press
tomovethroughthelisttoTV.Thisisthelist
ofA/VreceiverinputsyounamedintheAVReceiver
(AVR)Learnscreen(seefigure13).
TheTVsettinghereindicatesthataudiooutfrom
theTV(
DIGITAL AUDIO OUT
or
AUDIO OUT
LEFT/RIGHT
)issenttotheA/Vreceiver’s
TV
AUDIO
input.Audiofrom
ANT 1
and
ANT 2
,
memorycards,andIEEE1394devicesmustgotothe
A/VreceiverfromtheTV’saudiooutputsasthereis
nowaytosendtheaudiodirectlytotheA/Vreceiver.
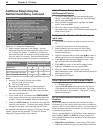
Figure 17. A/V receiver setup
indicating that the TV’s audio
output (
DIGITAL AUDIO
OUT
or
AUDIO OUT LEFT/
RIGHT
) is connected to the
A/V receiver input named
TV
AUDIO
.
6. Press
EXIT
toclosethescreen.
Analog Audio (e.g., analog VCR)
1. Press
INPUT
todisplaytheInputSelectionmenu.
2. HighlighttheiconfortheVCRandpress
ENTER
to
switchtotheVCRinput.
3. Press
MENU
andopentheNetCommandmenu.
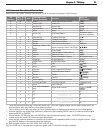
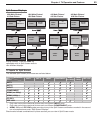
4. HighlightthetextboxunderAV RECEIVER SETUP.
5. ConfirmthatthesettingisatNone,thedefault.
ThissettingtellstheTVtoautomaticallytransferVCR
audiototheA/Vreceiver.TheTVconvertsanalog
audiotodigitalforouputtoadigitalA/Vreceiver.
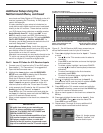
Figure 18. A/V receiver setup
indicating the analog VCR’s
audio output is automatically
sent to the A/V receiver via the
TV’s audio output.
6. Press
EXIT
toclosethescreen.
IMPORTANT
To hear audio that is sent from the TV to the A/V
receiver, you must have:
•
physically connected the TV to the A/V receiver
•
learned the IR codes for the A/V receiver inputs
• chosenthecorrectinputunderNetCommand
AV RECEIVER SETUP
•
selected the A/V receiver in the Input Selection
menu
If you hear no audio from the A/V receiver, open
the NetCommand menu and perform the proce-
dure in Part 3, “Audio Directly from TV” or “Analog
Audio (e.g. analog VCR.”
Note that all audio should be sent through the TV’s
audio outputs unless you have surround sound
audio going from the device directly to the A/V
receiver.