15
RQT6981
Recording
[RAM] [DVD-R]
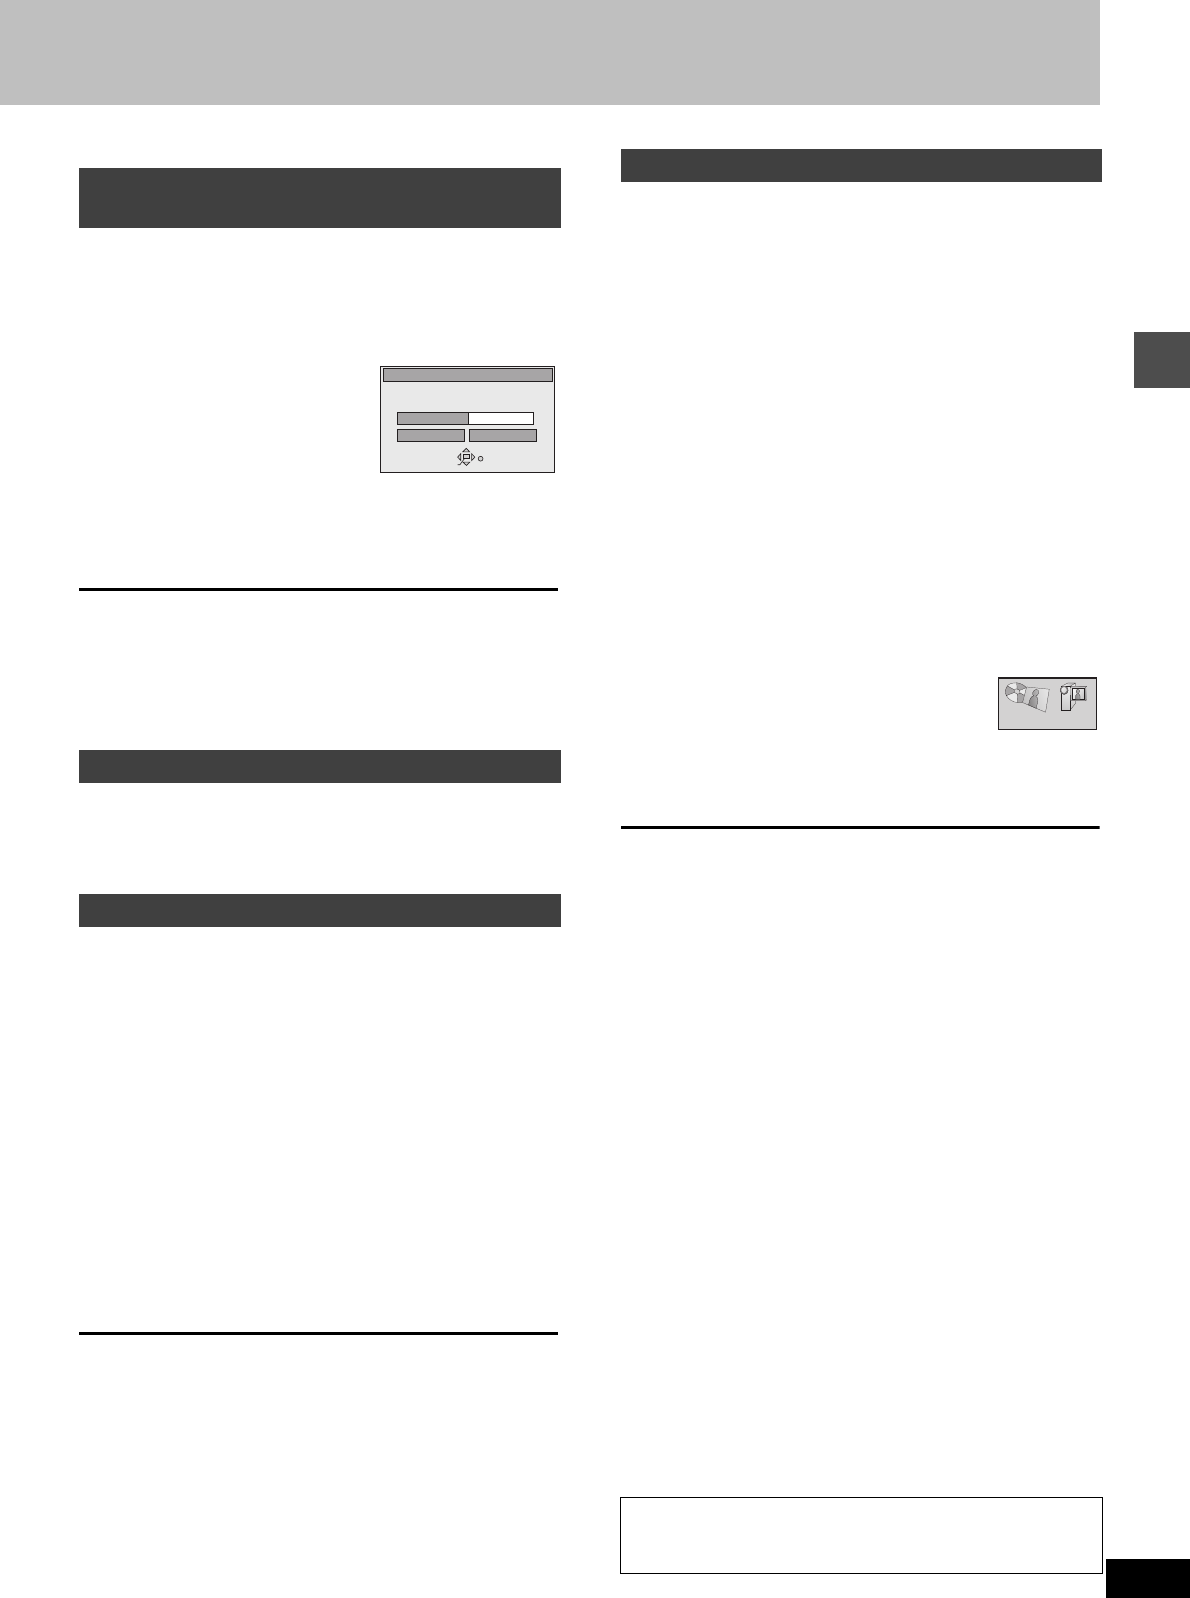
The unit calculates a recording rate that enables the recording to fit
in the time you set (within the remaining time on the disc) and with
the best possible picture quality.
1 While stopped
Press [F Rec].
2 Press [2, 1] to
select “Hour” and
“Min.” and press [3,
4] to set the record-
ing time.
3 Press [3, 4, 2, 1] to select “Start”
and press [ENTER].
Recording starts.
[Note]
It may not be possible to record to the finish of the program if the
remaining time doesn’t allow.
For your reference
≥Press [STATUS] during recording to show the remaining time.
≥Recording time reduces if you repeatedly pause recording.
≥The recording mode becomes FR.
Pictures being recorded are unaffected.
Switch [DVD, TV] to “TV”.
1
Press [TV/VIDEO] to change the television’s input mode to “TV”.
2 Press [W, X, CH] to change channels.
≥You can also select the channel with the numbered buttons.
Preparation
Connect a video cassette recorder to this unit’s input terminals
(➜page 52).
1 While stopped
Press [INPUT SELECT] to select the
input channel for the equipment you
have connected.
Select L1, L2, L3, or DV.
≥You can also select the input channel by pressing [W, X, CH].
2 Press [REC MODE] to select the
recording mode (XP, SP, LP or EP).
3 Start play on the other equipment.
4 Press [¥, REC] at the point you want
to start recording.
Recording starts.
To skip unwanted parts
Press [;] to pause recording. (Press again to restart recording.)
To stop recording
Press [∫].
[Note]
≥When recording using L1, L2 or L3 terminals, only the sound
received at the time of recording will be recorded.
≥The audio recorded through the DV Input terminal is the audio
selected in the “Select Audio CH for DV input” (➜page 45).
≥If flexible recording (➜ above) is used instead of steps 2 and 4,
settings can be made so that recording continues to the end of the
video.
[RAM]
Automatic generation of programs and play lists is possible for using
the “DV AUTO REC” function when connecting DV equipment (e.g.,
Digital Video Camcorders) to the DV input terminal on the front of
the unit with the DV cable. Recordings from DV camcorders can be
recorded to DVD-RAM and DVD-R media, however the “DV AUTO
REC” function cannot be used with DVD-R.
Preparation
1. Turn off the main unit and DV equipment, then connect the
equipment with the unit’s DV input terminals. (➜page 52)
2. Turn on the main unit and DV equipment.
3. Pause play of the DV equipment at the point you want recording
to start.
1 While stopped
Press [REC MODE] to select the
recording mode (XP, SP, LP or EP).
2 Press [FUNCTIONS].
The FUNCTIONS window appears (➜page 42).
3 Press [3, 4, 2, 1] to select “DV
AUTO REC” and then [ENTER].
DV AUTO REC screen appears.
(The DV equipment pauses automatically if it
was playing.)
4 Press [2, 1] to select
“Rec” and then [ENTER].
Recording starts.
When recording finishes
The confirmation screen appears. Press [ENTER] to finish DV auto
recording.
To stop recording
Press [∫].
[Note]
≥Select the type of audio recording from the Audio menu’s “Select
Audio CH for DV input” settings (➜page 45).
≥When “Cannot detect DV connection” is displayed or there is a
recording problem confirm the connections, DV equipment set-
tings and reset the power.
If that does not work follow the instructions for “Recording from a
video cassette recorder” (➜left).
≥It is not possible to carry out Chasing play or Simultaneous rec
and play of the program that are being recorded.
≥The DV equipment name may not be shown correctly.
≥You cannot start recording until the images from the DV equipment
appear on the television.
≥Do not operate the DV equipment during recording, as this will
cause recording to stop.
≥Recording may not be performed as desired if the time codes on
the tape in the DV equipment are not successive.
≥During copying, a marker is automatically assigned to points in the
original recording where recording was stopped or paused.
≥The date and time information on the tape of the DV equipment
will not be recorded.
≥Depending on the equipment, the DV Automatic Recording may
not operate properly.
Recording the best quality pictures in
the remaining time—Flexible Recording
Watching the television while recording
Recording from a video cassette recorder
FLEXIBLE REC
Start Cancel
Record on FR mode
ENTER
SELECT
RETURN
Set up rec time
2 Hour 15 Min.
Maximum rec time
1 Hour 00 Min.
DV Automatic Recording (DV AUTO REC)
Almost all videos and DVD software on sale have been
treated to prevent illegal copying. Any software that has
been so treated cannot be recorded using this unit.
DV AUTO REC


