RQT8009
19
Recording
You can enter up to 16 programs up to a month in advance. (Each
daily or weekly program is counted as one program.)
•When connecting a cable TV box or satellite receiver, select the
channel on the cable TV box or satellite receiver before the
scheduled recording starts.
1 Press [SCHEDULE].
2 Press [e, r] to select “New
Scheduled Recording” and press
[ENTER].
3 Press [q] to move through the items
and change the items with [e, r].
•Press and hold [e, r] to alter On (Start time) and Off (Finish
time) in 30-minute increments.
•You can also set Channel, Date, On (Start time), and Off
(Finish time) with the numbered buttons.
•You can also press [REC MODE] to change the recording
mode.
•DATE
•Title Name
Press [w, q] to select “Title Name” and press [ENTER]
(➔ page 31).
4 Press [ENTER].
Repeat steps 2–4 to schedule other recordings.
5 Press [SCHEDULE].
The message “Turn recorder off for Scheduled Recording.” is
shown on the television.
6 Press [^ DVD POWER].
The unit turns off and “z” lights on the unit’s display to
indicate scheduled recording standby has been activated.
•Even if the unit is in scheduled recording standby, you can play a
disc. Without pressing [^ DVD POWER], just press [q] (PLAY) or
[DIRECT NAVIGATOR]. Scheduled recording works even during
play.
•Even when the unit is turned off, you can display the schedule list
by pressing [SCHEDULE].
Press [SCHEDULE].
■ To change a program
Press [e, r] to select the program and press [ENTER].
(➔ left, step 3)
■ To delete a program
Press [e, r] to select the program and press [ CANCEL] or
[ADD/DLT].
■ To exit the schedule list
Press [SCHEDULE].
The message “Turn recorder off for Scheduled Recording.” is shown
on the television.
■ To put the unit on scheduled recording standby
Press [^ DVD POWER].
The unit turns off and “z” lights on the unit’s display to indicate
scheduled recording standby has been activated.
•
Programs that failed to record are displayed gray. They are
automatically deleted from the schedule list at 4 a.m. two days later.
•During scheduled recording, you can change the end time as long
as the recording mode is not “FR”.
Manually programming scheduled
recordings
■ To release the unit from recording standby
Press [^ DVD POWER].
The unit turns on and “z” goes out.
•Be sure to press [^ DVD POWER] to return the unit to standby
mode before the scheduled recording time. Scheduled recording
will work only if “z” is displayed.
■ To cancel recording when recording has
already begun
Press [g], then [ENTER] within 5 seconds.
•You can also press and hold [g] on the main unit for more than 3
seconds to stop recording.
RAM
-RW(V) +R-R
SCHEDULE
LIST
Remaining Recording Time 1:58 SP
3/26 TUE 12:53 PM
SP5:10 PM4:20 PM39 4 / 1 MON01
ModeOffOnNo Channel Date
OK
Check
New Scheduled Recording
SCHEDULED
RECORDING
Remaining Recording Time 1:58 SP
3/26 TUE 12:53 PM
5:10 PM4:20 PM4 / 1 MON SP39
Title Name
ModeOffOnChannel Date
Date: Current date up to one month later minus
one day
Daily timer: Sun-Sat
→ Mon-Sat → Mon-Fri
Weekly timer: Weekly Sun
→ --- → Weekly Sat
SCHEDULE
LIST
Remaining Recording Time 1:58 SP
3/26 TUE 12:53 PM
ModeOffOnNo Channel Date
SP3:00 PM2:30 PM64 ABC 3/ 26 TUE02
OK
Check
OK
SP2:00 PM1:00 PM64 ABC 3/ 26 TUE01
New Scheduled Recording
Check to make
sure “OK” is
displayed.
RAM
Note
•“z” flashes when the unit cannot go to scheduled recording
standby (e.g., a recordable disc is not in the disc tray).
•When you program successive scheduled recordings to start
immediately one after the other, the unit cannot record the part at
the beginning of the later programs (a few seconds when
recording with DVD-RAM and approximately 30 seconds when
recording with DVD-R, DVD-RW (DVD-Video format) or +R).
•If you set DST (Daylight Saving Time) to On when manually
setting the clock (➔ page 34), scheduled recording may not work
when summer switches to winter and vice versa.
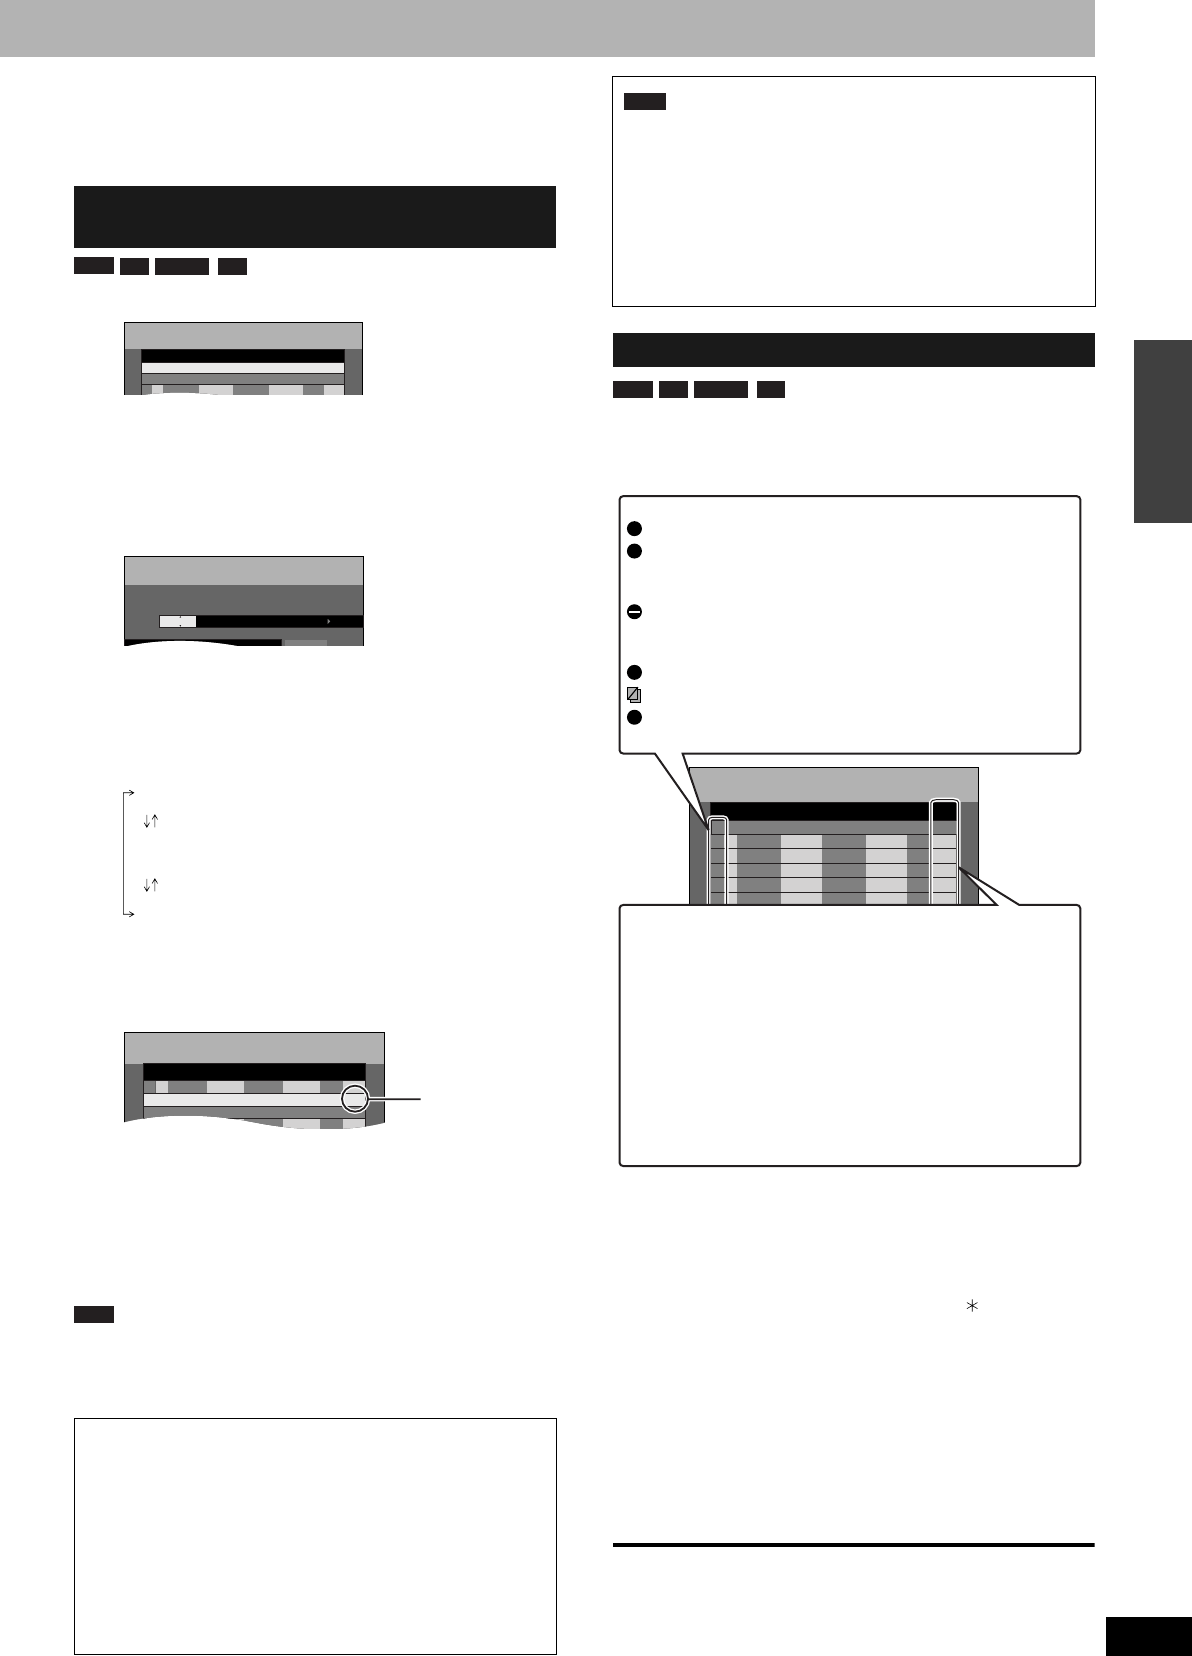
Check, change or delete a program
RAM
-RW(V) +R-R
No.
SCHEDULE
LIST
Remaining Recording Time 1:58 SP
3/26 TUE 12:53 PM
--
0 9
Cancel
Press ENTER to store new schedule.
ModeOffOnNo Channel Date
New Scheduled Programing
Check
Icons
This program is currently recording.
The times overlap those in another program. Recording of
the program with the later start time starts when the earlier
program finishes recording.
You stopped a weekly or daily scheduled recording. The icon
disappears the next time the scheduled program starts
recording.
The disc was full so the program failed to record.
The material was copy-protected so it was not recorded.
The program did not complete recording because the disc is
dirty or for some other reason.
W
F
X
Message displayed in the Check line
Displayed if the recording can fit in the remaining
space.
For recordings made daily or weekly, the display
will show until when recordings can be made (up to
a maximum of one month from the present time)
based on the time remaining on the disc.
It may not be possible to record because:
•the disc is write-protected
•there is no more space left
•the number of possible titles has reached its
maximum.
OK:
→ (Date):
! :
DMR-ES10-P_new.fm Page 19 Saturday, February 12, 2005 2:31 PM


