


30 C2673M-D (8/10)
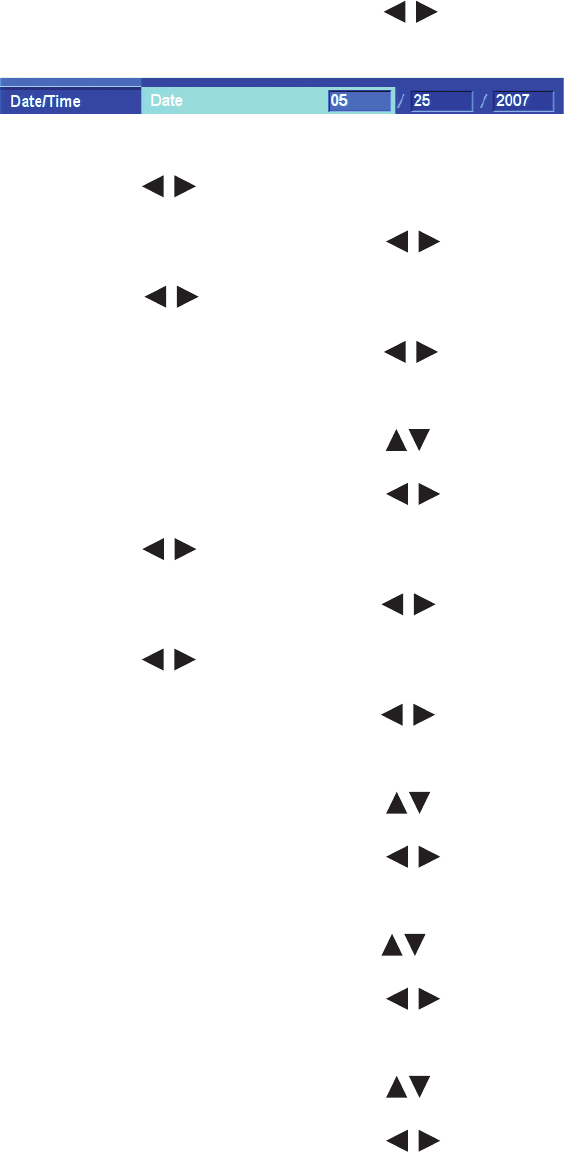
3. Select the date.
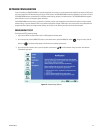
a. On the front panel or remote control, press ENTER twice. Using the mouse, click the month settings box. The month settings box
changes color.
b. On the front panel or remote control, press the left/right arrow buttons to display the desired month, and then press ENTER.
Using the mouse, click the settings box.
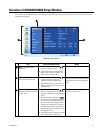
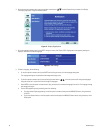
Figure 21. Date Setting Entry Box
c. Press the left/right arrow buttons to highlight the day settings box and press ENTER. Using the mouse, click the settings box.
The day settings box changes color.
d. On the front panel or remote control, press the left/right arrow buttons to display the desired date, and then press ENTER.
Using the mouse, click the settings box.
e. Press the left/right arrow buttons to highlight the year settings box press ENTER. Using the mouse, click the year settings
box. The day settings box changes color.
f. On the front panel or remote control, press the left/right arrow buttons to display the year, and then press ENTER. Using the
mouse, click the settings box.
4. Select the time.
a. On the front panel or remote control, press the up/down arrow buttons to highlight the Time property, and then press ENTER.
Using the mouse, click the hour settings box. The settings box changes color.
b. On the front panel or remote control, press the left/right arrow buttons to display the desired hour, and then press ENTER.
Using the mouse, click the settings box.
c. Press the left/right arrow buttons to highlight the minutes settings box and press ENTER. Using the mouse, click the minutes
settings box. The minutes settings box changes color.
d. On the front panel or remote control, press the left/right arrow buttons to display the desired minute, and then press ENTER.
Using the mouse, click the settings box.
e. Press the left/right arrow buttons to highlight the seconds settings box and press ENTER. Using the mouse, click the seconds
settings box. The seconds settings box changes color.
f. On the front panel or remote control, press the left/right arrow buttons to display the desired second, and then press ENTER.
Using the mouse, click the settings box.
5. Set the date format.
a. On the front panel or remote control, press the up/down arrow buttons to highlight the Date Format property, and then press
ENTER. Using the mouse, click the Date Format settings box. The settings box changes color.
b. On the front panel or remote control, press the left/right arrow buttons to display the date format, and then press ENTER.
Using the mouse, click the settings box.
6. Set the time format.
a. On the front panel or remote control, press the up/down arrow buttons to highlight Time Format, and then press ENTER. Using
the mouse, click the Time Format settings box. The settings box changes color.
b. On the front panel or remote control, press the left/right arrow buttons to display the time format, and then press ENTER.
Using the mouse, click the settings box.
7. Set the time zone.
a. On the front panel or remote control, press the up/down arrow buttons to highlight Time Zone and then press ENTER. Using
the mouse, click the Time Zone settings box. The settings box changes color.
b. On the front panel or remote control, press the left/right arrow buttons to display the time zone, and then press ENTER.
Using the mouse, click the settings box.
8. If you want to configure DST, proceed with the following steps. If you do not want to configure DST, go to step 5 of Configuring Daylight
Saving.