English
16
TIPS: Before making or changing any connections, make sure that all the devices are disconnected
from the power outlet.
Step 1: Basic Recorder Connections (continued)
Connecting the video cables
This connection enables you to view the
disc and VHS tape playback from the
recorder. You only need to choose one
of the options below to make your video
connection.
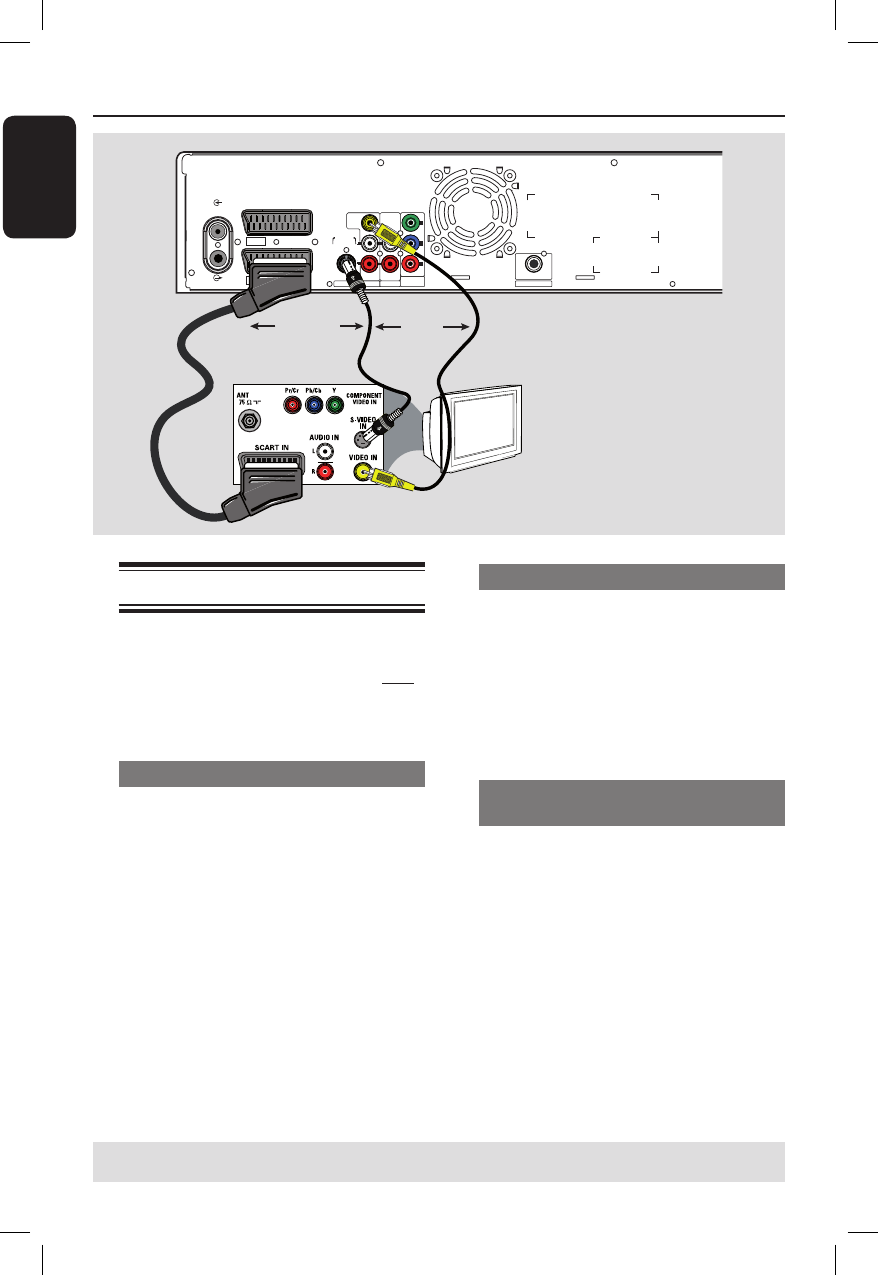
Option 1: Using a SCART cable
Connect a SCART cable (not supplied)
from the EXT1 TO TV-I/O socket on
the recorder to the corresponding
SCART input socket on the TV.
Helpful Hints:
– If your TV has several SCART sockets,
select the SCART socket that is suitable for
both video output and video input.
– If your TV displays a selection for the
SCART socket, select ‘VCR’ as the source for
the SCART socket.
– The EXT2 AUX-I/O socket is intended
only for additional devices.
Option 2: Using an S-Video cable
Connect an S-video cable (not supplied)
from the S-VIDEO (Y/C) socket on the
recorder to the S-Video input socket (or
labelled as Y/C or S-VHS) on the TV.
Audio connection is required in order
to hear the sound, see next section
“Connecting the audio cables”.
Option 3: Using a Video (CVBS)
cable
Connect a composite video cable (yellow
end - not supplied) from the VIDEO
(CVBS) OUT socket on the recorder
to the video input socket (or labelled as
A/V In, Video In, Composite or
Baseband) on the TV.
Audio connection is required in order
to hear the sound, see next section
“Connecting the audio cables”.
3139 241 26501
TO TV - I
/
O
EXT1
AUX - I
/
O
EXT2
S-VIDEO
(Y/C)
AUDIO
R
L
AUDIO / VIDEO OUT AUDIO OUT
COMPONENT
VIDEO OUT
VIDEO
(
CVBS
)
ANTENNA
TV
COAXIAL
DIGITAL AUDIO OUT
P
R
P
B
Y
TV
Option 1
Option 2
Option 3
OR OR
DVDR3510V_eng_26244.indd 16DVDR3510V_eng_26244.indd 16 2007-08-01 1:46:16 PM2007-08-01 1:46:16 PM


