


11
Lining up recordings (assemble cut)
When you add a further recording to a cassette,which already
has a recording on it,a short blank (flicker) can appear between
the old and the new recording or the picture itself can flicker.
To help reduce these from occurring,proceed as follows:
1 Find the tape position of the old recording where you want to
insert the new recording.
2 Look at the last minute of the old recording (playback).
3 Press PAUSE
k
at the tape position where the new recording
is to go and press REC I.
4 Now start recording as usual by pressing REC I on the
remote control.
5 Stop recording with STOP C.
Copying a video tape
You can make copies of video cassettes made by friends or relatives
for your own enjoyment.
WARNING:
Unauthorized recordings of copyrighted video
cassettes may be an infringement of copyright laws.
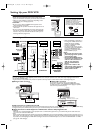
Connect the recording DVD/ VCR (this unit/Recording Unit)
and the playback video recorder (another video recorder/
Playing Unit) by using VCR AUDIO IN/ VIDEO IN jacks on the
back or front AUDIO/ VIDEO IN jacks.
1 Insert a pre-recorded video cassette into the playing unit.
2 Insert a blank video cassette, or one you want to record over,
into the cassette compartment of this unit.
3 Press the numerical key pads “001” or “002”.
• 001 :If you use VCR AUDIO IN/ VIDEO IN jacks on the back.
• 002 :If you use front AUDIO/ VIDEO IN jacks.
4 Press REC MODE to select SP or LP at this unit.
5 Press REC I on the front panel of this unit.
6 Begin playback of the tape at the playing unit.
7 To stop recording,press STOP C on this unit,then stop
playback of the tape at the playing unit.
•For the best results during dubbing,use the DVD/ VCR’s front
panel controls whenever possible.The remote control might
affect the playback video recorder’s operation.
• If video or colour fades in and out,you may be copying a copy
guarded video tape.
VCR Manual Recording
Programming a Recording (TIMER)
General information
Use a TIMER programming to automatically start and stop a
recording at a later time or date.The DVD/ VCR will switch to
the right programme number and begin recording at the
correct time.With this unit, you can pre-programme up to
eight recordings within a period of one year.To make a
programmed recording,your DVD/ VCR needs to know:
* the date you want to make the recording
* the programme number of the TV channel
* the start and stop time of the recording
This information is saved in a TIMER block.
Programming a recording
• Use the remote control for this procedure.
• Insert a cassette tape with its erase prevention tab in place.
(If necessary,rewind or fast forward the tape to the point at
which you want to begin recording.)
1 Press VCR, then DISC/VCR MENU.
2 Press K/L to select “TIMER”,then press B.
Notes:
If you have not set the clock yet,“CLOCK”setting menu
appears.If so, follow the steps outlined in the “Setting the
Clock”section.Then, set the timer.
– When you press B after pressing K/L during steps 3 to
10,the input mode will move to the next step.
– If you do not press B within 5 seconds of setting an
item,the input mode will move to the next step.
– Press s to go back one step from the current setting
during steps 4 to 9.If s is pressed when the TIMER
NUMBER is flashing,the entire timer block will be
erased.
3 Programme number flashes.Press K/L repeatedly until the
desired timer block number appears.Then, press B.
4 Select once,daily,everyday,or
weekly recording.
For once-only recording : Press
K/L repeatedly until the relevant
month appears.Then, press B.
For daily recording :To r ecord a
TV programme at the same time
on the same channel from Monday
through Friday.While the month
digit is flashing,press K/L repeatedly to select “MO-FR”.Then,
press B.
For everyday recording :To r ecord a TV programme at the
same time on the same channel every day.While the month
digit is flashing,press K/L repeatedly to select “MO-SU”.Then,
press B.
For weekly recording :To r ecord a TV programme at the
same time on the same channel every week.While the month
digit is flashing,press K/L repeatedly to select “W-MO”
(Example:every Monday).Then,press B.
5For once-only recording only : Press K/L repeatedly until
your desired date appears.Then, press B.
6 Press K/L repeatedly until the relevant start hour appears.
Next,enter the minute digit.Then,press B.
7 Press K/L repeatedly until the relevant end hour appears.
Next,enter the minute digit.Then,press B.
8 Press K/L repeatedly until the relevant channel number
appears.Then, press B.
9 Press K/L repeatedly until your the desired tape speed
appears.You must select the recording speed to complete the
timer programming.
10 Press B.
Timer block 1 is now completed.
To set another timer block, repeat steps 3 to 10.
11 Press DISC/VCR MENU to remove the menu.
12 Press TIMERSET to activate the timer.
• If the DVD component is on,the unit will switch to the DVD
mode when you press TIMER SET.
• If the DVD component is not on,the unit stays in the VCR
mode and ‘ ’ will appear on the front panel display.
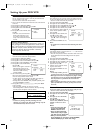
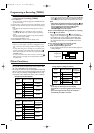
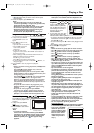
B
TIMER NUMBER
1
DATE – – / – –
START – – :– –
END – – :– –
CHANNEL – –
SPEED – –
Recording from DVD to VCR
Follow the steps below to copy a DVD or video disc to a
videotape.This will be possible only if the DVD is not copy
protected.
1 Put a videotape in the cassette compartment. Make sure the
tape’s record tab is intact and the tape is long enough to record
the disc.
2 Put the DVD you want to copy in the disc tray.
3 Press VCR.
4 Point the remote control at the DVD/ VCR.Press numerical
key pads “003”.“DISC” will appear on the TV screen.
5 Select the recording speed.
Details are at “Selecting the recording speed (SP or LP)”.
6 Press REC I to start recording.REC will appear on the display
panel.
7 Press DVD. Press PLAY B to play the disc.
8 To pause the recording,press VCR, then press PAUSE
k
once.
REC will flash.To resume recording,press REC I or press
PAUSE
k
again.REC will reappear.
9 To stop recording,press VCR, then press STOP C.
E8B23AD_EN 5/16/06 12:03 PM Page 11