


21
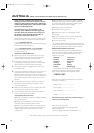
Problem
No power
No picture
Distorted picture
Completely distorted picture or
black/white picture with DVD
No sound or distorted sound
No audio at digital output
No sound and picture
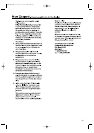
Picture freezes momentarily during
playback
Disc cannot be played
No return to start-up screen when disc is
removed
The unit does not respond to the
remote control
Buttons do not work or the unit stops
responding
The unit does not respond to some operating
commands during playback
The unit cannot read CDs/DVDs
The unit switches from DVD mode to VCR
mode after 30 minutes of no activity.
The VCR do not record a TV program
The unit do not perform a timer
The motor (cylinder) rotates even when tape
playback is stopped
You cannot insert a tape
You cannot remove a tape
The unit ejects the tape when you press REC I
or TIMER SET for a timer recording.
If you are unable to remedy a problem by following these hints,consult your dealer or service centre (HOTLINE).
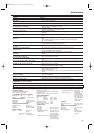
Troubleshooting
PLAYBACK SYSTEM
DVD Video, DVD+R/RW,DVD-R/RW,
Video CD, Audio CD,CD-R/RW
TV STANDARD (PAL/50Hz) (NTSC/60Hz)
Number of lines 625 525
Playback Multistandard (PAL/NTSC)
VIDEO PERFORMANCE
Video output 1 Vpp into 75 ohm
RGB output 0.7 Vpp into 75 ohm
Video Shift Left/Right
VIDEO CASSETTE RECORDER
Audio/Video heads 6 heads Hi-Fi
Antenna VHF/UHF - 75 ohm
VHF output 75 ohm unbalanced
AUDIO FORMAT
Digital MPEG Compressed
Digital
Dolby Digital 16,20,24 bits
PCM fs,44.1,48,96 kHz
Analogue Stereo Sound
Dolby Surround-compatible downmix from Dolby Digital
multi-channel sound
3D Sound for virtual multi channel sound on 2 speakers
AUDIO PERFORMANCE
DA Converter 24 bits
DVD fs 96 kHz 20 Hz - 44 kHz
fs 48 kHz 20 Hz - 22 kHz
CD fs 44.1 kHz 20 Hz - 20 kHz
Signal-Noise (1 kHz) 70 dB
Dynamic Range (1 kHz) 90 dB
Distortion and Noise (1 kHz) 0.02%
CONNECTIONS
Front panel:
Video input RCA connector x 1
Audio input RCA connector x 2
Rear panel:
Audio/Video output/input RCA connector x 6
S-Video output Mini DIN 4-pin Jack
(75 ohm) Analog
audio output (DVD)
Analogue audio output (DVD)
RCA connector x 2
(one left channel,
one right channel)
2 Vrms (47 kilo-ohm)
Coaxial digital audio output One pin Jack,
500mVpp (75 ohm)
Component output Y output level:
1 Vp-p (75 Ω/ohms)
P
B/CB output level:
0.7 Vp-p (75 Ω/ohms)
P
R/CR output level:
0.7 Vp-p (75 Ω/ohms)
Output connector:
Pin Jack,1 set
CABINET
Dimensions (w x h x d) 435 x 94 x 233 mm
Weight
Approximately 3.1 kg
POWER SUPPLY (UNIVERSAL)
Power inlet 230 ~ 240 V,50 Hz
Power usage 21 W
Power usage standby 9.2 W
(standby :5.0 W)
(
When Clock Display
set to OFF.
)
Specifications
Specifications subject to change without prior notice
Information
Solution
– Check if the AC power cord is properly connected.
– Check if the TV is switched on.
– Check the video connection.
– Sometimes a small amount of picture distortion may appear.This is not a malfunction.
– Connect the unit directly to the TV.
– Make sure the disc is compatible with the unit.
– Adjust the volume.
– Check that the speakers are connected correctly.
– Check the digital connections.
– Check if the audio format of the selected audio language matches your receiver
capabilities.
– Check that the RF or AV cables are connected to the correct device.(Refer to “Connecting to
a TV”.)
– Check the disc for fingerprints/scratches and clean with a soft cloth wiping from centre
edge.
– This may happen when you use the disc recorded in the non-seamless manner.
This is not a malfunction.
– Ensure the disc label is facing up.
– Check if the disc is defective by trying another disc.
– Reset the unit by switching the unit off,then on again.
– Aim the remote control directly at the sensor on the front of the unit.
– Reduce the distance to the unit.
– Replace the batteries in the remote control.
– Re-insert the batteries with their polarities (+/– signs) as indicated.
– To completely reset the unit,unplug the AC cord from the AC outlet for 5-10
seconds.
– Operations may not be permitted by the disc.
Refer to the instructions of the disc.
– Use a commonly available cleaning CD/DVD to clean the lens before sending the unit for
repair.
–
When Auto Power OFF is set to ON,the unit switches itself from DVD mode to VCR mode if disc playback
stops for more than 30 minutes and you press no buttons on the remote or the unit.
– Make sure the tape has a record tab.
– Make sure the unit is in VCR position.
– Check the TV and the unit’s channel are similar.
– Make sure the recording start and stop times are set correctly.
– Make sure the tape has a record tab.
– Make sure the clock is set.
– The unit may not perform or continue a timer recording if the power fails for more than 1
minute.
– To enable quick play mechanism,the cylinder will rotate for about five minutes.
This is not a malfunction.
– Insert a tape,window side up with the record tab facing you.
– Gently push on the center of the tape when putting into the unit.
– Make sure the power plug is completely connected to a power outlet.
– Make sure the tape has a record tab.
E8B23AD_EN 5/16/06 12:03 PM Page 21