


! Remember that using the wide mode feature
of this system for commercial or public view-
ing purposes may constitute an infringement
on the authors rights protected by the Copy-
right Law.
! Video will appear grainy when viewed in
CINEMA or ZOOM mode.
! The navigation map and the back-up camera
picture is always FULL.
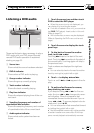
Adjusting the picture
adjustment
You can adjust BRIGHT (brightness),
CONTRAST (contrast), COLOR (color) and
HUE (hue) for each source and back-up cam-
era.
! The adjustments of BRIGHT and
CONTRAST are stored separately for light
ambient (daytime) and dark ambient (night-
time). A sun
or moon is displayed to
the left of BRIGHT and CONTRAST, respec-
tively, as the ambient light sensor deter-
mines brightness or darkness.
! You cannot adjust HUE for PAL video.
! You cannot adjust COLOR and HUE for the
audio source.
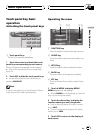
1 Press MENU on the head unit and hold
to display PICTURE ADJUST.
Press MENU until PICTURE ADJUST appears
in the display.
# You cannot use MENU on the remote control.
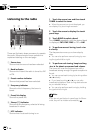
2 Touch any of the following touch panel
keys to select the function to be adjusted.
The adjustment function names are displayed
and adjustable ones are highlighted.
! BRIGHT Adjust the black intensity
! CONTRAST Adjust the contrast
! COLOR Adjust the color saturation
! HUE Adjust the tone of color (red is em-
phasized or green is emphasized)
! DIMMER Adjust the brightness of display
! B.Camera Switch to the picture adjust-
ment display for the back-up camera
! SOURCE Return to the picture adjustment
display for each source
# You can adjust the picture adjustment for
back-up camera only when BACK UP CAMERA is
turned on. (Refer to Setting for back-up camera on
page 91.)
# SOURCE will appear in the display instead of
B.Camera when you touch B.Camera.
# With some back-up camera, the picture ad-
justment may not be able to use.
3 Touch c or d to adjust the selected
item.
Each time you touch c or d increases or de-
creases the level of selected item. +24 24 is
displayed as the level is increased or de-
creased.
4 Touch ESC to hide the touch panel keys.
Adjusting the dimmer
The adjustment of DIMMER is stored sepa-
rately for each ambient light; daytime, evening
and nighttime. The brightness of LCD screen
will be adjusted optimum level automatically
in accordance with the ambient light based on
the setting values.
1 Press MENU on the head unit and hold
to display PICTURE ADJUST.
Press MENU until PICTURE ADJUST appears
in the display.
2 Touch DIMMER.
The ambient light level used as the standard
for adjusting DIMMER appears above the level
bar.
! Orange sun Adjust the brightness for
bright ambient light (daytime)
Basic Operations
En
26
Section
04