


13
Be sure to follow all of these steps. If you
do not do so, your set-top will not be
authorized to receive digital services.
WARNING:
Electric shock hazard! Unplug all
electronic devices before connecting
or disconnecting any device cables.
1. Unplug all electronic devices before
connecting the set-top.
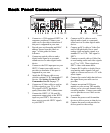
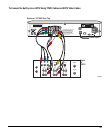
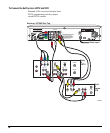
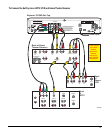
2. Connect the set-top to your HDTV,
VCR, and other devices as shown in the
diagrams on pages 15 through 17.
These diagrams do not cover every
possible wiring combination.
Important:
• These cables are color-coded. Make
sure that you connect them to the
proper ports on each device.
• Make note of the video input on the
set-top where you connected the
YPbPr cables. (For example,
Component 1.) You will need to
know this port when you use the
Setup Wizard, later in this guide.
3. Plug the set-top and the HDTV into an
AC power source, but do not turn on
your set-top or HDTV yet.
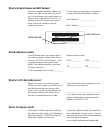
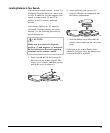
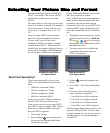
To Connect The Set-Top
Now that you’ve unpacked the Explorer
3270HD Set-Top from its carton, you’re
ready to connect it to your HDTV and other
electronic devices. The diagrams on the
following pages show examples of common
ways to connect your set-top to your
HDTV, VCR, and home theater receiver.
Connecting the ExplorConnecting the Explor
Connecting the ExplorConnecting the Explor
Connecting the Explor
er 3270HD Set-Ter 3270HD Set-T
er 3270HD Set-Ter 3270HD Set-T
er 3270HD Set-T
opop
opop
op
However, these diagrams do not show
every possible combination of devices.
Please consult the user’s guides that came
with your other devices for further
information.
Some of the cables shown in the diagrams
may not be included with your Explorer
Set-Top.
4. Contact your cable service provider and
ask them to turn on cable services for
your set-top. Be prepared to give them
the serial number from the back panel
of your set-top. You should have
written this number down on page 7 of
this guide.
Note: If you do not contact your cable
service provider, your set-top will not
be able to receive some or all of the
available services.
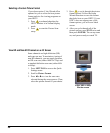
5. Wait for the front of your set-top to
display one of the following:
• Current time
• Four dashes (- - - -)
Important: It may take several minutes
for the set-top to receive the latest
software, programming, and service
information. When the front panel
displays the time or four dashes, the
update is complete.
6. After the update is complete, press
POWER to turn on your set-top.
7. Turn on the power to your HDTV.
8. Your next step is to use the Setup
Wizard to select your picture size and
format. Go to Selecting Your Picture
Size and Format on page 18.