


PREPARATION
15
GB
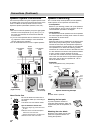
VIDEO Operation Setup
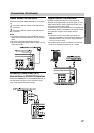
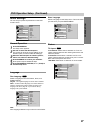
Video channel set
Video channel (RF output channel) is the channel on
which your TV receives picture and sound signals from
the DVD/VCR Receiver through the RF cable.
If you have used a
SCART lead you will not have to tune
your TV, simply select the AV channel. The AV channel
is already pre-tuned for optimum video playback on
your TV.
Perform the following steps only if interference appears
in the TV picture after you have moved to a different
area or a new station has started broadcasting in your
area, or if you change the connection from RF connec-
tion to AV connection, or vise versa.
11
Turn on DVD/VCR Receiver and TV.
2
Set the vacant position 52 on your TV.
3
Press @ / 1 on the remote control to enter the
standby mode.
44
Press and hold CH/PRESET + or – on the
DVD/VCR Receiver for more than
4 seconds.
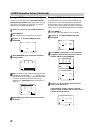
RF 52 will appear in the DVD/VCR Receiver dis-
play.
The following picture will be displayed on the TV
screen.
If the picture is snowy, move to step 5.
If the picture is clean, press @ / 1 on the DVD/VCR
Receiver to store the RF channel. The video chan-
nel is now set.
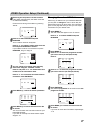
55
Press CH/PRESET + or – on the DVD/VCR
Receiver to set the video channel to a vacant
position between 22 and 68 which is not occu-
pied by any local station in your area.
You can also set it to “OFF” if there is any inter-
ference when your TV is connected to the
DVD/VCR Receiver.
Note
The RF channel will not change until step 6 has been
executed.
66
Press @ / 1 to store the new RF channel into the
DVD/VCR Receiver.
7
Press @ / 1 to bring the DVD/VCR Receiver from
standby to on and follow your TV manufacturers
tuning instruction manual to tune a new channel
to the DVD/VCR Receiver.
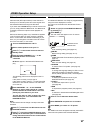
How to use the main menu
This DVD/VCR Receiver can easily be programmed by
using the menus displayed on screen.
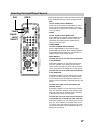
The menus are controlled from the Remote Control
Handset.
11
Switch on your TV set and DVD/VCR Receiver
by pressing @ / 1.
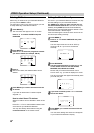
22
Press MENU (i).
The main menu will appear on the TV screen.
Indicates current
selected icon.
REC
Timer recording setting (see pages 27).
PR SET
Manual tuning setting (see page 16-17).
ACMS
ACMS (Automatic Channel Memory System) (see
page 16).
TIME DATE
Date and clock setting (see page 18).
O SYSTEM
To set the Colour TV System (see page 19).
O ABC OSD
To change the language setting for OSD. You can
select the language from English, German,
French, Italian, Spanish, Dutch, and Portuguese.
O fOSD ON/OFF
To display the operational mode of your
DVD/VCR Receiver (see page 30).
O 16:9/4:3
To select the aspect ratio of your TV
(see page 28).
O OPR
To improve the playback picture (see page 24).
O NIC
To activate or deactivate the NICAM digital sound
(see page 28).
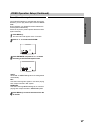
33
Press B or b to select the desired menu.
44
Press ENTER/OK and press V or v to select.
55
Press MENU (i) to return to a TV picture.
Note
The VIDEO main menu will appear incorrectly when NTSC
video source is inputted to the DVD/VCR Receiver.
i
RF CHANNEL 52
SET
P
R
REC
REC
OK
i
SYS-
TEM
P
SET
R
Pr-12
ACMS
OSD
ON
OFF
OSD
f
12
TIME
DATE
16:9
4:3
OPR
NIC
AB
C
OSD