61
Timer Recording
1 With the GUIDE Plus+ system turned
off, press SCHEDULE.
The SCHEDULE list appears.
2 Select the timer setting you want to
cancel using M/m.
3 Press the red button (“Delete”).
To close the SCHEDULE list
Press TV GUIDE or SCHEDULE.
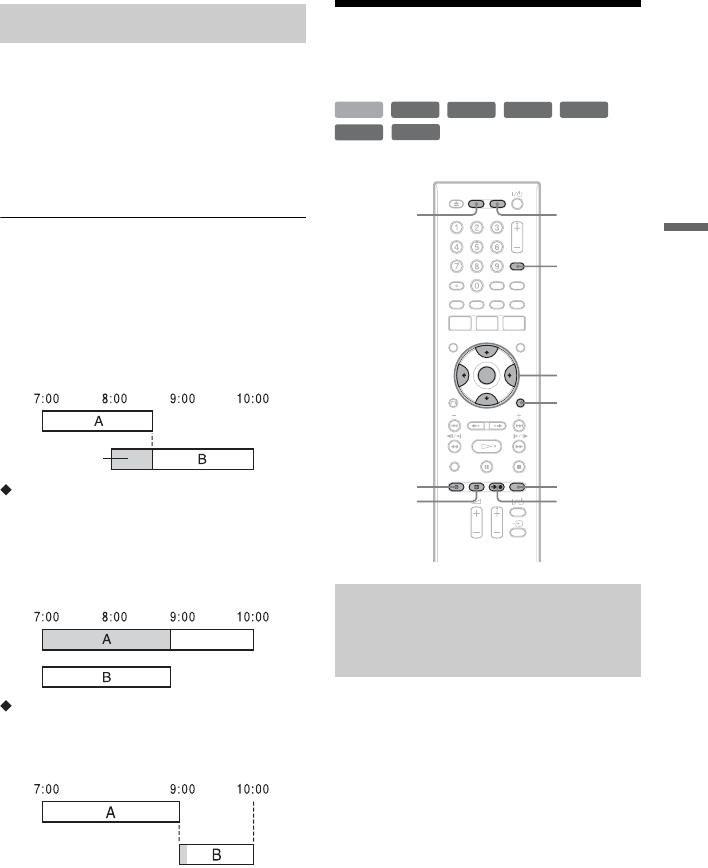
When the timer settings overlap
The programme that starts first has priority
and the second programme starts recording
only after the first programme has finished.
When the recordings start at the same
time
The programme that is set last has priority. In
this example, timer setting B is set after A, so
the first part of timer setting A will not be
recorded.
When the end time of one recording and
the start time of another are the same
After finishing the previous recording, the
other recording may be delayed.
b Note
When “PDC/VPS” is set to “On” for one or more
timer recordings, the start times may change in the
event of a broadcast delay or early start.
Recording From
Connected Equipment
You can set the recorder to automatically
record programmes from connected
equipment that has a timer function (such as
a satellite tuner). Connect the equipment to
the LINE 3/DECODER jack of the recorder
(page 27).
When the connected equipment turns on, the
recorder starts recording a programme from
the LINE 3/DECODER jack.
1 Before recording, select HDD or DVD.
If you select DVD, insert a recordable
DVD (see “1. Inserting a Disc” on
page 32).
2 Set “Synchro Rec” to “Record to
HDD” or “Record to DVD” in the
“Recording” setup (page 103).
Cancelling timer settings
will be cut off
Recording from connected
equipment with a timer
(Synchro Rec)
+
RW
-
RWVR
-
RW
Video
-
RVR
+
R
HDD
-
R
Video
</M/m/,,
ENTER
INPUT
SELECT
OPTIONS
REC MODE
z REC
x REC
STOP
c z
SYNCHRO
REC
DVDHDD
,continued


