82
3 Press TIMER.
• If the Timer programming (VIDEO Plus+)
menu appears, press < to switch the
display to “Standard.”
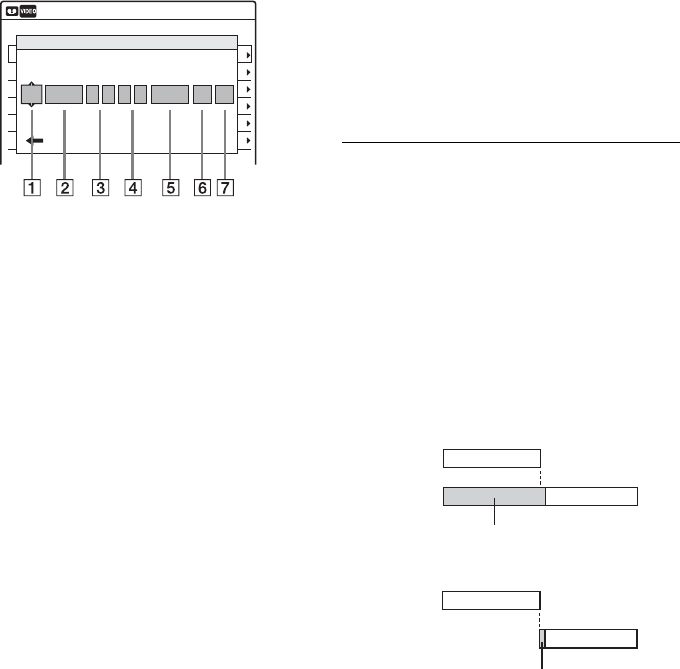
4 Select an item using </, and adjust
using M/m.
A “Media”: Select “VCR.”
B “Date”: Sets the date using M.
To record the same programme every day
or the same day every week, press m.
The item changes as follows:
Today y Sun~Sat (Sunday to Saturday)
y Mon~Sat (Monday to Saturday) y
Mon~Fri (Monday to Friday) y Sun
(every Sunday) y Mon (every Monday)
y … y Sat (every Saturday) y
1 month later y … y Today
C “Start”: Sets the start time.
D “End”: Sets the stop time.
E “Prog.”: Selects the programme
position or input source.
F “Mode”: Selects the recording mode;
“SP” or “LP.” To use the Rec Mode
Adjust function (page 82), select
“AUTO.”
G “PDC/VPS”: Sets the PDC/VPS
function. See “About the PDC/VPS
function” (page 83).
• If you make a mistake, select the item and
change the setting.
5 Press ENTER.
The Timer List menu (page 86) appears.
If timer settings overlap, a message appears.
To change or cancel a timer recording, select
“Edit” from the Timer List (page 86).
6 Press SYSTEM MENU to turn off the menu.
7 Press )/1 (on/standby) to turn off the
recorder.
The c indicator lights up in the front panel
display, and the recorder is ready to start
recording.
If the c indicator flashes in the front panel
display, check that a tape with its safety tab in
place is inserted.
To stop recording
Press x twice.
If timer settings overlap
The programme that starts first has priority and the
second programme starts recording only after the
first programme has finished. If the programmes
start at the same time, the programme listed first in
the menu has priority. If the end time of one
setting and the start time of another timer setting is
the same, the beginning of the programme that
starts later will be cut.
To change or cancel timer recording
See “Changing or Cancelling VCR Timer Settings
(Timer List)” on page 86.
To use the Rec Mode Adjust function
If the remaining tape length is too short for the
current recording, the VCR automatically changes
the recording mode from SP to LP.
When setting the timer, select “AUTO” in
“Mode,” and check that the “Tape Length” setting
is correct for the inserted tape (“VCR Function” -
“Tape Length” in the “Features” setup
(page 108)).
Note that some noise will appear on the image
when the recording mode is changed. If you want
to keep the recording mode, select “SP” or “LP”
for “Mode.”
01 DVD 04/15 09:00 10:00 PR 1
--- --/-- --:-- --:-- ---- ---04
--- --/-- --:-- --:-- ---- ---05
--- --/-- --:-- --:-- ---- ---06
03 --- --/-- --:-- --:-- ---- ---
02 DVD 04/30 09:15 09:45 PR 2
No Rec To Date Start End Source Mode
---
---
---
---
SP
SP
Off
Off
Edit
Timer – Standard
10:10
PDC
/VPS
No.01
:
VCR
:
Today 10 10 10 15 Prog. 1 SP
Media
VIDEO Plus+
Date Start Prog. Mode
Off
End
PDC
/VPS
7:00 8:00 9:00 10:00
7:00 8:00 9:00 10:00
Programme 1
Programme 2
Programme 1
will be cut off
will be cut off
Programme 2


