


105
Copyright © 2005 TOSHIBA CORPORATION. All rights reserved.
(E) 56/62/72MX195
Connecting your TV to the Network
11
Setting up the Network connection
Setting up the Network address
The following explains how to manually input settings such as
the IP address, etc.
Note:
•You must first set up THINC™ to connect to a home network,
see page 30.
•This feature is only for remotely scheduling recordings and
reminders. You will not be able to access the Internet through
the TV.
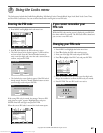
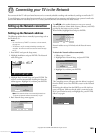
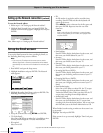
1. Press MENU and open the Setup menu.
2. Highlight Installation and press ENTER. The Network
menu will appear.
Navigate
Select
Back Exit
CH RTN
EXIT
Basic Network Setup
Recording Email Setup
Home File Server Setup
Network
3. Highlight Basic Network Setup, and press ENTER. The
screen to confirm automatically obtaining the Network
address appears. Highlight No, and then press ENTER.
Basic Network Setup
Obtain network address automatically?
Yes No
Note: If the network address is automatically obtained, see
“To obtain the Network address automatically” at right.
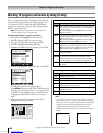
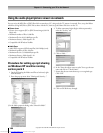
4. Basic Network Setup menu appears.
Basic Network Setup
Please enter your Network Address Information
IP Address
Subnet Mask
Gateway(Router)
DNS(Domain Name Saver)
Cancel Done
Use yzx • or the number buttons to enter your network
address (IP address, Subnet Mask, Gateway (Router), and DNS)
provided by the internet service provider.
When finished, highlight Done and press ENTER.
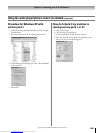
Basic Network Setup
Please enter your Network Address Information
IP Address
Subnet Mask
Gateway(Router)
DNS(Domain Name Saver)
xxx
Cancel Done
xxx xxx xxx
xxx xxx xxx xxx
xxx xxx xxx xxx
xxx xxx xxx xxx
Network address set up is finished, and the Network menu
returns.
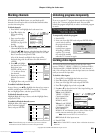
To obtain the Network address automatically
1. Follow steps 1-2 above.
2. Highlight Basic Network Setup, and press ENTER.
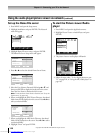
Basic Network Setup
Obtain network address automatically?
Yes No
3. Highlight Yes, and then press ENTER.
Basic Network Setup
Please waite...
The Completion screen will appear after the address is assigned
from the DHCP server. Press ENTER to return to the Network
menu.
If obtaining the address from the DHCP server fails, the Error
screen will appear. Make sure the the cable is connected to the
RJ-45 port terminal securely, and highlight Yes, press ENTER,
and set it up again.
Error.Unable to obtain network address information.Please
re-check network connections and DHCP server status.
Try Again?
Yes No
You can network the TV with your home Internet service to remotely schedule recordings and reminders by sending an email to the TV.
To use this feature, you must have Internet e-mail service in your home and two separate e-mail addresses (your personal e-mail and a
second email address for use solely by the TV). Contact your ISP (Internet Service Provider) for these services.
#01E_105-111_566272MX195 05.7.11, 9:35 PM105
Black
Downloaded from www.Manualslib.com manuals search engine