


106
Copyright © 2005 TOSHIBA CORPORATION. All rights reserved.
(E) 56/62/72MX195
Chapter 11: Connecting your TV to the Network
Setting up the Network connection
(continued)
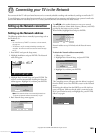
To reset the Network address
1. Follow steps 1-2 of “Setting up the Network address”.
2. Highlight Basic Network Setup, and press ENTER. The
screen to confirm resetting appears. Highlight Yes and press
ENTER.
Basic Network Setup
Your Basic Network Setup is complete. Would you like to start over?
Yes No
Next, follow step 4 on “Setting up the Network address”.
Set up the Email account
To set up the Email account for timer recording by Email, set
the Recording Email setup screen as follows.
Note:
• If you set up the TV address with the same name as another
address, large Emails or Email with attached files will be deleted
automatically. You must have an Email address for sole use by the
TV.
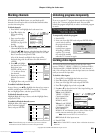
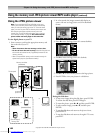
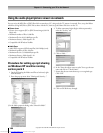
1. Press MENU and open the Setup menu.
2. Highlight Installation and press ENTER. The Network
menu appears.
Navigate
Select
Back Exit
CH RTN
EXIT
Basic Network Setup
Recording Email Setup
Home File Server Setup
Network
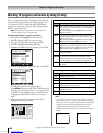
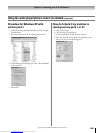
3. Highlight Recording Email Setup, and press ENTER. The
Recording Email Setup menu appears.
Done
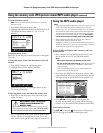
Recording Email Setup
TV-Guide E-mail
Please enter your Email Setup Information.
On
ID Required
Test cancel
Account
Password
Incoming Mail Server
Outgoing Mail Server
ID
Email Address
Email Authorization
Authorized Email
On
On
Enter YOUR email here
XXXXXXXXXXXX
XXXXX
*****
XXXXXXXXXXXXXXXXXXXXXXX
XXXXXXXXXXXXXXXXXXXXXXX
XXXXXXXXXXXXXXXXXXXXXXX
4. Set up the contents below using yzx • and ENTER;
•TV-Guide Email:
Select On or Off. When you select On, it is available to timer
record by Email through the TV-Guide Email function.
• ID required:
Select On or Off.
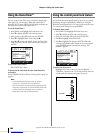
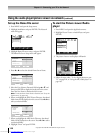
• ID:
An ID number is required to add or cancel the timer
recording. Press ENTER, and then the keyboard will
appear on the screen.
Press yzx • to select a character for the first space and
then press ENTER. Repeat to enter the rest of the
characters.
Note:
Enter a mail verification ID containing 6 or more characters.
After you have entered your ID number, then highlight Enter
and press ENTER.
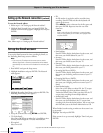
Required ID
Please enter a mail verification ID containing 6 or more characters
Enter Clear Cancel
123 54 67890-=
qwertyuiop[]
asdfghjkl;'
z
Shift BS
xcvbnm,./
_
•Email address:
Press ENTER to display the keyboard on the screen, and
then enter your Email address for your TV.
•Account:
Press ENTER to display the keyboard on the screen, and
then enter your Email account for your TV.
•Password:
Press ENTER to display the keyboard on the screen, and
then enter your Email password for your TV.
•Incoming Mail Server (POP3):
Press ENTER to display the keyboard on the screen, and
then enter your Incoming mail server name of your TV
Email.
•Outgoing Mail Server (SMTP):
Press ENTER to display the keyboard on the screen, and
then enter your Outgoing mail server name of your TV
Email.
•Email Authorization:
Select On or Off. When you select ON, the TV accepts
timer recordings only from an address selected in
“Authorized Email” below. When you select Off, the TV
accepts timer recordings from multiple addresses.
•Authorized E-mail:
Press ENTER to display the keyboard on the screen, and
then enter your desired address. the TV accepts timer
recordings only from the desired address. You can not input
this field when you set the Email Authorization to Off.
When finished, test the setting to make sure the account is set
up accurately.
Highlight Test and press ENTER
If the account is set up accurately, highlight “Done” and press
ENTER.
#01E_105-111_566272MX195 05.7.11, 9:35 PM106
Black
Downloaded from www.Manualslib.com manuals search engine