


66
Chapter 7: Using the TV Guide On Screen™ interactive program guide
Copyright © 2005 TOSHIBA CORPORATION. All rights reserved.
(E) 56/62/72MX195
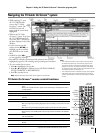
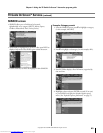
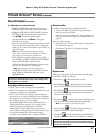
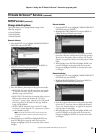
SCHEDULE screen
The SCHEDULE service screen allows you to review, edit, or
delete Record and Remind events you set previously.
•With SCHEDULE highlighted in the Service Bar, press
INFO to display a help screen. Press INFO again to close
the screen.
•Highlight an event and press MENU to display the Schedule
Options panel menu, with the following options:
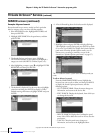
– GO TO SERVICE BAR: Closes the menu, changes no
information, and returns to the Service Bar.
–WATCH NOW: Exits the TV Guide On Screen
™
system
and tunes to the highlighted show.
– DELETE RECORDING: Removes the recording from
the schedule. A Confirm panel menu displays. Press YES
to delete the recording or NO to close the panel menu.
– EDIT RECORDING: Opens a menu in which you can
change existing recording information.
– SET REMINDER: Opens a menu in which you can set a
reminder for the show (Record is not cancelled).
– CANCEL: Closes the panel menu, changes no
information, and returns to the highlighted show.
An icon identifies the event type. For more details, see “Record
features,”at right, and “Remind features” on page 63.
TV Guide On Screen™ Services (continued)
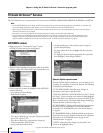
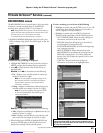
Record features
You can set a show to Record, or edit the record settings for a
show, in LISTINGS, SEARCH, and SCHEDULE. There are
three ways to set a show to Record, as described below.
1) Set a show to Record using the REC key on the
remote control
Press the REC key on the remote control to record the
show Once with current default settings (start and end
recording on time). Each time you press REC, you change
the Record frequency (but not the default settings) among
Once (default), Regularly, Weekly, and Cancel.
Note: The related Record icon appears on the show tile
each time you press REC. See “Record icons,” on page 62.
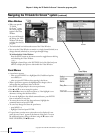
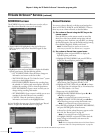
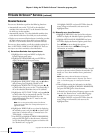
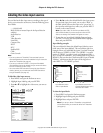
2) Set a show to Record from a panel menu
1. Highlight a show and press MENU to display the
Episode Options panel menu.
2. Highlight SET RECORDING and press ENTER to
display the Record Options panel menu.
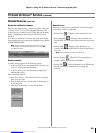
3. Highlight the FREQUENCY field, and press x or • to
choose among Once, Regularly, Weekly, or Off.
4. Highlight the START field, and press x or • to choose
in the range from 120 minutes early to 120 minutes late
or On Time (default = On Time).
5. Repeat step 4 for the END field.
6. Highlight the RECORDER field and press x or • to
choose the recording device.
Note: For connected IEEE1394 recording devices only.
7. Highlight the KEEP UNTIL field and press x or • to
choose how long you want to keep the Record event.
Note: For connected IEEE1394 recording devices only.
8. Press ENTER to highlight SCHEDULE RECORDING,
and press ENTER again to close the menu.
A Record icon for the selected frequency appears on the
show tile. See “Record icons” on page 62.
Note: For connected IEEE1394 recording devices only.
Or highlight CANCEL and press ENTER to close the
menu, change no information, and return to the
highlighted show.
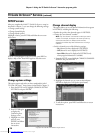
Note: You can change the default values of the Record Options
panel menu fields. See “Change default options” on page 66.
#01E_062-067_566272MX195 05.7.11, 9:31 PM66
Black
Downloaded from www.Manualslib.com manuals search engine