


11
EN
EN
Disc
Management
Recording Playback
Introduction
Connections Basic Setup Editing Function Setup Others
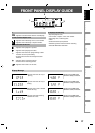
FUNCTIONAL OVERVIEW
Fr
o
n
t
P
a
n
el
R
ear Pane
l
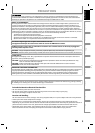
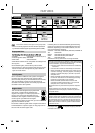
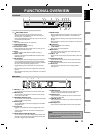
1. I
/
yy
ON/STANDBY
b
utto
n
•
Press to turn on t
h
e unit, or to turn t
h
e unit into t
h
e
stan
db
y mo
d
e. (To comp
l
ete
l
y s
h
ut
d
own t
h
e unit, you
must unp
l
ug t
h
e AC power cor
d
.
)
•
I
f
timer programmings have been set, press to turn the unit
into t
h
e timer-stan
db
y mo
d
e
.
2. D
i
sc tra
y
•
P
l
ace a
d
isc w
h
en t
h
e
d
isc tray is opene
d
.
3
.
A
OPEN/CLOSE
b
utton*
•
Press to open or c
l
ose t
h
e
d
isc tray
.
4. In
f
rared sensor windo
w
•
Receive signals
f
rom your remote control so that you can
control the unit
f
rom a distance
.
5. Disp
l
a
y
•
Re
f
er to “FRONT PANEL DISPLAY GUIDE” on page 17.
6. HDMI in
d
icator
•
Lig
h
ts up an
d
in
d
icates t
h
e HDMI vi
d
eo reso
l
ution w
h
en
H
D
MI output is on
.
7.
S
KIP
H
b
utto
n
•
During p
l
ay
b
ac
k
, press once mi
d
way t
h
roug
h
a c
h
apter or
track to go back to the beginning o
f
the current chapter
or trac
k
. W
h
en presse
d
twice in quic
k
succession, p
l
ay
b
ac
k
will start
f
rom the preceding chapter or track
.
•
During playback, press and hold
f
or 1.5 seconds to
f
ast
re
v
erse.
•
W
h
en p
l
ay
b
ac
k
is pause
d
, press to p
l
ay
b
ac
k
reverse step
b
y step
.
•
When playback is paused, press and hold
f
or 1.5 seconds to
slo
w r
e
v
e
r
se.
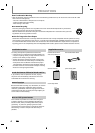
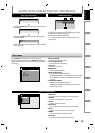
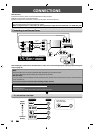
1. VIDEO IN
j
ac
k
(L1)
•
Use
to
co
nn
ect
e
x
te
rn
a
l
de
vi
ce
wi
t
h
a
n R
C
A vi
deo
cab
l
e.
2. VIDEO OUT
j
ac
k
•
U
se to connect a TV monitor
,
AV receiver or other device
wi
t
h
a
n R
C
A vi
deo
cab
l
e.
3. COMPONENT VIDEO OUT
j
acks
•
U
se to connect a TV monitor with com
p
onent video in
p
uts
with a com
p
onent video cable
.
4. HDMI OUT jac
k
•
U
se an HDMI cable to connect to a displa
y
with an HDMI
c
om
p
atible
p
ort
.
5.
A
C
P
o
w
e
r
Co
r
d
•
C
onnect to a standard AC outlet to suppl
y
power to this
u
ni
t.
•
U
nplug this cord from the AC outlet to completel
y
shut
do
wn
t
h
e
u
ni
t.
6. COAXIAL DIGITAL AUDIO OUTPUT
j
ack
•
U
se to connect an AV receiver, Dolb
y
Digital decoder, DTS
decoder or other device with a di
g
ital audio coaxial input
j
ac
k
wit
h
a
d
igita
l
au
d
io coaxia
l
ca
bl
e
.
7. S-VIDEO OUT
j
ac
k
•
Use to connect the S-video in
p
ut o
f
a TV monitor, A
V
r
ece
iv
e
r
o
r
ot
h
e
r
de
vi
ce
wi
t
h
a
n
S
-vi
deo
cab
l
e.
8. AUDIO OUT
j
ack
s
•
Use to connect a TV monitor
,
AV receiver or other device
wi
t
h
a
n R
C
A
aud
i
o
cab
l
e.
9. S-VIDEO IN
j
ack (L1)
•
Use to connect the S-video out
p
ut of external device with
a
n
S
-vi
deo
cable.
10. AUDIO IN
j
acks (L1
)
•
Use
to
co
nn
ect
e
x
te
rn
al
de
vi
ce
wi
th
a
n R
C
A
aud
i
o
cable.
N
ot
e
•
Do not touch the inner pins of the
j
acks on the rear
panel. Electrostatic discharge ma
y
cause permanent
dama
g
e to the unit
.
IN OUT
Y
PR/CR
PB/CB
L
R
L
R
VIDEO
IN
VIDEO
OUT
S-VIDEO
AUDIO IN
(L1)
S-VIDEO
AUDIO OUT
HDMI OUT
COMPONENT
VIDEO OUT
COAXIAL
DIGITAL AUDIO OUTPUT
PCM / BITSTREAM
5
7
69 810
321 4
2
3* 7 8 9 10* 11
1314
15
54 61
12
(
*) The unit can also be turned on b
y
pressing these buttons
.
8.
S
KIP
G
b
utto
n
•
During p
l
ay
b
ac
k
, press to s
k
ip to t
h
e next c
h
apter or trac
k.
•
During playback, press and hold
f
or 1.5 seconds to
f
ast
fo
rw
a
r
d.
•
W
h
en p
l
ay
b
ac
k
is pause
d
, press to p
l
ay
b
ac
k
a
d
vance step
b
y step
.
•
When playback is paused, press and hold
f
or 1.5 seconds to
s
l
o
w
fo
rw
a
r
d.
9
.
C
STOP
b
utton
•
Press to stop p
l
ay
b
ac
k
or recor
d
ing
.
1
0
.
B
PLAY
b
utton*
•
Press to start or resume p
l
ay
b
ac
k.
11
.
I
REC
b
utton
•
Press once to start a recor
d
ing. Press repeate
dl
y to start
one-touc
h
timer recor
d
ing.
12. DV IN jac
k
(L3
)
•
Use to connect the DV output o
f
external device with a D
V
ca
bl
e.
13. AUDIO input jac
k
s (L2)
•
Use to connect externa
l
d
evice wit
h
an RCA au
d
io ca
bl
e
.
14. VIDEO input jac
k
(L2
)
•
Use to connect externa
l
d
evice wit
h
an RCA vi
d
eo ca
bl
e
.
15. USB input jac
k
•
You can p
l
ug your USB
d
evice
h
ere, an
d
p
l
ay
b
ac
k
t
h
e
co
n
te
n
ts
i
n
it.