


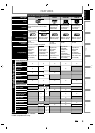


13
EN
EN
Disc
Management
Recording Playback
Introduction
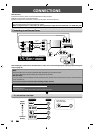
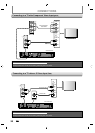
Connections Basic Setup Editing Function Setup Others
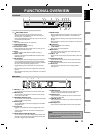
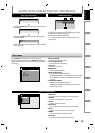
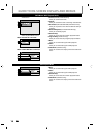
FUNCTIONAL OVERVIEW
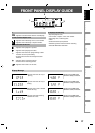
*
) T
h
e unit can a
l
so
b
e turne
d
on
b
y pressing t
h
ese
b
uttons
.
1
.
INP
U
T
S
ELE
C
T
button
• Press to se
l
ect t
h
e a
pp
ro
p
riate in
p
ut
.
2. OPEN/CLOSE
A
butto
n*
• Press to open or c
l
ose t
h
e
d
isc tra
y.
3. Number
/
Character buttons
• Press to select a title/chapter/track/file on displa
y
.
• Press to enter values
f
or the settin
g
s in the main
menu.
•Pr
ess
to
e
n
te
r
t
i
t
l
e
n
a
m
es.
4
.
S
ET
U
P
button
• Press to
d
isp
l
a
y
t
h
e main menu
.
• During DVD pla
y
back, press and hold
f
or more than
3
secon
d
s to switc
h
t
h
e progressive scanning mo
d
e
to the interlace mode. (Thou
g
h a
pp
ears, the
out
p
ut mo
d
e switc
h
es to t
h
e inter
l
ace an
d
“
” will be displa
y
ed on the front panel
displa
y
brie
f
l
y
.
)
5.
T
O
P MEN
U
butto
n
• Press to displa
y
the title list.
6.
Cu
r
so
r
K
/
L
/
{
/
{
B
butto
n
s
• Press to select items or settin
g
s
.
7
.
C
LEAR
butto
n
• Press to c
l
ear t
h
e
p
asswor
d
once entere
d
, to cance
l
the pro
g
rammin
g
f
or CD, to clear the selectin
g
mar
k
er num
b
er in t
h
e
d
isp
l
a
y
menu, etc
.
8.
S
KIP
H
butto
n
• During pla
y
back, press to return to the beginning o
f
the current cha
p
ter, track or file
.
• During pla
y
back, press twice in quick succession to
s
k
i
p
to t
h
e
p
revious c
h
a
p
ter or trac
k.
• When pla
y
back is in pause, press repeatedl
y
to
reverse t
h
e p
l
a
yb
ac
k
step
by
step
.
9
.
REV
E
button
• During pla
y
back, press to
f
ast reverse pla
y
back.
• When pla
y
back is in pause, press to slow reverse
pla
y
back
.
1
0.
PA
US
E
F
butto
n
• Press to pause playback or recording
.
11
.
P
LAY
B
butto
n*
• Press to start pla
y
back or resume pla
y
back
.
12
.
TIME
S
LIP
button
• Press once to start recor
d
ing t
h
e TV program
y
ou
are watchin
g
. Press a
g
ain to watch the content
bein
g
recorded from the be
g
innin
g
while recordin
g
continues. (VR mode DVD-RW with the recordin
g
mode of LP, EP or SLP onl
y)
1
3.
REPEAT
button
• Press to displa
y
the repeat menu
.
14
.
RE
C
M
O
DE
butto
n
• Press to switch the recordin
g
mode.
1
5.
HDMI
button
• Pr
ess
to
set
t
h
e
HDMI vi
deo
r
eso
l
ut
i
o
n
.
1
6.
I
I
/
yy
ON/STANDBY
button
• Press to turn on the unit
,
or to turn the unit into the
s
tan
dby
mo
d
e. (To comp
l
ete
ly
s
h
ut
d
own t
h
e unit,
y
ou must unp
l
ug t
h
e AC power cor
d
).
• If timer pro
g
rammin
g
s have been set, press to turn
t
h
e unit into t
h
e timer-stan
dby
mo
d
e
.
17
.
S
ATELLITE LINK
button
• Press to turn t
h
e unit into t
h
e sate
ll
ite
l
in
k
stan
dby
m
ode.
• In t
h
e sate
ll
ite
l
in
k
stan
dby
mo
d
e, press to cance
l
t
h
e
m
ode
a
n
d
to
tu
rn
t
h
e
u
ni
t
o
n
.
1
8.
TIMER PR
O
G
.
butto
n
• Press to
d
isp
l
a
y
t
h
e timer programming
l
ist.
19
.
A
U
DI
O
button
• Press to
d
isp
l
a
y
t
h
e au
d
io menu
d
uring p
l
a
yb
ac
k.
2
0.
DI
S
PLAY
button
• Press to displa
y
the displa
y
menu on or off
.
21. MENU
/
LIST
b
utton
• Press to displa
y
the disc menu. To change original
an
d
p
l
a
yl
ist on t
h
e TV screen.
22
.
ENTER
button
• Pr
ess
to
co
nfirm
o
r
se
l
ect
m
e
n
u
i
te
m
s.
2
3.
R
ET
URN
button
• Press to return to t
h
e previous
d
isp
l
aye
d
menu
s
c
reen.
2
4
.
S
KIP
G
button
• During p
l
ay
b
ac
k
, press to s
k
ip to t
h
e next c
h
apter,
t
r
ac
k
o
r
f
il
e.
• W
h
en p
l
ay
b
ac
k
is in pause, press repeate
dl
y to
f
orward the playback step by step
.
25. FW
D
D
b
utto
n
• During playback, press to
f
ast
f
orward playback
.
• When pla
y
back is in pause, press to slow
f
orward
p
l
ay
b
ac
k.
2
6.
S
T
O
P
C
button
• Press to stop p
l
ay
b
ac
k
or recor
d
ing.
• Press to exit
f
rom the title list.
27
.
IN
S
TANT
S
KIP
button
• During p
l
ay
b
ac
k
, press to s
k
ip 30 secon
d
s
.
28. 1.3x/0.8x PLAY
b
utto
n
• During p
l
ay
b
ac
k
, press to p
l
ay
b
ac
k
in a s
l
ig
h
t
l
y
f
aster/slower speed while keeping the sound output
.
29
.
Z
OO
M
butto
n
• During p
l
ay
b
ac
k
, press to en
l
arge t
h
e picture on t
h
e
TV
sc
r
ee
n
.
30. RE
C
I
b
utto
n
• Press once to start a recor
d
ing
.
• Press repeate
dl
y to start t
h
e one-touc
h
timer
recor
d
in
g.