


94
EN
EN
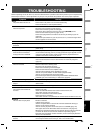
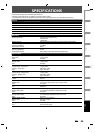
TROUBLESHOOTING
Symptom Remedy
P
l
ay
b
ac
k
Th
e
d
isc
d
oes not start p
l
a
yb
ac
k
f
rom the be
g
innin
g.
• Resume p
l
ay
b
ac
k
was activate
d
(page 54). Press
[
STOP
C
]
tw
i
ce.
• You
h
ave inserte
d
a
d
isc w
h
ose tit
l
e menu or DVD menu automatica
lly
appears on the TV screen when it is
f
irst inserted
.
T
he unit starts pla
y
ing back the
disc automaticall
y.
• The DVD-video features an auto pla
y
back function
.
Some functions such as stop,
searc
h
, or s
l
ow-motion p
l
a
yb
ac
k
cannot be
p
er
f
ormed
.
• Depending on the disc, you may not be able to do some of the operations.
Re
f
er to the instruction manual supplied with the disc
.
T
he language
f
or the sound trac
k
cannot
b
e c
h
ange
d.
• T
h
e tit
l
es
d
oes not
h
ave t
h
e mu
l
ti
l
ingua
l
au
d
io trac
k
s
.
• The DVD-video prohibits the changing o
f
the language
f
or the sound track
.
T
he subtitle lan
g
ua
g
e cannot be
chan
g
ed or turned off
.
• Multilin
g
ual subtitle are not recorded on the DVD-video
.
T
he angles cannot be changed
.
• Multi-angles are not recorded on the DVD-video being pla
y
ed back
.
• T
h
e ang
l
e-c
h
ange operation is w
h
enever possi
bl
e as
l
ong as t
h
e
d
isc contains
a multi-an
g
le portion. Actual chan
g
e will be performed when the portion has
come u
p.
• The DVD-video prohibits chan
g
in
g
an
g
les
.
• Try changing the angle using the DVD-video’s menu
.
Recor
d
ing / Timer recor
d
ing / E
d
iting
External in
p
ut
p
osition (L1/L2)
cannot
b
e c
h
ange
d
w
h
i
l
e
recor
d
in
g.
• This unit is desi
g
ned so. This is not a mal
f
unction
.
Not
h
ing was recor
d
e
d
even
t
h
oug
h
you set t
h
e timer setting
correct
l
y
.
• There was a power
f
ailure during recording
.
• The unit’s internal clock stopped due to a power
f
ailure that lasted
f
or more
t
h
an 30 secon
d
s. Reset t
h
e c
l
oc
k
(page 25)
.
• T
h
e program contains copy protection signa
l
s t
h
at restricts copying
.
• T
h
e timer setting over
l
appe
d
wit
h
anot
h
er setting t
h
at
h
as priority
.
Recordin
g
does not stop
i
mmediatel
y
after
y
ou press
[
STOP
C
]
.
• It will take a few seconds for the unit to input disc data before recordin
g
sto
p
s
.
T
imer recor
d
in
g
is not comp
l
ete
o
r
d
i
d
n
ot
sta
r
t
f
r
o
m
t
h
e
be
g
innin
g.
• T
h
e timer setting over
l
appe
d
wit
h
anot
h
er setting t
h
at
h
as priorit
y
(page 41)
.
• Disc space was not enou
g
h
.
• “Make Recordin
g
Compatible“ is not set to “ON”, when recordin
g
onto
DVD+RW
/
+R t
h
at was recor
d
e
d
on ot
h
er unit.
DV
DV signal cannot be input
.
• Before connection, turn on the
p
ower su
pp
lies for both this unit and the DVC,
an
d
ma
k
e sure t
h
at t
h
ese units are in sto
p
mo
d
e
.
• Onl
y
a “DVC-SD” signal can be input
f
rom the DVC to this unit. Other t
y
pes o
f
si
g
nals are not supported
.
• Do not connect an
y
device other than the DVC. Even if a recorder or PC with
another DV terminal is connected, the DV function will not o
p
erate
.
• If the DVC is not recognized after connection, turn off the power suppl
y
for
the
u
ni
t
a
n
d
r
e
-
co
nn
ect
the
DV
C.
Th
e DVC cannot
b
e operate
d
wit
h
t
h
is unit
.
• Signal input or DVC operation
f
rom this unit may be disabled depending on
the type o
f
DVC
.
• I
f
a DVC signal cannot be input, use an external input (L1 (Rear)/L2 (Front))
f
or
ana
l
og connection via au
d
io/vi
d
eo ca
bl
es
.
• DVC control may be disabled depending on the type o
f
DVC, even in a mode
ot
h
er t
h
an camera mo
d
e. In t
h
is case, switc
h
to DVD contro
l
an
d
execute t
h
e
norma
l
recor
d
ing proce
d
ure w
h
i
l
e operating t
h
e DVC
.
Ce
r
ta
in f
u
n
ct
i
o
n
s
o
f
t
h
e
u
ni
t
cannot o
p
erate
.
• Some functions ma
y
not operate depending on the t
y
pe of DVC. For
example, if the DVC does not support slow pla
y
back mode, the slow pla
y
bac
k
f
u
n
ct
i
o
n i
s
d
i
sab
l
ed.
• With L3 (DV-IN), the disc displa
y
menu does not appear unless disc pla
y
bac
k
i
s
e
x
ecuted.
DV audio si
g
nal cannot be
s
wi
tc
h
ed.
• For recordin
g
with the DVC, the recordin
g
audio si
g
nal can be set to 12 bits
or 16 bits. However, when 16-bit recordin
g
mode is selected, audio si
g
nal
cannot be switched. To record an audio si
g
nal, set it to 12 bits
.