


15
EN
EN
Disc
Management
Recording Playback
Introduction
Connections Basic Setup Editing Function Setup Others
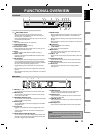
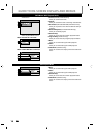
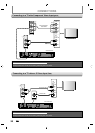
Video Info. : 480p / YCbCr
Audio Info. : Bitstream
21
3
3
3
*1
.
Indicates the resolution of the HDMI output ima
g
e
.
*
2
.
Indicates the HDMI video
f
ormat
.
*
3
.
Indicates the HDMI audio
f
ormat
.
*
“- - -” will be displa
y
ed, when it does not have an
y
inf
o
rm
at
i
o
n
.
HDMI Information
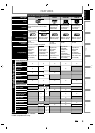
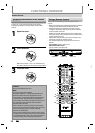
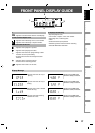
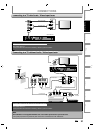
GUIDE TO ON-SCREEN DISPLAYS AND MENUS
•
First, trac
k
name wi
ll
b
e
d
isp
l
a
y
e
d.
Track Name
•
If
y
ou press
[
DISPLAY
]
one more time
,
artist name will
b
e displa
y
ed
.
Artist Name
•
If
y
ou press
[
DISPLAY
]
one more time
,
a
lb
um name
will be displayed
.
Album Name
•
I
f
there is no artist, track or album name, “Not Available”
wi
ll
b
e
d
isp
l
aye
d.
MP3 Tag Information
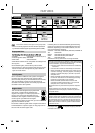
Pr
ess
[
SETUP
]
to
d
isp
l
a
y
t
h
e main menu. T
h
en
use
[
K
/
L
]
to
se
l
ect
a
m
e
n
u
a
n
d
press
[
ENTER
]
to displa
y
the
menu. These menus
p
rovide entries to all main functions
of
t
h
e
u
ni
t.
1
. Genera
l
Setting
:
To
g
o to
g
eneral settin
g
menu
.
2. T
i
mer Programm
i
ng
:
To pro
g
ram a timer recordin
g.
3.
Ti
tle
Li
st:
To ca
ll
u
p
t
h
e tit
l
e
l
ist
.
4.
D
V
D
M
e
n
u:
To set up t
h
e DVD setting
.
5. DISC Pla
y
back Mode:
To set up t
h
e
d
isc p
l
a
yb
ac
k
setting.
• “DISC Playback Mode” is available only when an audio
CD
,
a CD-RW/-R with MP3 / JPEG
f
iles is inserted into
the
u
ni
t.
6. USB Pla
y
back Mode
:
To set up t
h
e USB p
l
a
yb
ac
k
setting.
• “USB Playback Mode” is available only when a USB
de
vi
ce
i
s
co
nn
ected.
Setup
Timer Programming
Title List
DVD Menu
DISC Playback Mode
General Setting
USB Playback Mode
1
1
2
2
3
3
4
4
5
5
1
2
3
4
5
6
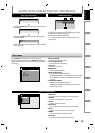
General Setting Menu
General Setting
Playback
Display
Video
Recording
Clock
HDMI
Reset All
1
1
2
2
3
3
4
4
5
5
2
2
3
3
1
2
3
4
5
6
7
1
. Pla
y
back
:
To set up the unit to pla
y
back discs as
y
ou prefer
.
2. Displa
y:
To set up the OSD screen as
y
ou prefer
.
3.
Vi
deo:
To set up the video settin
g
.
4
. Recordin
g:
To set up the unit to record to discs as
y
ou prefer
.
5.
C
l
oc
k
:
To set up the clock of the unit as
y
ou need
.
6.
HDMI
:
To set up the HDMI connection settin
g.
7.
R
eset
All
:
To reset the setting to the factor
y
default.
M
ai
n M
e
n
u