


Computer System HyperTools Tevion TSD-DR40HD User Guide
F:\Our Files\Our Computers\User Guides\Tevion (Wintal)\Tevion TSD-DR40HD DVR Performance Log.doc 18/5/08 at 10:57 Page 21
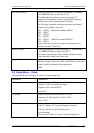
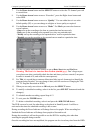
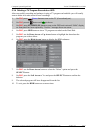
7. Use the Down Arrow button and the SELECT button to select the TV channel you wish
to record from.
8. Use the Down Arrow button to move “Record to”, press the Right Arrow button and
select HDD.
9. Use the Down Arrow button to move to “Quality”. You can either leave it set at the
default quality (EP) or you can change to a higher or lower quality as required.
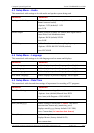
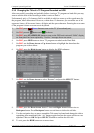
10. Use the Down Arrow button to move to “Mode”. For Mode you can select between
several options:
- Once sets up the recording to be done at a particular time but once only
- Daily sets up the recording to be repeated every day at a particular time
- Weekly sets up the recording to be repeated once a week at a particular time
- Monthly sets up the recording to be repeated once a month at a particular time:
11. Use the navigation and numeric buttons to set up Date, Start time and End time.
Warning: The Date is in American Date Format (mm/dd/yyyy). Don’t forget to put
your glasses on when you double-check the date and times you have entered (I am prone
to enter 6s instead of 0s, and suffer the consequences).
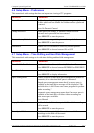
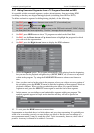
12. For Title it is a good idea to enter an abbreviated title (up to 8 characters) to identify the
program being recorded. You can change it later (refer the section on Changing the Title
of a TV Program Recorded on HDD).
13. When you are ready, move down to OK and press the SELECT button.
14. To modify a scheduled recording, select it in the list, press SELECT button and make the
change(s).
15. To schedule another recording, repeat Steps 6-13.
16. To exit, press the TIMER button.
17. To delete a scheduled recording, select it and press the ADD/CLEAR button.
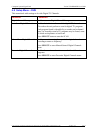
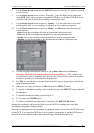
The DVR can now be used for other things or be placed in Stand By mode. It will be re-
activated at the time the scheduled recording is due to start.
During recording the Power Indicator will change from red to purple. When recording has
finished the Power Indicator will change from purple to blue and/or red.
During the recording it will not be possible to use the DVR for anything else other than
watching the program being recorded.
Once the recording has been accomplished, the program can be viewed any time from the HDD.