


Computer System HyperTools Tevion TSD-DR40HD User Guide
F:\Our Files\Our Computers\User Guides\Tevion (Wintal)\Tevion TSD-DR40HD DVR Performance Log.doc 18/5/08 at 10:57 Page 12
4. DVR Set Up Menus in Detail
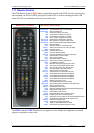
As demonstrated in the previous chapter, the Setup menus can be accessed by pressing the
SETUP button on the DRC. Navigation is done by means of the Right Arrow, Left Arrow,
Up Arrow, Down Arrow and SELECT buttons.
Here is a detailed description of each Setup menu.
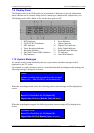
4.1 Setup Menu – Recording
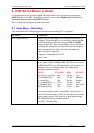
This menu deals with settings that have an impact on recording of TV programs.
Submenu Comments
Auto Chapter Marker Enables a given recording to be divided into time periods or
“Chapters” of equal length, so you can skip a certain amount
of time forwards or backwards using the NEXT or PREV
buttons on the DRC. This would probably not be relevant for
recordings that already have a natural division into Chapters,
such as classical music videos; for such a recording the
feature should be turned Off.
5 Options: 5/10(default)/20/30/Off
Set to 5 mins
Record Quality Enables the quality of a recording to be reduced so as to take
up less space on the recording media. This device can record
on HDD and DVD in six different densities giving rise to six
different levels of recording quality each taking up an
increasing amounts of space:
SPEED 4.7Gb DVD HDD QUALITY
SLP (Super Long Play) 6 hrs 562 hrs Low
EP (Extended Play) 4 hrs 371 hrs Moderate
LP (Long Play) 3 hrs 261 hrs Normal
SP+ (Standard Play +) 2.5 hrs 221 hrs Good
SP (Standard Play) 2 hrs 191 hrs Very Good
HQ (High Quality) 1 hrs 94 hrs Best
Choosing the highest quality setting (HQ) would only be of
interest for classical music videos, but for ordinary videos the
lowest quality setting (SLP) may not be quite good enough
(EP will probably be an adequate choice).
Set to EP = Extended Play