17
DV (Digital Video) Recording
is unit can perform real-time monitorin
and recordin
for a DV throu
h the IEEE 1394 serial port (DV).
onnect the DV to the unit (for details, see System Connection: System Connection for Recordin
).
■ Switch on the
ower of the unit.
ress t
e Source
utton unti
DV Input is se
ecte
.
Switch on the Power button of the DV, set it to CAMERA mode, and start monitorin
■
ress the REC button to start recording.
Other operations is the same as in the Recording Mode
is unit can also record the VCR content of the DV
■ e connection method is the same as stated in the fi rst 3 ste
s of ste
1 above.
Switch on the Power button o
the DV unit to enter Pla
back mode
ress t
e REC
utton to start recor
in
During the recording process, press the PAUSE button to suspend recording of the unit, and press again to suspend the DV unit.
To restore play o
the DV unit, press the PLAY button; i
you press the REC button, the play o
the DV unit and the recordin
will
resume at t
e same time.
While paused the FWD, REV buttons operate the DV; if you press the STOP button, the recording of the unit will stop fi rst, press
a
ain to stop the play o
the DV
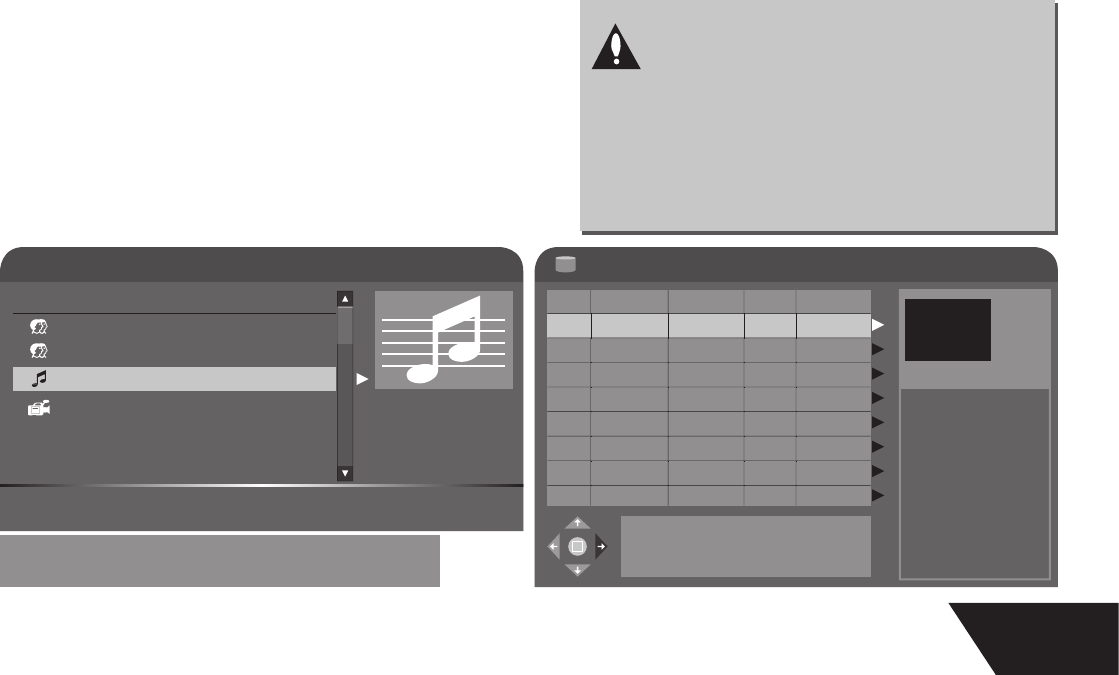
File Manager
File manager allows you to browse, play and copy fi les across the three storage devices
DVD, HDD and USB
. Press FILE/USB to
nter the
le mana
er.
To navigate the fi le manager, use the arrow keys to select a fi le or folder. Pressing select on a compatible media fi le will start playback.
ressin
Ri
ht on a
le will call up the
le submenu, with the options as
ollows:
opy: allows you to copy a fi le to another destination. Selecting copy brings up the destination window, navigate to select the copy
estination. Once you have selected the drive and
older to copy to, press ri
ht and select Complete to be
in the copy.
elete: will delete the fi le. Note that some fi les may be copy protected and unable to delete
ename: will call up a keyboard to rename the fi le. Take care to preserve the extension of the fi le.
xxxx.mp3, xxxx.jpg, etc
Move: similar to copy, however the
le is removed
rom the source directory.
reate
ir: wi
create a su
irectory in t
e current
irectory, enter usin
t
e
ey
oar
Select all: selects all the fi les in the current directory. Any actions, such as co
y, move or delete a
ly to the selected fi les.
Unselect all: unselects all
les in director
Note: pressin
add/clear will select/unselect individual fi les
HDD-to-DVD Recording
ress t
e HDD
DUB
utton to enter into t
e HDD mo
e
ress ADD/CLEAR to se
ect t
e tit
es t
at you
esire to
o
y to
V
ress t
e HDD/DUB
utton a
ain toto copy t
e
elected fi les to DVD.
2
■
■
■
■
■
■
■
2
kendachi.fl ac
File Manager
../
00:00:00 -
Right Operation menu Select Play highlighted fi le
Menu Return Previous menu Add Select/Unselect fi le
File Size: 12MB
Modify Date:
27 /03/ 2007
1 kendachi01.fl ac
4 cocoa_overd.
2 crossley.
N
TE
ONLY USE A BLANK REWRITABLE DVD DISC
R A DI
PREVI
LY
ED
NLY F
R
R
HIVIN
FR
M HDD.
HEN RE
RDIN
FR
M HDD T
VD±R
DI
, THERE WILL BE A FLA
HIN
I
N
N
THE UPPER LEFT CORNER OF THE SCREEN TO
NDICATE THE RECORDING PROCESS.
For other options Press DVD,
TV/Video, USB, SETUP or TIMER keys
HDD
No. CH Date Time Title
-
1
:1
itl
0
-
MP
0
09
06 1
:4
itl
0
F-
2
09
06 10:4
itle
P PA
:
:
Press Add/Clear key to
select program(s)
Press Dub key to copy
selected program(s)
to DVD
Press Sort key to sort
programs by name, date
or time


