


16
3. SETUP continued …
SETTING UP THE PROCESSOR
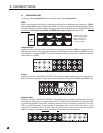
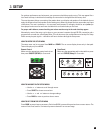
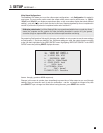
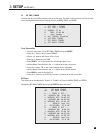
Upon entering the setup menu your display will show the menu below. Only 8 menu items can be displayed
at once – for clarity this manual shows each menu with all its items. On-screen display is recommended
although the front panel shows similar information, one item at a time. If the default video output settings do
not work with your display, use the front panel display to set video output. Setup menus are displayed
through MAIN HDMI and Component (processed) outputs, and MAIN and ZONE2 S-Video outputs, whereas
the 2-line status display and the video processing menu are displayed as follows:
MAIN on-screen display is available via HDMI1 output by default. On-screen display comes from HDMI2 and
Component (processed) if “Preferred” is changed to “Component” in menu 1 submenus. S-Video on-screen
display is available in both cases.
ZONE2 on-screen display is available via S-Video output.
To go to a submenu, highlight a menu item and press SELECT. Each on-screen menu also has a scrolling help
line at the bottom as shown above.
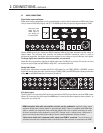
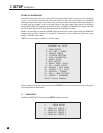
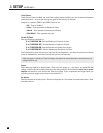
3.1 VIDEO OUTPUT
Highlighting VIDEO OUTPUT then pressing SELECT displays this menu:
STATEMENT D2v SETUP
1. VIDEO OUTPUT
2. SET TIME / TIMERS
3. SPEAKER CONFIG
4. LISTENER POSITION
5. LEVEL CALIBRATION
6. SOURCE SETUP
7. MODE PRESETS
8. ANALOG INPUT LEVELS
9. ADC / AUDIO OUTPUT
10. VOLUMES / PATH NAMES
11. TRIGGER / IR / RS232
12. DISPLAYS / TIMEOUT
13. SAVE / LOAD SETTINGS
14. LOCKOUT / PASSWORDS
SELECT Enters Submenu
1. VIDEO OUTPUT
a. VIDEO OUT CONFIG 1
b. VIDEO OUT CONFIG 2
c. VIDEO OUT CONFIG 3
d. VIDEO OUT CONFIG 4