


31
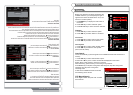
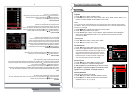
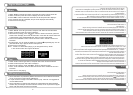
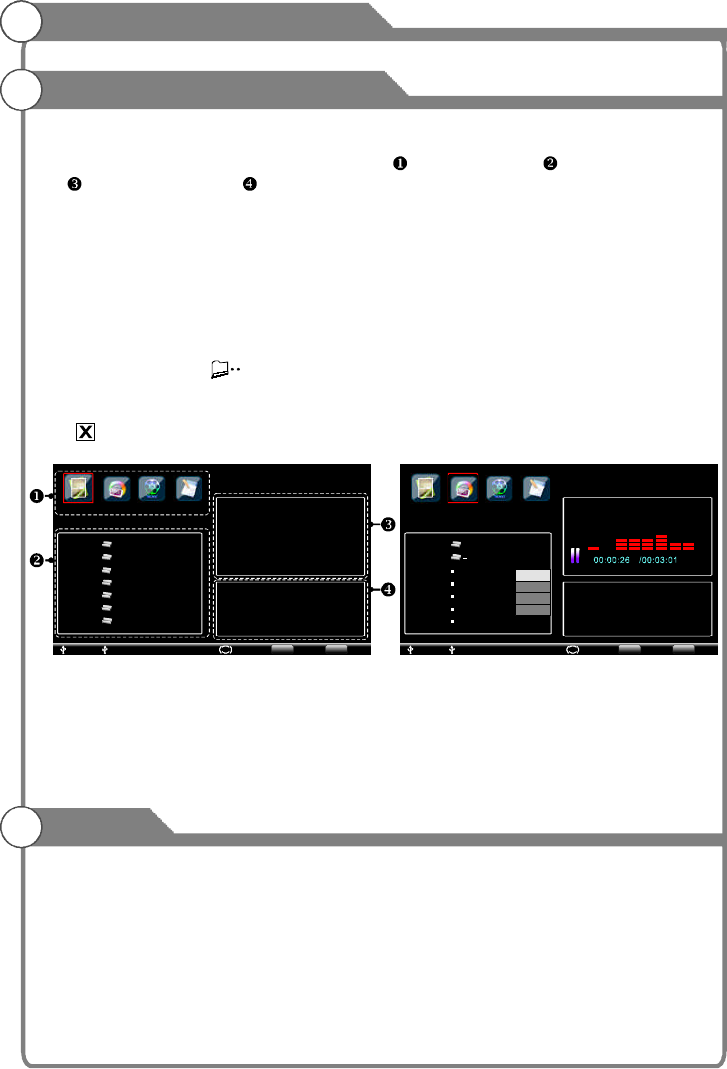
1. Press “Input” button to select “USB”. The screen will display the USB menu. The
menu is divide into four sections, including: File type section, File list section,
File preview section, File inform ation section. The system will search the device
automatically. If no USB device connects, the menu will display as figure 1.
2. Plug the USB device into the USB port, the system will automatically read and display
the device as figure 2. The file list section display the folders and picture files of the
first d rive .
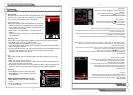
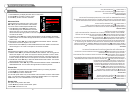
3. For the original USB menu, press “ b utton to select the file type as: PHOTO/
MUSIC/MOVIE/TEXT. Press “ button to select the logical drive and press “OK”
button to show the file list.
4. In the file list section, press “ bu tton to select folder. Press “OK” button to enter
this fold er. Select “ ” press “OK” button to return.
5. It will aut omatically preview the file which is focused. Press “OK” button to show the
submenu, you can select: “Play/Select/ All/D all”, it will be signed as
“ ”, if it has been
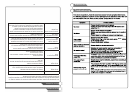
Note:1. If you want to play multi files. It’s needed to select the files yo u want to play first
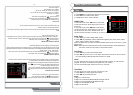
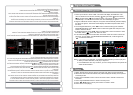
1. Select “PHOTO”in the file type section, and press “OK” button to show the file list.
2. When more than one file are selected, they will be displayed circularly at the speed of
5 seconds per file.
3
/
/
/
/ /
Select eselect
selected.
.
2. When you select multi files, it will play in sequence.
3. If the USB device have only one drive, you can’t change the drive the system will
select this drive default.
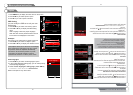
. Press “PLAY CONTROL” button to show the shortcut menu. Han dle it at the menu
instruction.
4. Press “Page UP/DOWN” button to zoom in/out the picture.
5. Press “ button
6. Press “EXIT” to exit pla ying.
”
”
”
” to move picture when it is zoo m in mode.
Figure 1
Figure 2
Digital Media Player
Device and File Management
Picture
USB1 USB1
USB2 USB2
C: Page 1/2 C: Page 1/2
C:
Select Select
PHOTO PHOTOMUSIC MUSIC
TEXT TEXT
MOVIE MOVIE
RMStream
MOVIE
RMVBStream
H.264
RMHDMovie
.wd_tv
AVI
EXIT EXITBack BackEnter EnterOK OK
C:
RMStream
Chattahoochee.MP3
S ummertime.MP3
Wanted.MP3
S omeday.MP3
Dallas.MP3
Play
Select
SelectAll
DeselectAll
Album:
Title:
BitRate: 192K
Artist:
Sampling: 44K
Year:
31
Reproductor Digital de Medios
Administración del dispositivo y de los archivos
Fotografías
1. Presione el botón “Input” para seleccionar “USB”. La pantalla mostrará el menú USB. El menú se encuentra
dividido en cuatro secciones que incluyen: 1) Sección de tipo de archivo, 2) Sección de lista de archivos, 3)
Sección de pre visualización de archivos, 4) Sección de información de archivos. El sistema efectuará una
búsqueda del dispositivo automáticamente. Si el dispositivo USB no contuviera nada, el menú se mostrará cómo
en la gura 1.
2. Conecte dispositivo USB al puerto USB. El sistema automáticamente efectuará una lectura y mostrará el
dispositivo como en la gura 2. La sección de lista de archivos mostrará las carpetas y archivos de imágenes del
primer disco.
3. Para visualizar el menú original USB, presione el botón para seleccionar el tipo de archivo como: PHOTO/
MUSIC/MOVIE/TEXT (fotografía/música/película/texto). Presione el botón (gura) para seleccionar el disco
apropiado y presione OK para mostrar la lista de archivos.
4. En la sección de lista de archivos, presione el botón para seleccionar la carpeta. Presione el botón OK para
ingresar a esa carpeta. Seleccione y presione el botón para retornar.
5. Automáticamente se pre visualizará el archivo que se está enfocando. Presione el botón (gura) para mostrar el
submenú. Se puede seleccionar las opciones Reproducir/Seleccionar/Seleccionar todo/No seleccionar todo. Si se
selecciona la opción, ésta se encontrará marcada por una “X”.
Figura 1 Figura2
Nota:
1. Si se desea reproducir archivos múltiples, se necesitará seleccionar los archivos que se desea reproducir primero.
2. Si se selecciona archivos múltiples, se reproducirán en secuencia.
3. Si el dispositivo USB cuenta con sólo un disco, no existe la posibilidad de cambio de disco y el sistema
seleccionará el único disco por defecto.
1. Seleccione PHOTO en la sección de tipo de archivos y presione el botón OK para mostrar la lista de archivos.
2. Si se selecciona más de un archivo, se mostrarán de manera circular a una velocidad de cinco segundos
por archivo.
3. Presione el botón PLAY CONTROL (control de reproducción) para mostrar el menú de atajos. Siga los pasos
según las instrucciones del menú.
4. Presione el botón PAGE UP/DOWN (pagina arriba/abajo) para efectuar un acercamiento hacia adentro o hacia
afuera de la imagen.
5. Presione el botón para mover la imagen bajo la función de acercamiento.
6. Presione el botón EXIT para salir de la función.
31
/
/
/
/
/