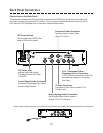
COAXIAL
VIDEO
VIDEO
S-VIDEO
OUT
AUDIOAUDIO
ANALOG OUT
DIGITAL OUT
R
L
VIDEO
VIDEO
AUDIOAUDIO
Y
Pb / Cb Pr / Cr
P-SCAN / COMPONENT VIDEO
VIDEO
OUT
COAXIAL
VIDEO
VIDEO
S-VIDEO
OUT
AUDIOAUDIO
ANALOG OUT
DIGITAL OUT
R
L
VIDEO
VIDEO
AUDIOAUDIO
VIDEO
OUT
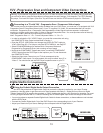
Digital Audio Connection
13
Using the CoAxial Digital Audio Output Connection
Your DVD Player features a Digital Audio Output to provide the ultimate in realism for your Home Theater
experience. Use this option to get the most out of discs recorded with Dolby 5.1 Digital Surround Sound or Digital
Theater System (DTS) by sending the encoded, or “RAW” digital audio signal to your Receiver for decoding. You must
be using a Digital Receiver with 5.1 Channel Decoding and a CoAxial Digital Input to take advantage of this feature.
You must purchase a separate Coaxial Digital Audio Cable for these connections, as these cables are not included
with the DVD Player.
Connect the Coaxial Digital Audio Out of the DVD Player to the corresponding Input of your Receiver.
Adjust your Receiver’s Input Source Setting to the correspond with the Digital Audio In.
4
COAXIAL DIGITAL
AUDIO IN
DVD
RECEIVER
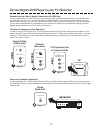
Connecting to a TV with YUV - Progressive Scan / Component Video Inputs
In order to enjoy the highest Video Quality available from your DVD Player, you must use a TV equipped with YUV
Progressive Scan or Component Video Inputs. If your TV supports YUV Video, it’s recommended that you use this
connection. Progressive Scan / Component Video separates the Video Signal into three separate “components”,
resulting in a higher quality picture than S-Video or Standard Composite Video. *You must purchase a set of three (3)
Component Video Cables for this connection (not included).
Note : Progressive Scan = Y - Pb - Pr and Component Video = Y - Cb - Cr
YUV - Progressive Scan and Component Video Connections
DVD
Y
Pb / Cb
Pr / Cr
COMPONENT
or
PROGRESSIVE SCAN
VIDEO IN
TV
GREEN OR YELLOW
RED
BLUE
3
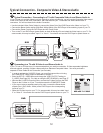
In order to activate the YUV VIDEO Output, you must first connect the unit using
the COMPOSITE Video Output as described in Section 1.
Enter the SETUP- VIDEO Menu and change the VIDEO OUTPUT setting to
YCbCr (See Page 28). *For Help on using the SETUP MENU’s, see Page 27.
Select SCAN MODEsettings for Interlanced for Component Video and
Progressive for Progressive Scan (note: warning on top of page)
Now that the COMPONENT Outputs are Active, connect the COMPONENT
VIDEO Outputs from the DVD Player to the inputs on your TV and disconnect
the COMPOSITE Cable.
Select the Video Input Channel on your TV that corresponds to the
COMPONENT Video Inputs. On some models, this may be called “Input 3” or
“Video 3”. You should now see the DVD Player’s splash screen on your TV.
Y
Pb / Cb Pr / Cr
P-SCAN / COMPONENT VIDEO
Warning: If you selected Progressive SCAN and your TV does not support P-SCAN, the display may go blank and
you will not be able to view the Setup Menu to change back the video settings. If this happens, Turn OFF (Standby)
the player, Turn back ON Player, Open Disc Tray and Press and hold the STOP button on player for 5 Seconds.
DVD


