


QSD42908 User’s Manual
55
The maximum bit rate selection is related to resolution. If you select high resolution, you
must select high bit rate. For CIF resolution, the typical maximum bit rate is 384K-768Kbps.
Of course, you will select the proper max bit rate based on the camera, background and
image quality required.
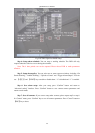
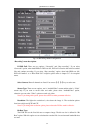
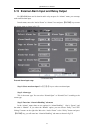
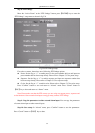
Bit rate: You can select bit rate size for fixed bit rate type. It is the same as “Max Bit Rate”.
Frame Rate: Frame per second. Options are: 25 (PAL)/30(NTSC) 20, 16, 12, 10, 8, 6, 4, 2, 1
For low frame rate, you can select low bit rate size, this will maximize hard drive usage.
PreRecord Time: When you enable motion detection recording or external alarm recording,
you can setup prerecord time. The options are: No PreRecord, 5 Seconds (default selection), 10
Seconds, 15 Seconds, 20 Seconds, 25 Seconds, 30 Seconds and Max PreRecord.
MaxPreRecord is used to save all data in PreRecord buffer. The PreRecord time is related
with bit rate. The lower bit rate, the longer PreRecord time is.
If the bit rate (Max bit rate) is very low, and you select “PreRecord Time” as “5 Seconds” the
actual pre-record time may be more than 5 seconds. On the other hand, if the bit rate is high, and
you set “PreRecord Time” as “30 Seconds”, the actual prerecord time may be less than 30
seconds.
PostRecord Time: When external alarm or motion alarm is stopped, DVR will continue
recording time. The options are: 5 Seconds (default), 10 Seconds, 30 Seconds, 1 Minute, 2
Minutes, 5 Minutes and 10 Minutes.
Enable Rec: Enable or disable selected camera’s record function. “旚” means disabled and
“ü” means enabled.
Schedule: When you enable recording function, you can setup recording schedule.
Note: When the camera’s recording schedule is modified, you must reboot the DVR to make
it effective.
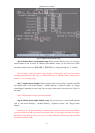
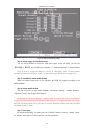
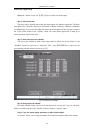
All day recording setup:
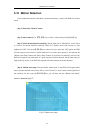
Step 1: Enter into recording schedule menu
In recording menu, use【ENTER】or【EDIT】key to enable record function (“ü” flag), press
“Schedule” button to enter into recording schedule menu.
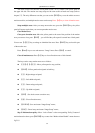
Step 2: Select a day and enable all day recording option
For “Day”, the options are: Monday, Tuesday, Wednesday, Thursday, Friday, Saturday and
Sunday. Use【↑】【↓】keys to select a day. Move the “Active Frame” to the check box on the right
side of “All Day”, press【ENTER】or【EDIT】key to enable the “All Day” option. “旚” means
disabled and “ü” means enabled.
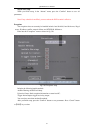
Step 3: Record type
For “Rec Type”, the options are: All Time, Motion Detect, Alarm, Motion|Alarm, and
Motion&Alarm, command.
For all day record mode, only one record type can be selected.