


10.2.4 Replacing the membrane and electrolyte solution.
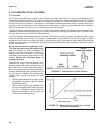
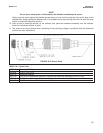
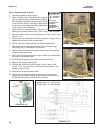
1. Unscrew the membrane retainer and remove the membrane assembly and O-ring. See Figure 10-2.
2. Hold the sensor over a container with the cathode pointing down.
3. Remove the fill plug and allow the electrolyte solution to drain out.
4. Wrap the plug with two turns of pipe tape and set aside. Remove old tape first.
5. Prepare a new membrane. Hold the membrane assembly with the cup formed by the membrane and mem-
brane holder pointing up. Fill the cup with electrolyte solution. Set aside.
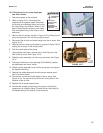
6. Hold the sensor at about a 45-degree angle with the cathode end pointing up. Add electrolyte solution
(PN 9210438) through the fill hole until the liquid overflows. Tap the sensor near the threads to release trapped
air bubbles. Add more electrolyte solution if necessary.
7. Place the fill plug in the electrolyte port and begin screwing it in. After several threads have engaged, rotate
the sensor so that the cathode is pointing up and continue tightening the fill plug. Do not overtighten.
8. Place a new O-ring in the groove around the cathode post. Cover the holes at the base of the cathode stem
with several drops of electrolyte solution.
9. Insert a small blunt probe, like a toothpick with the end cut off, through the pressure equalizing port. See Figure
10-2.
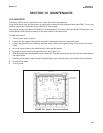
MODEL TCL SECTION 10
MAINTENANCE
10.2 TOTAL CHLORINE SENSOR
10.2.1 General
When used in clean water, the total chlorine sensor requires little maintenance. Generally, the sensor needs main-
tenance when the response becomes sluggish or noisy or when readings drift follow calibration. Maintenance
frequency is best determined by experience. If the sensor is used in potable water, expect to clean the mem-
brane every month and replace the membrane and electrolyte solution every three months. Sensors used in dirty
water require more frequent maintenance and calibration. However, if experience shows the sensor is holding
calibration and not drifting appreciably between calibration intervals, the maintenance interval can be extended.
10.2.2 Cleaning the membrane.
Keep the membrane clean. Clean the membrane with water sprayed from a wash bottle. Use a soft tissue to
gently wipe the membrane.
10.2.3 Replacing the membrane.
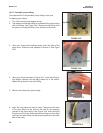
1. Hold the sensor with the membrane facing up.
2. Unscrew membrane retainer. Remove the membrane assembly and O-ring. See Figure 10-2.
3. Inspect the cathode. If it is tarnished, clean it by gently rubbing in the direction of the existing scratches (do
not use a circular motion) with 400-600 grit silicon carbide finishing paper. Rinse the cathode thoroughly with
water.
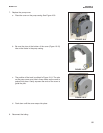
4. Prepare a new membrane. Hold the membrane assembly with the cup formed by the membrane and mem-
brane holder pointing up. Fill the cup with electrolyte solution. Set aside.
5. Put a new O-ring in the groove.
6 Place a drop of electrolyte solution on the cathode. Invert the membrane assembly and place it over the cathode stem.
7. Screw the membrane retainer back in place.
8. Hold the sensor with the membrane pointing down. Shake the sensor a few times, as though shaking down a
clinical thermometer.
CAUTION
Fill solution may cause irritation.
Avoid contact with skin and eyes.
May be harmful if swallowed.
50