


i
RCP 2000 with ISS 506 Support • Table of Contents
i
RCP 2000 with ISS 506 Support • Quick Start Guide
Quick Start Guide — RCP 2000 with ISS 506
Support, cont’d
QS-2
Step 4
Complete the procedure for installing the ISS 506. (Refer to the
ISS 506 User’s Manual for installation procedures.)
Step 5
Attach power cords to the ISS 506, the input devices, and the output
devices, and plug them into grounded AC sources.
Attach an IEC power cord to the RCP 2000, and plug it into a
grounded AC power source.
Step 6
Check the default cycle screens in the LCD window. If a screen with
the words “ISS 506 Linked” does not appear in the rotation, do the
following:
• Ensure that all devices are plugged in and receiving power.
• Check the cabling and make adjustments as needed.
• Check the RCP and ISS communication settings.
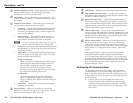
Step 7
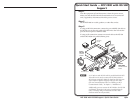
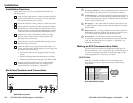
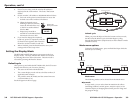
If needed, set up the IP information for the RCP to ISS connection.
To begin the setup process, press the Color/Tint, Cont/Bright, Size,
and Center buttons simultaneously and hold them until the Cut
button lights. See “Setting Up IP Communication,” in chapter 3,
“Operation,” for the complete setup procedure.
CONT
BRIGHT
H
V
COLOR
TINT
PICTURE CONTROLS
Press and hold
first four buttons.
CENTERSIZE DETAIL
Table of Contents
Chapter One • Introduction .................................................... 1-1
About this Manual .................................................................... 1-2
About the RCP 2000 with ISS 506 Support........................ 1-2
Features .................................................................................. 1-2
Application Diagra ................................................................. 1-3
Chapter Two • Installation ...................................................... 2-1
Installation Overview ............................................................... 2-2
Back Panel Features and Connections ................................2-2
Making an RCP Counication Cable ............................... 2-3
RS-232 link .............................................................................. 2-3
Ethernet link ........................................................................... 2-4
Chapter 3 • Operation ............................................................... 3-1
Top Panel Controls ..................................................................... 3-2
Setting Up IP Counication ............................................... 3-5
Setting Up RS-232 Counication...................................... 3-7
Setting the Display Mode ....................................................... 3-8
Default cycle ........................................................................... 3-8
Mode enu options .............................................................. 3-9
Wipe ode ..............................................................................3-9
PIP (picture-in-picture) ode ...............................................3-10
Title ode .............................................................................3-10
Dissolve ode ...................................................................... 3-11
Using a Cut................................................................................. 3-12
Transition Sub-effects ............................................................ 3-12
Sub-effects available in wipe and PIP odes .................... 3-12
Standard wipes .....................................................................3-13
Curtain wipes ........................................................................3-13
Plus wipes .............................................................................3-14
Square wipes ........................................................................3-14
Dissolve (PIP ode only) ......................................................3-15
Setting a transition sub-effect ............................................ 3-15
Selecting a wipe sub-effect .................................................3-15
Selecting a PIP sub-effect .....................................................3-15
Switching with a transition sub-effect ............................... 3-16
Using the Picture Controls .................................................... 3-16
Adjusting color and tint ...................................................... 3-16
Adjusting contrast and brightness ..................................... 3-17