


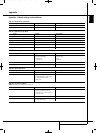

OPERATION 29
ENGLISH
Operation
Undock iPod: This command ends play of any
content on the iPod and returns to the Media
Library view of the Main Menu. The iPod’s own
menu appears on its screen. To resume playback,
physically undock the iPod from The Bridge and
redock it.
Press the Back Button to return to the previous
menu level, similar to pressing the Menu button
on the iPod itself.
You may not import content from the iPod to the
Media Library, and you may not add the iPod’s
content to the Play Queue or a playlist. You may
not record from the Media Library to an iPod
docked in The Bridge. These are limitations of the
iPod’s design, and do not reflect a problem with
the DMC 1000.
NOTE: The Bridge may not be compatible with
some iPod models, particularly the iPhone and
the iPod touch. To enjoy content stored on these
devices, connect a cable from the device's head-
phone output to the DMC 1000's Auxiliary
Analog Audio Inputs.
Auxiliary Analog Audio Inputs
In addition to digital media, the DMC 1000 also
accommodates analog source devices, such as
cassette decks and turntables, but mainly as a
recording source. Connect the device to the rear-
panel Auxiliary Inputs.
IMPORTANT NOTE: Do not connect a turntable
directly to the DMC 1000 unless it includes an
onboard phono preamp or is connected to an
external phono preamp which is then plugged
into the Auxiliary Inputs. Phono preamps may be
available from specialty audio shops or electron-
ics stores.
The device connected to the Auxiliary Inputs is
not available for source selection in the usual
manner. It is selected as a recording source, as
described in the Content Transfer section,
although it is possible to monitor the source
without making a recording.
Content Transfer
One of the DMC 1000’s most exciting features is
its ability to transfer content from one type of
media to another, and to store your library
of music on its internal hard-disc drive.
The method for making recordings varies slightly,
depending on the source media.
Audio CDs
As soon as an audio CD is loaded, the DMC
1000 begins the process of copying it to the
Media Library at high speed. It displays the
progress of the recording as a percentage record-
ed.
At the same time, the DMC 1000 automatically
begins playing the copy of the CD from the
Media Library, if you have programmed the DMC
1000’s Setup Menu to do so.
The DMC 1000 uses Gracenote MusicID to iden-
tify the CD, tag it with the correct information
and import the album cover art, if available. If the
DMC 1000 is not connected to the Internet,
Gracenote MusicID will tag the content using the
offline database stored on the DMC 1000’s hard-
disc drive; however, it will not display any cover
art. For homemade discs, the service will attempt
to identify the content based on any tags that
were created when the disc was recorded.
After the DMC 1000 has finished copying the CD
to the Media Library, you may remove the disc
and store it.
NOTE: The DMC 1000 initially copies the CD to
.wav files. If you have adjusted the Audio
Encoding Quality setting in the Media Library
Setup menu to one of the MP3 formats, the DMC
1000 will then encode the .wav files as MP3 files
at the specified sampling rate. If you attempt to
transfer the CD from the Media Library to a
memory card, recordable CD or USB drive before
the encoding is completed, the files will be trans-
ferred as .wav files. Since .wav files are much
larger than MP3 files, depending on your desti-
nation media, you may not have enough space to
complete the transfer.
Data CDs
Data CDs are discs that contain sound and image
files. They are recognized when loaded, but oper-
ation is handled differently.
To transfer the CD’s content to the Media Library:
1. Select it as a playback source, and view the
audio files. Still-image files may not be added
to the Media Library.
2. The CD is listed as a single folder, which you
may expand as usual. Select the Add to Library
option to import it to the Media Library. Audio
files are transferred in their original format,
e.g., as MP3 files.
Auxiliary Inputs
With the analog audio device connected to the
Auxiliary Inputs and the media loaded, either
press the Record Button, or press the Menu
Button to view the Main Menu. Scroll to the
Record line and press the Enter Button.
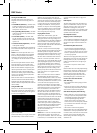
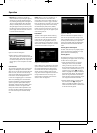
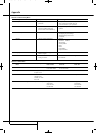
Select “Auxiliary” from the dropdown menu as
the recording source. See Figure 23.
Figure 23 – Select a Recording Source
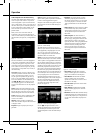
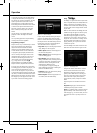
Next, select the Media Library (the only option)
as the recording destination. The screen shown in
Figure 24 will appear.
Figure 24 – Record From the Auxiliary Inputs
Select the Listen to Aux In option to monitor the
analog device. Begin playing the device, and cue
it up to the desired starting point. Example: most
cassette tapes include about five seconds of
blank leader tape, plus additional blank tape at
the beginning. Play until the audio begins so as
to minimize the amount of dead air in the
recording.
2083124_HK_DMC_1000_OM_ENG.qxp:34241_DMC250_ENG 15/08/08 10:49 Side 29